My reptarium background *progress pics*

leet13

New Member
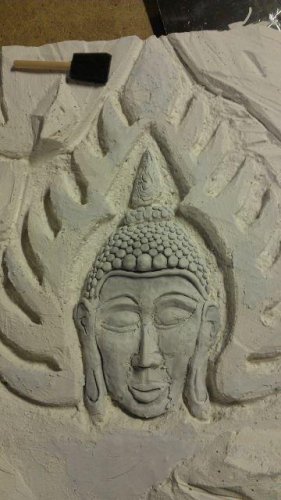
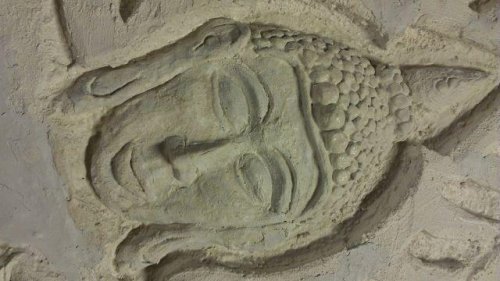
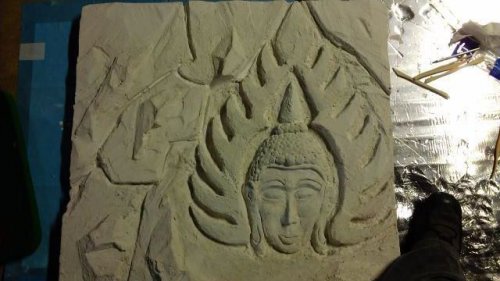
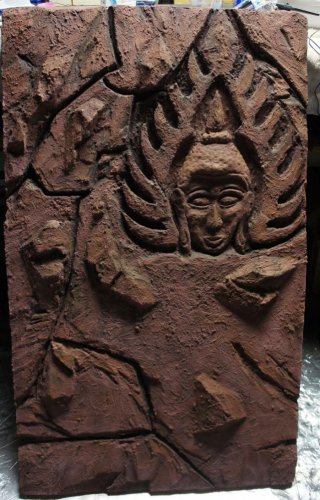
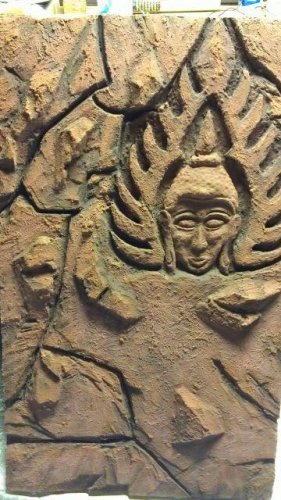
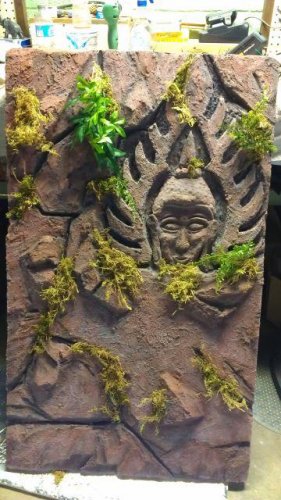
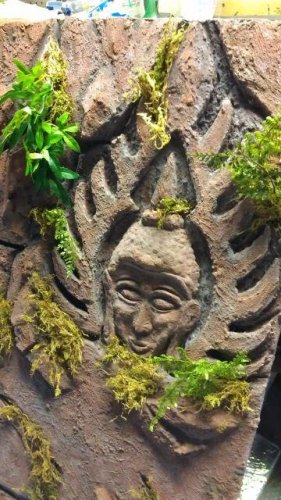
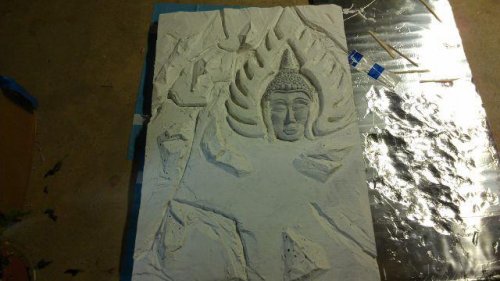
So far this is what I have... about to go down there and work on it some more. I had a hard time carving the buddha head so i added clay to it to build up some spots. Those areas are in gray (it will dry white). oh yeah, it also has one layer of grout on it so far. I need to add some zip ties or wire ties to this so I can secure it to the pvc in my reptarium.

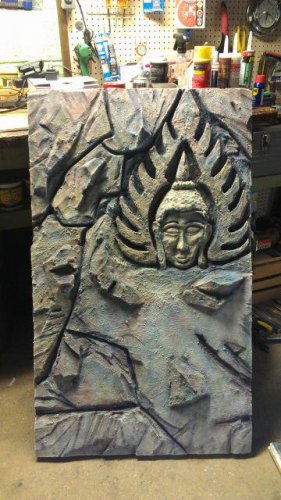
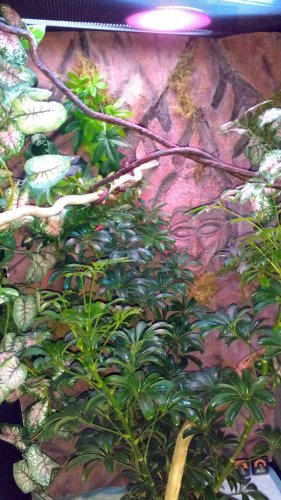
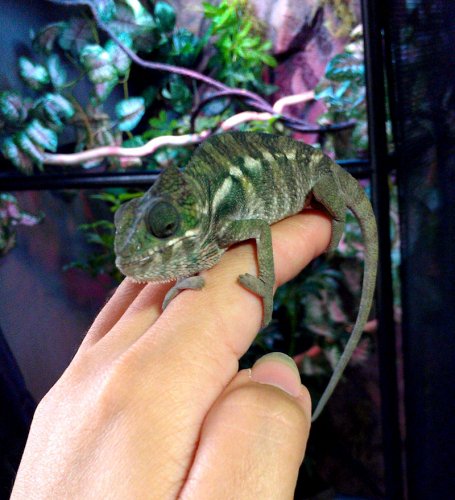
I am doing a background on 2 sides because my enclosure is in a corner of a room and I dont want to keep spraying my walls. The 2nd background that I have not started yet will look like faux rock.

*oh the silver stuff under it is just padding for my knees lol*
 

Attachments

  • 536484_10151116403093333_304553635_n.jpg
    536484_10151116403093333_304553635_n.jpg
    39 KB · Views: 414
Thanks! I was a bit mad at myself for trying to carve the Buddha from foam- it was so hard and I had only some knives and kitchen knives- should have bought an exacto blade (then I realized why dont I try clay over it like when they reconstruct a face on CSI lol)... Then my husband said it looks kind of like me. Maybe I will post a comparison pic when its done.

I cannot wait to start painting this!

Time to go down there and do some more work. :)
 
As of yesterday, Nov 7.

The one with the cracks in the face was after I applied the clay to build up areas... i covered it with a thin layer of grout in the other pics. I am about to go down again and fill in a few small areas today and get some cardboard to practice airbrushing on since I have not used one in forever.
 

Attachments

  • 481739_10151119256608333_2061535947_n.jpg
    481739_10151119256608333_2061535947_n.jpg
    39.2 KB · Views: 277
  • 21096_10151119292838333_644679647_n.jpg
    21096_10151119292838333_644679647_n.jpg
    40.7 KB · Views: 242
  • 530660_10151120400788333_615137735_n.jpg
    530660_10151120400788333_615137735_n.jpg
    42.8 KB · Views: 255
I always liked to draw stuff when I was growing up... I went to art school 12 years ago (eek) and did computer animation but never kept up with it. I never really did any sculpting (maybe in art class or something in school) so it was a bit of a challenge for me to build up the foam areas I had messed up trying to carve.

The reason I have the Thai Buddha head in the upper right area of the whole background is because I would like to see some of it after my plants and all that are placed in the enclosure. It looks a bit funny by itself but I meant it to be that way.

Today I added some more grout to make sure i covered all cracks/holes so that water will definitely NOT get trapped in or under anything. I think i am ready to paint tomorrow... my airbrush is ready. This may be hard since I only used an airbrush 2 times and it was in high school LOL.

More pics to come tomorrow night...
 
My hand got tired of airbrushing... I am going to paint it a sort of brown color I think... reddish brown kind of like the old temples in Thailand that I have seen. right now its every color almost. lol

Another update tomorrow night...
 

Attachments

  • paintedbg.jpg
    paintedbg.jpg
    59.2 KB · Views: 260
looks like it is coming along pretty well!


I'm not entirely understanding how your enclosure itself will be setup. If you plan on hanging it to your PVC frame (can't entirely picture this), I would add a support piece going across under it as well. It can get heavier than it seems (especially once you soak it down) and the foam/concrete can give over time even if it holds on day1 without support.


Good luck with the painting; that is one area that is way out of my skill set :p
 
EvilLost-
It should stand up well against the back of the enclosure... I put holes and ties in it today so i can make sure it it secure and will not fall down. I have 3 ties coming out of the top and 2 on the bottom. If I have to stick a piece of weather stripping along the edges for a good snug fit, i will do that too as a final step. I notched out the areas on the back for where the pvc is so it will sit flush against the mesh. I understand what you mean about something on the bottom of it because it will be a bit heavy but it should fit snug and the only thing to worry about is the whole piece toppling over somehow. I should get a pic of the back later on tonight so its easier to understand what I am trying to say. lol


__________________________________________
Progress today was not that great. I did feed some wire through so I can twist it tight against the pvc frame in the enclosure... I applied another coat of grout because when I was notching out the back, I realized some spots on the front were squishy. I went super light on the grout for the first two layers. Now it has 3 layers... tomorrow i will paint it and it should be ready for sealant later this week!!!!! last step will be vines/moss. Hope to finish in one week from today.
 
As of today-

I added a few close up pics so you can see it in more detail.

This will be awesome when I add my plants and vines!
 

Attachments

  • DSC05366.jpg
    DSC05366.jpg
    149.8 KB · Views: 227
  • DSC05369.JPG
    DSC05369.JPG
    99.2 KB · Views: 231
  • DSC05367.JPG
    DSC05367.JPG
    113.9 KB · Views: 280
My hand got tired of airbrushing... I am going to paint it a sort of brown color I think... reddish brown kind of like the old temples in Thailand that I have seen. right now its every color almost. lol

Another update tomorrow night...

Are you SERIOUS? I have never had an artistic hand...
Looks like a really fun project, and kudos to you...
I may try this at some point when resources become readily available! Can't wait to see it with the plants and cham in there!
 
AbooLovesYOU-- Yeah its going to really take off when its in the enclosure with plants (and my cham) on it! Well the background isnt really for walking or climbing on directly but there will be some vines connected to it for him to use. He has a favorite spot that I know i need to incorporate into the background with a little area he can just sit on.

I forgot to add a pic last night... I was up super early and then got caught up with watching a movie after I made dinner last night and just forgot to post.

Here it is as of yesterday- Background has some high and low lights... camera had a hard time capturing colors. Its a brownish red color, orange/yellow highlights, dark lowlights... I managed to make the paint look a bit stained from the weather (think water dripping down through rocks leaving mineral deposits/stains).
 

Attachments

  • nov14bg.jpg
    nov14bg.jpg
    64.7 KB · Views: 216
repitarium background

It looks beautiful..I wonder if all products usef are nontoxic or maybe it doesnt matter when dried and finished..
 
It looks beautiful..I wonder if all products usef are nontoxic or maybe it doesnt matter when dried and finished..


I was under the impression that as long as it was sealed with a non toxic sealer (3 coats, last one was pretty heavy) and aired out/cured then everything should be ok. The only thing I can see happening is if the background was scratched hard enough then the grout would show... and with that, I think would be ok unless it was somehow ingested.


Here are pics from yesterday. I am going to attach additional vines to the pvc frame of my enclosure which will hang over this background... mainly so that they wont be pulled OUT from the background itself when Mathesar is climbing around.
 

Attachments

  • 230163_10151134717333333_1706923137_n.jpg
    230163_10151134717333333_1706923137_n.jpg
    59.8 KB · Views: 224
  • 561504_10151134717863333_295335209_n.jpg
    561504_10151134717863333_295335209_n.jpg
    66 KB · Views: 225
Background is in! Here are some pics. I will start working on the 2nd one for the left side in a few weeks... :)
 

Attachments

  • IMAG2279.jpg
    IMAG2279.jpg
    214.1 KB · Views: 324
  • IMAG2302.jpg
    IMAG2302.jpg
    193.3 KB · Views: 248
  • IMAG2296.jpg
    IMAG2296.jpg
    221 KB · Views: 233
Back
Top Bottom