Navigation
Install the app
How to install the app on iOS
Follow along with the video below to see how to install our site as a web app on your home screen.
Note: This feature may not be available in some browsers.
More options
You are using an out of date browser. It may not display this or other websites correctly.
You should upgrade or use an alternative browser.
You should upgrade or use an alternative browser.
DIY Aluminum 8020 Quick Frame Enclosure Build
- Thread starter Sgt. Bilko
- Start date
Sgt. Bilko
Established Member
Thanks!Wow that's really looking great!
Nice work!
Sgt. Bilko
Established Member
Aired out the enclosure and started the indoor setup. Went ‘shopping’ for sticks at the park and sterilized with heat. With the sticks cooked, mounted in the enclosure and moved our plants in. Can you find the preying mantis in the pic?

Attachments
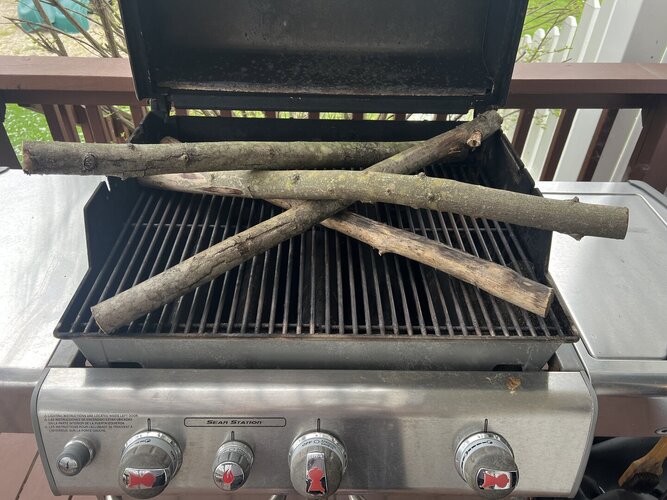
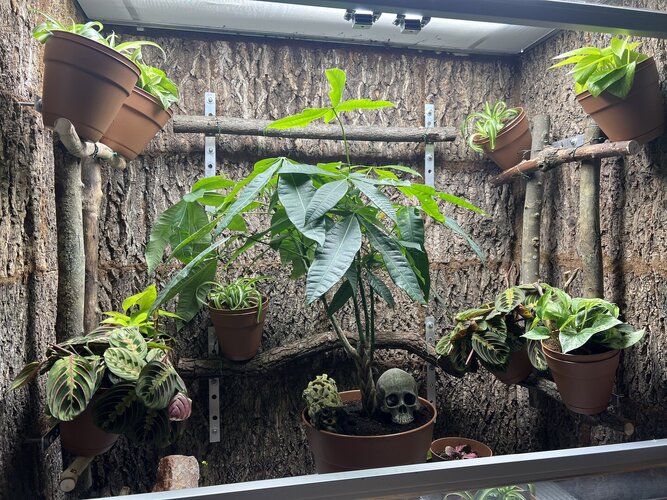


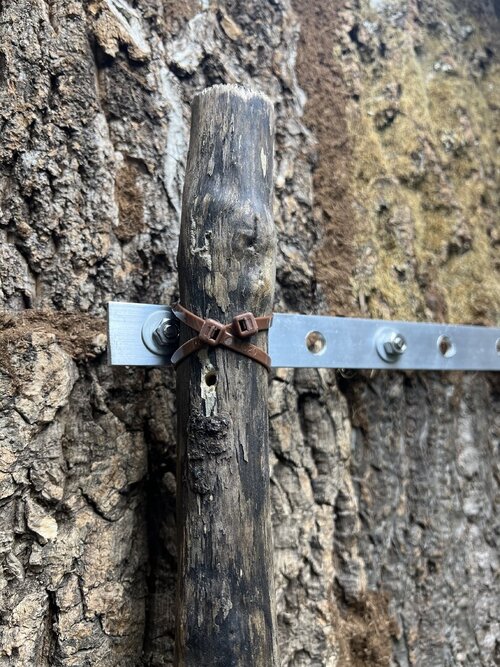
Really nice branches... I would replace the floral wire with zip ties and cross latch them to your supports. THen clean cut the zip tie so nothing sharp is hanging out. Floral wire in a cage can pose an issue because it is very sharp. Can pose risk for injury.Aired out the enclosure and started the indoor setup. Went ‘shopping’ for sticks at the park and sterilized with heat. With the sticks cooked, mounted in the enclosure and moved our plants in. Can you find the preying mantis in the pic? View attachment 337181
Sgt. Bilko
Established Member
I though I was being smart with the coated wire. But your point makes sense. I’ll replace with zip ties this week. Thanks!Really nice branches... I would replace the floral wire with zip ties and cross latch them to your supports. THen clean cut the zip tie so nothing sharp is hanging out. Floral wire in a cage can pose an issue because it is very sharp. Can pose risk for injury.
Your welcome. I have pics in this album of how to cross latch the zip ties and clean cut them. https://www.chameleonforums.com/media/albums/my-enclosures.6672/I though I was being smart with the coated wire. But your point makes sense. I’ll replace with zip ties this week. Thanks!
Beppo
Chameleon Enthusiast
It really is awesome!Yeah it's 2in eps and I used a blow torch to shape it and then painted it with several different colors. Did that on walls and back. I love it and it really blends in well with the plants
 I love seeing your guys builds it really inspires me for the future
Sgt. Bilko
Established Member
Good one. I’ll get working on the changeout.Your welcome. I have pics in this album of how to cross latch the zip ties and clean cut them. https://www.chameleonforums.com/media/albums/my-enclosures.6672/
Sgt. Bilko
Established Member
Sonny13
Chameleon Enthusiast
Looks pretty neat! Now installing the branch / twig highway and it will be cham paradise, can't wait to see the end result.Corrected the mounting with Zip Ties. Found some nice UV resistant brown and green color. Blends in fairly nice.
Drip tray comes in tomorrow. I’ll work on the MisterKing install this weekend.
View attachment 337328
Wonderful that looks much more stable as well. Great job!Corrected the mounting with Zip Ties. Found some nice UV resistant brown and green color. Blends in fairly nice.
Drip tray comes in tomorrow. I’ll work on the MisterKing install this weekend.
View attachment 337328
Sgt. Bilko
Established Member
Thanks. More stick shopping to come. I also need to plan out the basking spot and UV height, etc.Looks pretty neat! Now installing the branch / twig highway and it will be cham paradise, can't wait to see the end result.
Sgt. Bilko
Established Member
Sgt. Bilko
Established Member
MisterKing installed! I 3D printed a set of corner supports. They worked well.
I have decent coverage with four mister heads. Two in the center and one each side. A bit of water dripping down outside of the drip tray. Working that out next.

I have decent coverage with four mister heads. Two in the center and one each side. A bit of water dripping down outside of the drip tray. Working that out next.
Is there a base below the egg crate that has holes in it? Just making sure you do not have over drip since you have electronics below it. Looks really good. That pan is shallow so I would consider a wet vac to pull water from it or a deeper pan that fits there that you could plumb drainage through into a bucket for easy removal.MisterKing installed! I 3D printed a set of corner supports. They worked well.
I have decent coverage with four mister heads. Two in the center and one each side. A bit of water dripping down outside of the drip tray. Working that out next.
View attachment 337423View attachment 337424View attachment 337425
Sgt. Bilko
Established Member
Thanks! Yes, that’s egg crate. The bottom is has a screen under the crate. I struggled to find a drip pan of that length with > 1” height. I bought a bucket head wet vac to suck out the water when it can’t manage the water carefully. I may plumb a drain. Still thinking about it :/Is there a base below the egg crate that has holes in it? Just making sure you do not have over drip since you have electronics below it. Looks really good. That pan is shallow so I would consider a wet vac to pull water from it or a deeper pan that fits there that you could plumb drainage through into a bucket for easy removal.
I’ve also bought thick clear vinyl sheets to help with the side drips. I had some splashing on the sides from the misting test run. I’ll post a pic of the solution later.
Last edited:
Trust me plumb a drain lol. The wet vac life sucks especially if you vacation at all.Thanks! I struggled to find a drip pan of that length with > 1” height. I bought a bucket head wet vac to suck out the water when it can’t manage the water carefully. I may plumb a drain. Still thinking about it :/
Sgt. Bilko
Established Member
I suddenly feel a strong urge to plumb a drain!Trust me plumb a drain lol. The wet vac life sucks especially if you vacation at all.
nightanole
Chameleon Enthusiast
Im not going to say that the white square pattern ceiling diffuser for a base wont get super brittle and disintegrate under uv lights, but mine did...
Sgt. Bilko
Established Member
Interesting. How long did yours last?Im not going to say that the white square pattern ceiling diffuser for a base wont get super brittle and disintegrate under uv lights, but mine did...
Similar threads
- Replies
- 32
- Views
- 10K
- Replies
- 14
- Views
- 5K