


Thank you this makes so much more sense to me now lolHere you go. I am the reason you get out on the dance floor and bust a groove.
View attachment 280535
Navigation
Install the app
How to install the app on iOS
Follow along with the video below to see how to install our site as a web app on your home screen.
Note: This feature may not be available in some browsers.
More options
You are using an out of date browser. It may not display this or other websites correctly.
You should upgrade or use an alternative browser.
You should upgrade or use an alternative browser.
***The Third Official Enclosure Picture Thread***
- Thread starter Decadancin
- Start date
Amanda1919
New Member
Klyde O'Scope
Chameleon Enthusiast
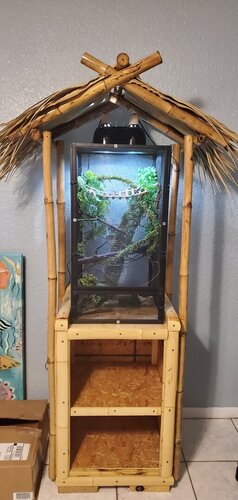
Kewl!We built her a tiki hut to have her home in.

cantgetagoodsn
Avid Member
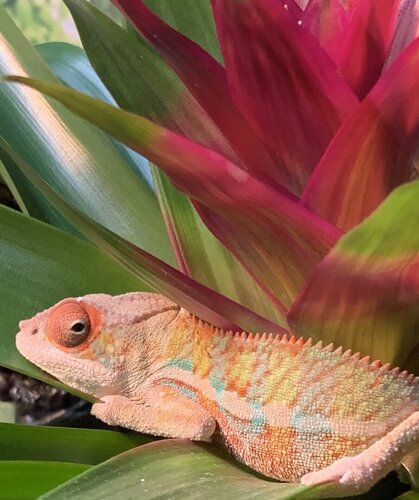
Well, after my little guy has had a very rough start with me, he’s finally fought off coccidia. That means I got to set up his home properly over the weekend. I’ve seen his colors more vibrant than I ever have before. I think Kenshō likes it!
Attachments
basshead469
New Member
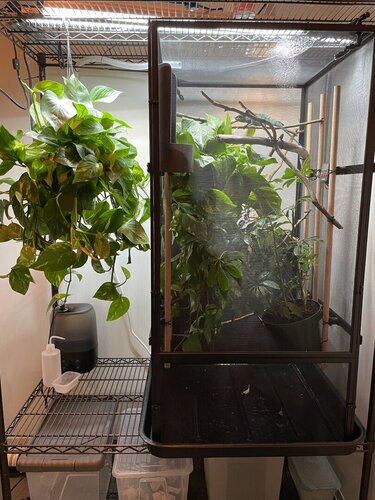
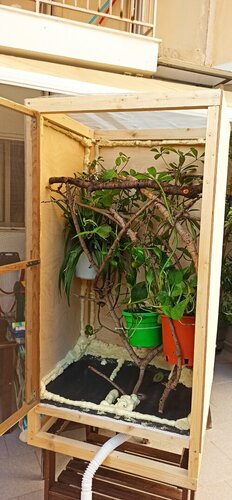
Got it finished! Just making some tweeks, needs a branch here and there. But got a bio-active box, gets lightly misted, keeps good moisture and borrows gr8. Humidifier and a fan since theres not one in that space, on a lil drawer I found for free at a thrift store. I wanted it in the room but i kinda made the atrium part too big lol. Shes been down to check out the substrate and roaming. But temps are right on, humidity during the day hard to keep track of while working. But in the high 40s low 50s when i get home. Probably need a longer uvb but she gets her sun and go back into the pothos. Any changes i need to make lmk.32"w x 28"d x 48"h obviously still not finished but working on it daily. 2x4 stand 28" to the top. A washing machine drain pan for the bottom supported underneath. Did 1x4 around the bottom and tied the side in on that. I can take the whole screen off in one piece if ever need to move. Gonna start sanding and staining in the next couple days. All for this crazy eyed female veil Jade. Shes currently in a repti breeze 16x16x30 which shes gonna out grow soon. They seem flimsy imo. So i built something i may need a permit for lol. Ill post more when its done. Thank you all for info and help!

Kaizen
Chameleon Enthusiast
Coccidia, eh? I’d love to hear your story of triumph in a PM.Well, after my little guy has had a very rough start with me, he’s finally fought off coccidia. That means I got to set up his home properly over the weekend. I’ve seen his colors more vibrant than I ever have before. I think Kenshō likes it!
Hello All,
First time poster, but long time reader and reptile enthusiast. Just got my first Dragonstrand cage and completed it today. I can't wait for all the plants to fill in.
First time poster, but long time reader and reptile enthusiast. Just got my first Dragonstrand cage and completed it today. I can't wait for all the plants to fill in.
Attachments
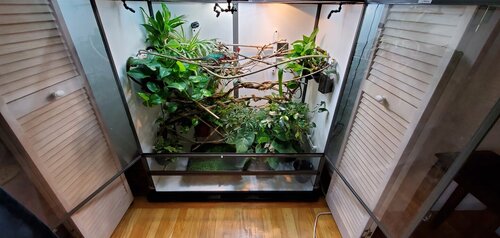
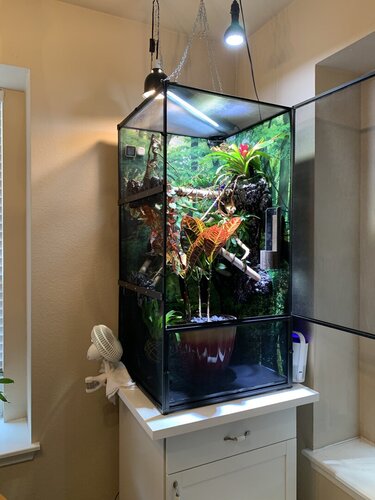
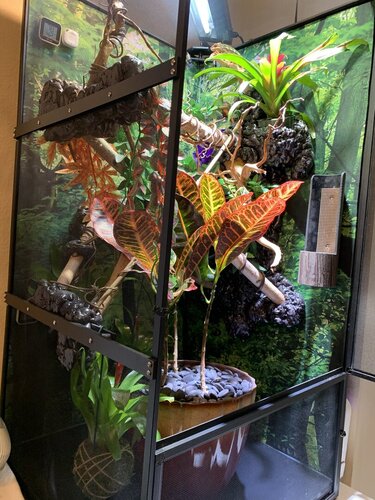
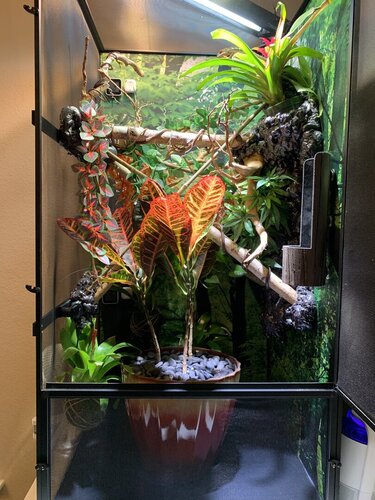
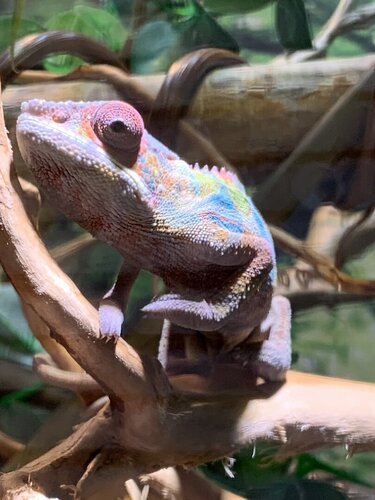
What is your back wall made of? Foam? I am in need of something similar for mine.Hi all! I’ve been silently watching threads and building my husbandry knowledge over the past few months. I started a custom build in the fall and it has been empty until a few weeks ago when I decided to add a new friend to occupy it!
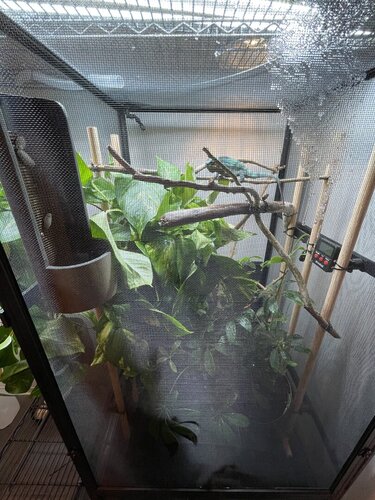
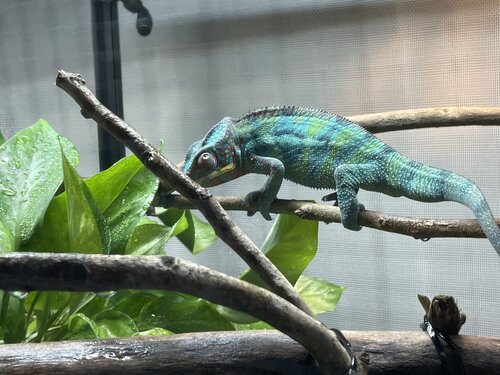
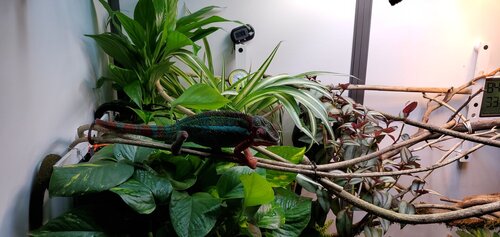
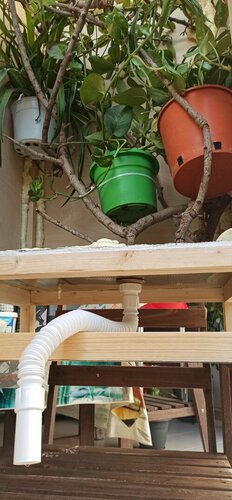
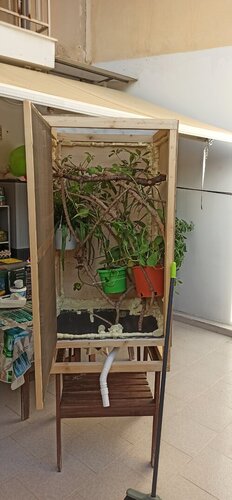
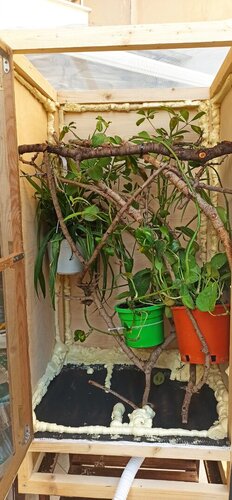
The enclosure is 3’x2’x5’. Has a sealed drainage tray below that I can just remove and dump. I know it can probably use some more foliage, banking on the pothos growing out more and currently trying to revive the ficus before I purchase anything else for it. Thought I would share, always open to suggestions for improvement! I added pics of the new guy in it as well, courtesy of Matt.
king julian
New Member
just wondering what type of bark you use on the sides of the glass enclosure. i also have a glass enclosure and very scared to have my chameleon stressed out seeing his own reflection.Recent photo of my male Nosy Mitsio's enclosure 4 months post setup:
View attachment 262822
Female mitsio's temporary enclosure. She will be moving into an 18x18x36 soon and I will probably use this to house a Kinyongia boehmei.
View attachment 262823
Kronos
Established Member
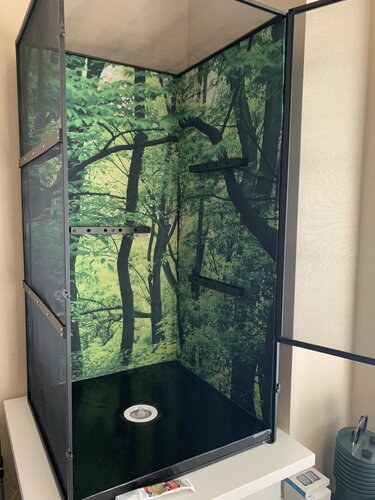
We bought coroplastic boards on Amazon that fit our habitat, had to cut them down a tiny bit to make them fit inside though. Just used a spray adhesive to attach a rainforest shower curtain. Here’s a couple of pictures of before we filled in our habitat and after. Make sure you seal with silicone where the 2 sides meet and at the bottom. If you decide to go this route. Just another option for you regarding backgrounds/walls, if you don’t have a dragon habitat.What is your back wall made of? Foam? I am in need of something similar for mine.
Attachments
-
 AF2F3907-FE39-431B-A87B-44DFDEE7104B.jpeg76.1 KB · Views: 313
 -
 DDD24F41-83CE-4DE1-BE51-531BE75B26D8.jpeg173.2 KB · Views: 320
 -
 7BA97ADE-FEBF-4A3D-AC1E-FC4C77082509.jpeg143.5 KB · Views: 308
 -
 1BE2F184-493E-41A8-82F0-BCE6325D3C36.jpeg251.3 KB · Views: 340
 -
 CCE6B047-2F88-4B2D-B839-D14C88C4BC4D.jpeg246.9 KB · Views: 320
The Wild One
Chameleon Enthusiast
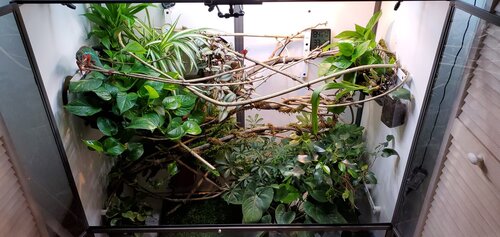
I thought it would be a good idea to post a progress pic, I replaced some of the plants with pothos ( mainly because they died) but they seem to be thriving

Kronos
Established Member
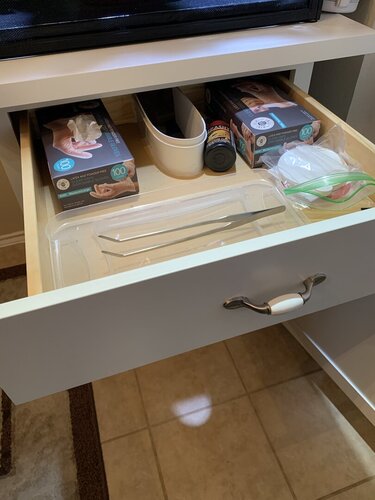
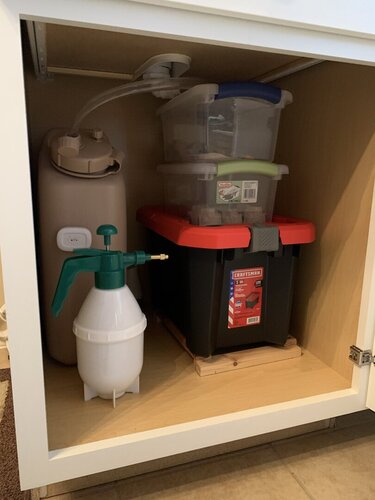
Just wanted to show what my husband did with the kitchen cabinet we used for our habitat. We didn’t want to lose space/the use of the drawer. He got creative. Luckily, there was just enough room in the cabinet for the mistking reservoir, insects and a water tank with a sensor that alerts us on our phones.
Also, would like to say that the enclosures on here are super impressive!!!! Loving all the awesome craftsmanship/creative things everyone did!!!
Also, would like to say that the enclosures on here are super impressive!!!! Loving all the awesome craftsmanship/creative things everyone did!!!
Attachments

Kronos
Established Member
Just wanted to show what my husband did with the kitchen cabinet we used for our habitat. We didn’t want to lose space/the use of the drawer. He got creative. Luckily, there was just enough room in the cabinet for the mistking reservoir, insects and a water tank with a sensor that alerts us on our phones.
Also, would like to say that the enclosures on here are super impressive!!!! Loving all the awesome craftsmanship/creative things everyone did!!!
[/QUOTE
Forgot to post a picture of our baby Zelus, hehehe. Noticed others did and I just can’t help it, we love him so much!!!!
Kronos
Established Member
Forgot to post a picture of our baby Zelus, hehehe. Noticed others did and I just can’t help it, we love him so much!!!! I think I accidentally posted this twice, sorry. Still learning.
Attachments

Last edited:
flyingpanther
Member

Here is a simple outdoor enclosure I completed earlier in the summer for outdoor time during those warmer days in San Diego. It’s 3’x3’x6’ framed using 2x2 redwood posts. Newtech wood (similar to Trex) decking as flooring. Caster wheels with wheel brakes for mobility.


Pearl Fields
Avid Member
OK so me and my mom just today finished making a cage for stormy (veiled male) and though it dosent have any plant or branches in it yet, i am still going to post some pics of it, and ill probably post another picture of it when its completely set up.
 this is Stormy. just had to include a picture of who the cage is for.
But basically, first i drew the plans, we bought the wood, we measured the wood, we cut the wood, sanded it, painted it, a day later polyurethaned it with water based polyurethane. we did a couple layers of the poly. We did have to sand and then repaint some of the wood with the green paint though because when we were polying, we set the frame on some paper, which the polyurethane dripped onto and got under (the wood) so the paper stuck to it. As for what wood we used, it was cheap pine or whatever you get from Lowes. We used mainly 1 by 2s, but used 2 by 2s for the 4 corners, and for the whole bottom of the frame. We got the frame part assembled (FINALLY) and it looks like this: (the frame was in 2 pieces bc we couldnt get it in the house when it was one piece.

After this i believe we started on the doors, which was like the cage all over again. We measured, cut, sanded, painted, polyed, etc. then put it together, made sure it fit in the doorways, (since the cage is custom it obviously wasn't exact so we had to adjust accordingly.)
After that we screened the doors, in the 40 degree weather for like 2 hours. It took awhile, about a half hour per door to put the screen on.
This is where we brought the screened doors, and the 2 pieces of frame inside and upstairs into the loft area outside my room.
My mom and grandpa (he has lots of tools and fixes lots of things) assembled the 2 pieces of frame into one, and then put screen on most of the frame. then since my grandparents left, we (me and my mom) screened the rest of the frame of the cage, and then put wood strips (that we ALSO painted and polyed) on the inside of the doors so that the screen (we had stapled on the inside of the doors fyi) which was very scratchy, would not scratch Stormy, as well as on the outside of the cage in one area, (on the front below the doors). Then we put the doors on, put the latches on so the doors would close, and then worked on drilling 6 holes in what was going to be the bottom of the cage, using a 5/8 inch spade drill bit. (Which caught the wood at the end and twisted my wrist btw, so be prepared for that if you use a spade drill bit. im fine though) then polyed the plywood and the inside of the holes we'd drilled as best i could, and today we put on the little pieces of wood behind the doors to prevent the doors from going in and like snapping the hinges. We also drilled on the bottom plywood piece today, and used silicone to put in the crack between the plywood base and the bottom of the frame of the cage so water eont get through and dirt and stuff wont disappear under there. here is the finished product!

 this is Stormy. just had to include a picture of who the cage is for.
But basically, first i drew the plans, we bought the wood, we measured the wood, we cut the wood, sanded it, painted it, a day later polyurethaned it with water based polyurethane. we did a couple layers of the poly. We did have to sand and then repaint some of the wood with the green paint though because when we were polying, we set the frame on some paper, which the polyurethane dripped onto and got under (the wood) so the paper stuck to it. As for what wood we used, it was cheap pine or whatever you get from Lowes. We used mainly 1 by 2s, but used 2 by 2s for the 4 corners, and for the whole bottom of the frame. We got the frame part assembled (FINALLY) and it looks like this: (the frame was in 2 pieces bc we couldnt get it in the house when it was one piece.


After this i believe we started on the doors, which was like the cage all over again. We measured, cut, sanded, painted, polyed, etc. then put it together, made sure it fit in the doorways, (since the cage is custom it obviously wasn't exact so we had to adjust accordingly.)
After that we screened the doors, in the 40 degree weather for like 2 hours. It took awhile, about a half hour per door to put the screen on.
This is where we brought the screened doors, and the 2 pieces of frame inside and upstairs into the loft area outside my room.
My mom and grandpa (he has lots of tools and fixes lots of things) assembled the 2 pieces of frame into one, and then put screen on most of the frame. then since my grandparents left, we (me and my mom) screened the rest of the frame of the cage, and then put wood strips (that we ALSO painted and polyed) on the inside of the doors so that the screen (we had stapled on the inside of the doors fyi) which was very scratchy, would not scratch Stormy, as well as on the outside of the cage in one area, (on the front below the doors). Then we put the doors on, put the latches on so the doors would close, and then worked on drilling 6 holes in what was going to be the bottom of the cage, using a 5/8 inch spade drill bit. (Which caught the wood at the end and twisted my wrist btw, so be prepared for that if you use a spade drill bit. im fine though) then polyed the plywood and the inside of the holes we'd drilled as best i could, and today we put on the little pieces of wood behind the doors to prevent the doors from going in and like snapping the hinges. We also drilled on the bottom plywood piece today, and used silicone to put in the crack between the plywood base and the bottom of the frame of the cage so water eont get through and dirt and stuff wont disappear under there. here is the finished product!
Vinesar21
Avid Member
Looking good!OK so me and my mom just today finished making a cage for stormy (veiled male) and though it dosent have any plant or branches in it yet, i am still going to post some pics of it, and ill probably post another picture of it when its completely set up.
View attachment 287662 this is Stormy. just had to include a picture of who the cage is for.
But basically, first i drew the plans, we bought the wood, we measured the wood, we cut the wood, sanded it, painted it, a day later polyurethaned it with water based polyurethane. we did a couple layers of the poly. We did have to sand and then repaint some of the wood with the green paint though because when we were polying, we set the frame on some paper, which the polyurethane dripped onto and got under (the wood) so the paper stuck to it. As for what wood we used, it was cheap pine or whatever you get from Lowes. We used mainly 1 by 2s, but used 2 by 2s for the 4 corners, and for the whole bottom of the frame. We got the frame part assembled (FINALLY) and it looks like this: (the frame was in 2 pieces bc we couldnt get it in the house when it was one piece.
View attachment 287663View attachment 287664
After this i believe we started on the doors, which was like the cage all over again. We measured, cut, sanded, painted, polyed, etc. then put it together, made sure it fit in the doorways, (since the cage is custom it obviously wasn't exact so we had to adjust accordingly.)
After that we screened the doors, in the 40 degree weather for like 2 hours. It took awhile, about a half hour per door to put the screen on.
This is where we brought the screened doors, and the 2 pieces of frame inside and upstairs into the loft area outside my room.
My mom and grandpa (he has lots of tools and fixes lots of things) assembled the 2 pieces of frame into one, and then put screen on most of the frame. then since my grandparents left, we (me and my mom) screened the rest of the frame of the cage, and then put wood strips (that we ALSO painted and polyed) on the inside of the doors so that the screen (we had stapled on the inside of the doors fyi) which was very scratchy, would not scratch Stormy, as well as on the outside of the cage in one area, (on the front below the doors). Then we put the doors on, put the latches on so the doors would close, and then worked on drilling 6 holes in what was going to be the bottom of the cage, using a 5/8 inch spade drill bit. (Which caught the wood at the end and twisted my wrist btw, so be prepared for that if you use a spade drill bit. im fine though) then polyed the plywood and the inside of the holes we'd drilled as best i could, and today we put on the little pieces of wood behind the doors to prevent the doors from going in and like snapping the hinges. We also drilled on the bottom plywood piece today, and used silicone to put in the crack between the plywood base and the bottom of the frame of the cage so water eont get through and dirt and stuff wont disappear under there. here is the finished product!
View attachment 287671View attachment 287672View attachment 287673View attachment 287674
Similar threads
- Replies
- 2
- Views
- 2K
- Replies
- 10
- Views
- 3K
- Replies
- 23
- Views
- 12K
- Replies
- 188
- Views
- 49K