My Bioactive Enclosure Build (Pt. 2)

GoodKarma19

Chameleon Enthusiast
Hey cham fam! Been awhile since I've updated my build thread, and since many pages of the original were related to general bioactive questions I thought I'd start up a new one containing only the build itself! :D It's still a work in progress, and I'll continue to update as I go.

I'm not quite organized enough to make a step by step break down of the build (and I didnt take enough pictures in the first place!), but I figured I'd share some picture progress in the hope of inspiring others. It's been great fun!! If you have any questions, about anything I've done, please feel free to ask. :)

If you're interested in reading the original thread, you can find it here.

The terrarium itself is a 36x18x36 ExoTerra glass terrarium with the new paludarium base (more space between the bottom and lower vent strip), and I've been using Great Stuff Big Gap Filler with the no drip dispenser. In total, I've used ~8 cans for this build.

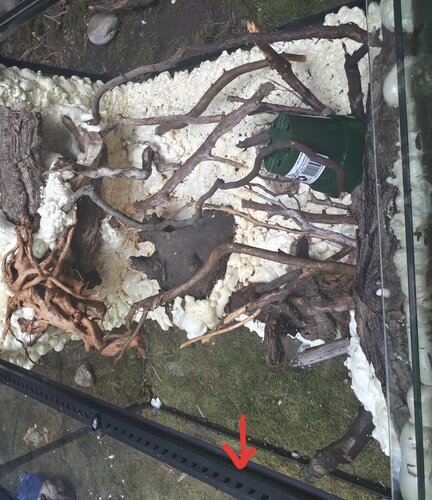
I didn't think to take any pictures of my drainage set up, but I was inspired by @Lennoncham's build for his cham, Melon, and did something very similar.

Hindsight #1: I feel like I should have affixed some cut-to-size eggcrate on the walls to provide additional structural support, a lattice to tie things to while foam cures, and an additional material for the foam to affix to. I've noticed some minor peeling around the edges, and I'm mildly concerned for the longevity of the build!

Placement of the larger focal pieces, with the terrarium still on it's right side:

239024


With filled in background:

239029


Hindsight #2: I probably should have shaved down my foam and possibly even gotten the cocofibre on it before I started affixing branches and making it very difficult to maneuver!

Branches foamed in, plus 2 planters and a bit of bark (ignore the random pot and a rock - I was using them to balance things):

239031


Background planters highlighted:

239034


Close-up of planter, with tubing exposed (I'll be trimming it when it cures):

239035


From left side, across:

239032


From right side, across:

239037


Currently working on shaving and shaping the foam - more to come!
 

Attachments

  • 20190707_134131.jpg
    20190707_134131.jpg
    280.7 KB · Views: 164
Looks like it’s going to be amazing looking when it’s done! Like Lennon said have fun shaving the foam and getting the silicone in and around those tight crevices for the background material haha. The hard work will pay off though and in the end you’ll have a beautiful looking chameleon cage!
 
Looking good. Have fun getting into the weird positions required to trim the foam with all the branches in the way lol.

Believe me - I'm kicking myself pretty hard for that particular genius move! :LOL: Thankfully, I'm well accustomed to working in awkward positions trying to get at hard to reach nooks and crannies. My work with miniature sculptures has trained me well! I managed to obtain enough extension cords to get my dremel to the enclosure, so that should help with some of the more unwieldy bits. I also have a bunch of clay tools and wood carving knives - i'll make it happen one way or another!! Next build, though, I'll definitely be shaving stuff down and possibly applying cocofibre before putting branches everywhere. :rolleyes:

It's definitely a learning process, but I think it'll look pretty neat once it's done!! :D

Ya I learned quick doing my frog tanks. There were parts I had my Wrist all bent up into spots I couldn’t even see. Had to get a knife with a curve in it. Thats why I did the branches at the end for melons cage. The real hard part will be getting the silicone in there.
 
Believe me - I'm kicking myself pretty hard for that particular genius move! :LOL: Thankfully, I'm well accustomed to working in awkward positions trying to get at hard to reach nooks and crannies. My work with miniature sculptures has trained me well! I managed to obtain enough extension cords to get my dremel to the enclosure, so that should help with some of the more unwieldy bits. I also have a bunch of clay tools and wood carving knives - i'll make it happen one way or another!! Next build, though, I'll definitely be shaving stuff down and possibly applying cocofibre before putting branches everywhere. :rolleyes:

It's definitely a learning process, but I think it'll look pretty neat once it's done!! :D

I just learned like 5000 lessons working with pond foam on a new 2x2x4 enclosure -- but GETTING MY DREMEL was never something I considered as I squeezed my fat a** under grape wood vines I stupidly put in before trimming the foam down. wow. WOW. I also have clay tools but no. I sat there with a paring knife like a fool.

That's gonna be one beautiful enclosure!
 
Yeah, that's gonna be a pain to trim and coat the foam, but it sure will look nice in the end.


Is this cork bark anchored in the foam and the pot slid into the opening, or is the pot in the foam and cork bark glued to the pot?

I was thinking of gluing cork bark chunks or sheets to my pots when I set up my dragon strand cage using the dragon ledges. I just thought it would look nicer with the black pots covered with cork.
 
Ya I learned quick doing my frog tanks. There were parts I had my Wrist all bent up into spots I couldn’t even see. Had to get a knife with a curve in it. Thats why I did the branches at the end for melons cage. The real hard part will be getting the silicone in there.

Yeah, silicone would be a nightmare. I opted to use liquid rubber instead, as it's brushable and I figured it'd be easier to get into the nooks and crannies! We'll see how that goes... not quite looking forward to that step haha!

Is this cork bark anchored in the foam and the pot slid into the opening, or is the pot in the foam and cork bark glued to the pot?

I put the pot into place, balanced the bark wherever I wanted it on top of the pot, and foamed them both in at the same time. I also placed a weight on top of the bark to prevent unwanted displacement. Gluing bark directly to a pot for placement on a ledge would probably also work - I'll be doing something similar for my next build, which is less involved than this one!

Looks good, can't wait to see finished project.
Looking really good so far, looks like a ton of work! Wow!

Thank you! Yes, it's definitely been a labor of love, but I'm very eager to get it done and watch the plants grow in over the coming months/years! And the inhabitant, of course. :)
 
A YouTuber I watch uses a brush with silicon. I would be worried about LNs, being toxic.

My huge Viv, I got sick of the silicon stuff real fast lol, so my cork panels I put a little silicon around them and busted out the nail gun. Wooden Viv how I live thee. Did the same thing with the branches, and then siliconed and ecoearth over the nails hahaha.

I checked the Liquid Rubber website, and it claims to be aquarium safe. I'm hopeful that it'll work out for me as a sealant/cocofibre adhesive! I'll do some more reading before I commit, though. I still have a few hours of carving ahead of me once the weather cooperates. Seems like it's raining whenever I'm not working!

I'd like to do a custom wood cabinet viv at some point. Having a solid wood backing would make this whole background situation a lot easier! I did a lot of pretty crazy balancing trying to keep everything in place while the foam cured, lol, and I'm concerned about long term slippage due to the weight. Ill have to use some eggcrate or something next time to anchor things to and provide extra support!

This is my guinea pig build, and I'll definitely be making some changes to the process on the next one!


That Flex Seal stuff might work. I used that on my soil bin.

So once my wood was built, I epoxied the entire cage, (pretty expesensive, and doesn't look great on the side, but it was my guinea pig lol) and then just for extra safety, I covered the soil bin in flex seal :).

It's pretty gooey, but likely easier to brush on than silicon. Might hold on better, longer, that's a good idea. I read the black becomes brown in high UV, not that it would matter for you. Mine did a little bit, after sitting for a few months that I had to put the project aside. However it was still pretty black, just brownish black, instead of blueish black.


I took the advice of my brother in law, we framed this thing out like a house lol. It's got a 2x2 skeleton, and 1/4 inch ply, on the inside and outside. Which is nice, it's like a room with in a room with an airgap. However it's heavy as all get out. Next time, (and there is going to be a next time, quite a few of them lol) I'm going to just use some Nice plywood.

That may be harder to nail, with my thick walls, I figured out where the "studs" were and shot in 1.5" finish nails to hold the back panels in. The stuff is 3/4, it might be easier with screws, and a stronger hold, like some 1 inch crown heads or something. Then cap them with silicon or something.

And flex seal may be cheaper than epoxy for that. The only thing with the Flex seal is, Silicon will not stick to it. So that's something to remember. It makes a slick surface.

Thank you! Yes, I had read that silicone doesn't stick to FlexSeal/Liquid Rubber... but since I'm using it pretty much just to seal my foam and adhere cocofibre, I figured that it ought to work for me! Color also won't really factor in. If I manage to miss covering any parts and it fades to brown, it'll just blend in more haha! Apparently this particular brand is quite UV resistant, too.

I bet your build weighs a ton!! Do you have a build thread somewhere/would you mind sharing? I'd love to take a better look, and always like to learn! I'm not very talented when it comes to woodwork (and i lack the tools), but my grandpa and dad have some carpentry skills. My eventual plan is to find a nice hutch to convert, since a ground up build would probably be a bit of a stretch... at least until I get some practice in!

Might have to pick your brain a little on a few topics, haha!


I think so somewhere, will have to look around.

And yep, no problem I am always happy to help.


I was going to do the cupboard method as well, but couldn't find one the proper size so just made it lol.
 
I think so somewhere, will have to look around.

And yep, no problem I am always happy to help.


I was going to do the cupboard method as well, but couldn't find one the proper size so just made it lol.

Sounds good, thank you!

I'm definitely going to try and find a nice one to convert with the depth I want... but I may need to make something custom! I figure I may just pay someone to make the the frame for me, worst case haha! I'm sure I could make a basic frame, but I want furniture quality craftsmanship and i'm not nearly that skilled!
 
I'm just about halfway through carving, now. I definitely underestimated the amount of work i was in for, but I'm feeling good about it! I'll rough carve out the other half tomorrow, and then go though it again with a curved wood carving knife to tidy it up. Should keep me busy over the weekend!! I think I'm happy with the feeder placement. It's practically hidden from the front, and once I have plants in there it'll be darn near invisible!

239314


239315
 
Well, I greatly underestimated how much work it'd be, but I'm nearly done with the carving! Just a little bit of tidying to do. I'm pretty pleased with it so far! :D Overall, I've spent about 8 hours actively carving.

Front:

239519


Top down (gap for feeder run circled):

239520


Left side across:

239523


Right side across:

239525
 
Man you make me want to build Vivs!!!

I got a couple in the works, later this month for bugs though.

Looking forward to seeing what you come up with! What kind of bugs are you keeping? I'm thinking about making a little bioactive display tank for some orange head roaches, just cause I kinda like them and if they're in my home anyway they may as well be pretty to look at!
 
Back
Top Bottom