diy clearside

dshuld

Chameleon Enthusiast
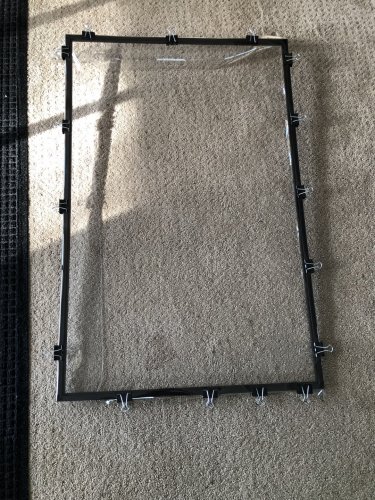
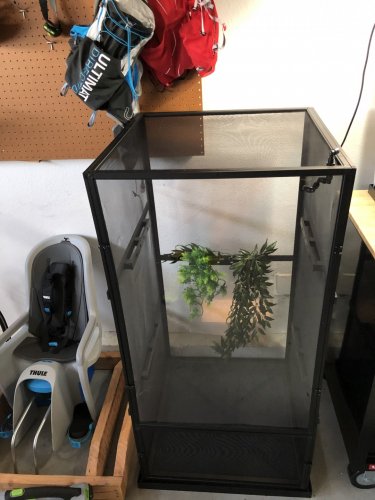
@celeste_knitter @Matt Vanilla Gorilla here is the finished zilla I was working on yesterday. While this may not be as nice as @DeremensisBlue clearsides, it serves my purposes well enough for retrofitting all of the cages I have already without using the plastic wall paneling like I did in Lola's cage.

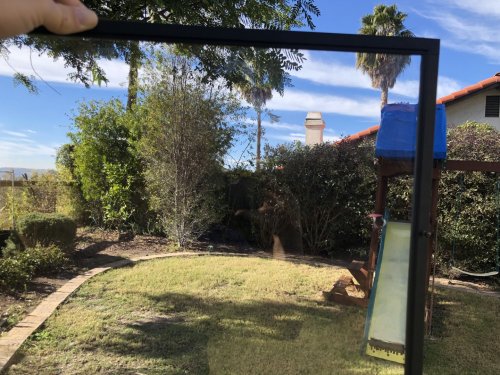
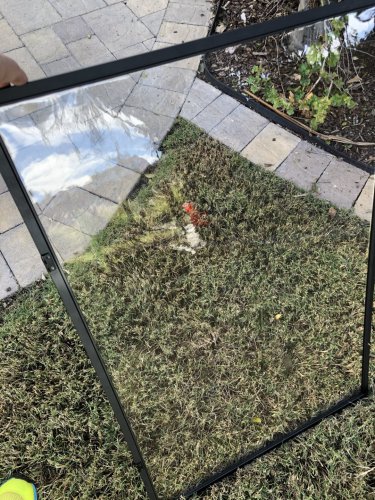
I used 20 gauge table cloth/ furniture cover vinyl from hobby lobby since I don't plan on leaving my sides clear. If I had planned on leaving them clear I probably would've gonna with the marine grade window vinyl. Not sure if the marine grade will be much if any clearer but would be the same gauge used either way.

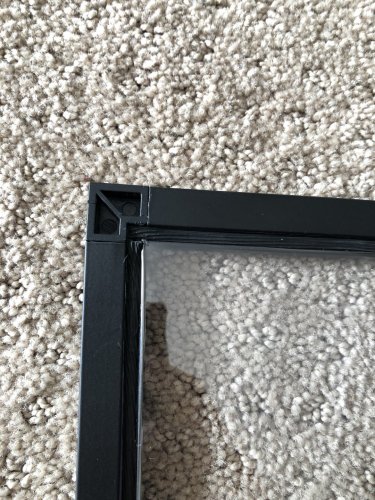
Krylon fushion spray paint does adhere very well to it. On the test piece I sprayed the paint remained flexable enough I was able to make a tight fold over loop with out it coming off. I also scratched at it with none flaking off.

20181125_185505.jpg 20181125_171329.jpg 20181125_204201.jpg 20181125_204222-1.jpg
 
Looks great! Based on your results,I ordered a few yards of 20 gauge marine vinyl. Was it difficult to install without wrinkles? Any tricks, other than using clips?

What size cage are you doing? Just finished another conversion tonight on a reptibreeze large. I need to buy some more clips for the larger cages. For this one I found it easier to get the vinyl tight with clips spaced 1/8 to 1/4 in between them and slowly work the roller until the vinyl was seated in the channel.

Working the roller slowly pulled the excess from under the clips while keeping the center tight. Smaller panels like on the zilla small in the pics I left the rolled side free like I would if rescreening the panel. With the side being rolled free of clips, it will look like it's rippling as you roll it into the channel. Don't freak out lol, just keep working it into the channel slowly rolling back and forth until it's seated.
 
Thanks for the tips. I’ll be doing the rear and a side panel of an XL Reptibreeze, maybe the front panel too. I’ll be psyched if my results are even close to yours. The vinyl is supposed to be here Tuesday.
 
Thanks for the tips. I’ll be doing the rear and a side panel of an XL Reptibreeze, maybe the front panel too. I’ll be psyched if my results are even close to yours. The vinyl is supposed to be here Tuesday.

Cool, for the most part it is just like rescreening the panel. Get the frame as centered as you can under the vinyl. Clip the center of one long side then work your way to the ends keeping it tight as you go. Flip to the opposite side and work center out. Then do the same for the short ends. I've only done one panel on one of my xl's and did that one with no clips (first panel as a trial run lol). Needless to say it's not tight like one would like it to be haha.
 
Thanks for the tips. I’ll be doing the rear and a side panel of an XL Reptibreeze, maybe the front panel too. I’ll be psyched if my results are even close to yours. The vinyl is supposed to be here Tuesday.

How's the marine grade look for clarity?
 
How's the marine grade look for clarity?

It was delivered last night and I haven’t had a chance to unpack it yet. I’ll post pics when I do. I ordered on a whim from a random site called marinevinylfabric.com, so hopefully it’s decent quality.
 
It was delivered last night and I haven’t had a chance to unpack it yet. I’ll post pics when I do. I ordered on a whim from a random site called marinevinylfabric.com, so hopefully it’s decent quality.

Think that is the site I had looked at too. Was it ~$7 a yard plus shipping?
 
Order details are below. I chose it to be packaged in a roll, which is a more expensive shipping option.

3x Clear Marine Vinyl - Flexa® - By The Yard / 20 Gauge: 54" for $6.75 each
Subtotal : $20.25 USD

Shipping : $16.00 USD

Total : $36.25 USD
 
Order details are below. I chose it to be packaged in a roll, which is a more expensive shipping option.

3x Clear Marine Vinyl - Flexa® - By The Yard / 20 Gauge: 54" for $6.75 each
Subtotal : $20.25 USD

Shipping : $16.00 USD

Total : $36.25 USD

Yeah, that's the site I spent most of my time looking around at before grabbing the table cloth/ furniture cover stuff from hobby lobby.
 
I cracked open the roll to take a peak. They did a great job packing it so I don’t expect to see any scratches or damage when I get around to unrolling it all. Shipping charge is justified.

The vinyl looks fantastic! Very clear! Hopefully I can attach it to my frames without issue. A12FF70F-C63E-4ACE-BEE5-1E6D1053FAD6.jpeg 358DB0CF-76E4-46FE-9885-3B2046EDAA80.jpeg
 
I cracked open the roll to take a peak. They did a great job packing it so I don’t expect to see any scratches or damage when I get around to unrolling it all. Shipping charge is justified.

The vinyl looks fantastic! Very clear! Hopefully I can attach it to my frames without issue.View attachment 219719View attachment 219720

Damn!!! Now that is front door worthy vinyl! Definitely better quality then the hobbly lobby stuff when it comes to clarity for sure.
 
Just finished the front door panel and am very pleased. I’m a bit of a DIYer but have never rescreened anything in my life, so I’m sure most of you could complete this project as well.

A few notes: I planned on using new spline but the .140 spline I purchased at Home Depot was too small. I ended up reusing the reptibreeze spline and it was just fine. This was done on a Reptibreeze XL (2x2x4). I followed @dshuld ‘s instructions and clipped the vinyl to the frame using medium binder clips from Office Depot, then installed the spline from the center out, starting with the long sides. The panel took just under an hour to fully complete. The next side I do will most certainly be quicker. The biggest issue I encountered on the whole project was stripping one of the door hinge screws upon reassembly, so be extra cautious.

Props to @dshuld!
 

Attachments

  • 55F3D33A-F69F-4A99-A751-116E21DC3D12.jpeg
    55F3D33A-F69F-4A99-A751-116E21DC3D12.jpeg
    624.9 KB · Views: 76
  • 5BBE743C-7345-4E41-A36E-C3061D477A64.jpeg
    5BBE743C-7345-4E41-A36E-C3061D477A64.jpeg
    455.3 KB · Views: 84
  • 39217456-4212-4191-A09B-A9396929D1A2.jpeg
    39217456-4212-4191-A09B-A9396929D1A2.jpeg
    636 KB · Views: 94
  • 816AF2E1-ECBD-4EE6-BAFD-8B035E7AF80E.jpeg
    816AF2E1-ECBD-4EE6-BAFD-8B035E7AF80E.jpeg
    437.9 KB · Views: 79
  • 313C38E9-5535-48DB-8747-A3FD3A36C4C1.jpeg
    313C38E9-5535-48DB-8747-A3FD3A36C4C1.jpeg
    363.7 KB · Views: 85
  • 66E27046-DFAF-4DE1-A537-C83035340308.jpeg
    66E27046-DFAF-4DE1-A537-C83035340308.jpeg
    223.6 KB · Views: 79
Just finished the front door panel and am very pleased. I’m a bit of a DIYer but have never rescreened anything in my life, so I’m sure most of you could complete this project as well.

A few notes: I planned on using new spline but the .140 spline I purchased at Home Depot was too small. I ended up reusing the reptibreeze spline and it was just fine. This was done on a Reptibreeze XL (2x2x4). I followed @dshuld ‘s instructions and clipped the vinyl to the frame using medium binder clips from Office Depot, then installed the spline from the center out, starting with the long sides. The panel took just under an hour to fully complete. The next side I do will most certainly be quicker. The biggest issue I encountered on the whole project was stripping one of the door hinge screws upon reassembly, so be extra cautious.

Props to @dshuld!

That came out looking great!! Love the clarity compared to the table cloth type stuff from hobby lobby. I reused most of my spline too but one panel did need to be replaced. .160 worked perfectly for it. Sorry, I forgot about the spline size if needing to replace it :(.
 
Just finished the front door panel and am very pleased. I’m a bit of a DIYer but have never rescreened anything in my life, so I’m sure most of you could complete this project as well.

A few notes: I planned on using new spline but the .140 spline I purchased at Home Depot was too small. I ended up reusing the reptibreeze spline and it was just fine. This was done on a Reptibreeze XL (2x2x4). I followed @dshuld ‘s instructions and clipped the vinyl to the frame using medium binder clips from Office Depot, then installed the spline from the center out, starting with the long sides. The panel took just under an hour to fully complete. The next side I do will most certainly be quicker. The biggest issue I encountered on the whole project was stripping one of the door hinge screws upon reassembly, so be extra cautious.

Props to @dshuld!
Amazing! That sure beats the cost of a clearside DragonStrand, with more airflow, as well!
 
Back
Top Bottom