Cleaning Mistking Reservoir?

nickb

New Member
Suggestions? I've been steam cleaning it thoroughly every week but does the tubing gather any bacteria? And is there any way to keep it bacteria free really? There's an aquarium heater in it so I imagine the heat would generate bacteria. I don't put too much water in at a time (about half way) so that fresh water is going in there every 2-3 days.


Also, any nice ways you clean your dripping systems as well? Preferably without soap (vinegar? not sure about smell :confused:)

I think my steam cleaner would melt the little dripper, plastic is too thin.


Thanks in advance ;)
 
Mistking Nozzle screen and supply bucket cleaning

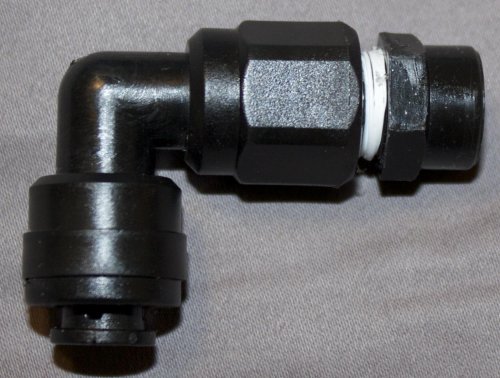
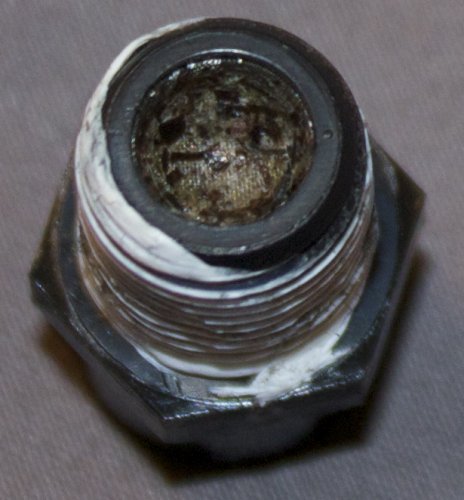
I've noticed that small debris can get into the supply tank and gets caught in the screens in the nozzles.

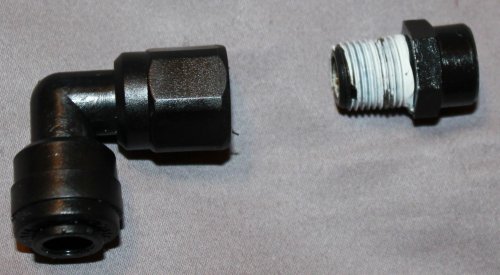
Unscrew the nozzle tip from the spray head.

nz1.jpg
nz3.jpg
Turn over the nozzle tip and remove the screen using a needle to gently lift it out
nz2.jpg

I use a hand sprayer set to stream and I direct a stream of water to back-flush out the screen. Place the screen back into the nozzle and screw the nozzle back on. The white stuff on the threads is pipe sealing tape and you can get it at any hardware store or home-improvement store if needed.

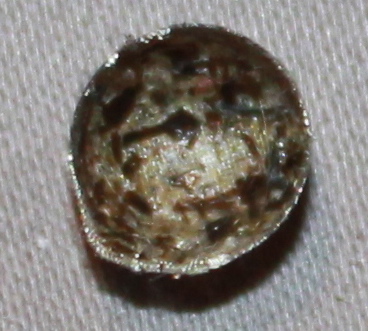
The screen below was used for 1 year before cleaning. I'm now going to be cleaning them monthly. I also run the pump with the nozzle removed to flush out the line on each of my spray heads.

I do detach my bucket and sanitize it with bleach on a monthly basis. I don't know if that is safe for the pump. I only use about a 2% bleach solution and I rinse very well.
 

Attachments

  • mkscreen.JPG
    mkscreen.JPG
    79.2 KB · Views: 180
Ewwwwww.

Put that on my to do list for today. Gave the rest of it a thorough clean but didn't realise this was in the nozzle!

Thanks ;)
 
Ewwwwww.

Put that on my to do list for today. Gave the rest of it a thorough clean but didn't realise this was in the nozzle!

Thanks ;)

Pretty gross huh. I'm going to put together a little video on you-tube and link it to a posting so others can clean them out too.
 
YUCK! One of the reasons I hated to put my nozzle in th very back right. It is hard to get to.
 
Pretty gross huh. I'm going to put together a little video on you-tube and link it to a posting so others can clean them out too.

That'd be good actually coz I just tried to unscrew the nozzle and it wouldn't budge??? Are all the nozzles the same or does the starter system (which I have) have a nozzle which doesn't come off??
 
That'd be good actually coz I just tried to unscrew the nozzle and it wouldn't budge??? Are all the nozzles the same or does the starter system (which I have) have a nozzle which doesn't come off??

Both the premium spray heads and value line have removable nozzles.

You can order replacement nozzles on the Mistking website for 3.25 each and they come with a new screen

As far as I can tell there is only one type of nozzle for both the value and premium spray heads.
 
Helps if u use the right tools! Lol

Got it off.

Filter rather ick!!!

1c7cc06412aeb0b9cd1e950022c8f76f.jpg


Will get that cleaned now! And regularly afterwards!!
 
Last edited:
All nice and clean now, using anti bac viv cleaner and hot water, then thoroughly rinsed:

f8540b01bd66d09d326689b0ac71eb07.jpg


Wish I'd known about these sooner!

I'll be cleaning it regularly from now on!!

To think of the bacteria build up in there.

I could puke!

I wonder if its had anything to do with his eye issues!!!!
 
So how did you get it off? Is it just the tip? Dd you have to take the whole thing out to get it off?
 
So how did you get it off? Is it just the tip? Dd you have to take the whole thing out to get it off?

I ended up having to use a pair of pliers and a 13ml socket as spanner was just chewing up the plastic. Yes it is just the end part that comes off. I took the whole valve head out to clean it. If you push this black part back in on itself, the valve head will come out:

mistkingvalve_zps7c180576.jpg


Have a look at David's pics above. They'll show you the part of the nozzle that comes off, then like he says, use a pin to carefully take the filter out to clean ;)

Hope that makes sense ;)
 
Gotcha....I think :eek:. I am such a visual person so the picture helped. I was thinking you might have to unscrew the whole thing from the bulkhead. The bad thing is I can't get to the back of Waldo's cage where the mister is to be able to take it off. I think this needs two hands and I can barley get one arm in the back standing in a step stool. Probably better for me to just unscrew it from the bulkhead and take the whole misting head down. Thinking of doing this once a month so I have some time being I just set it u this weekend :)

Thanks for the pictures.
 
You can get the screens super cheap from any hardware store. Something like a couple hundred for a few bucks. Smoke shops also have them...
 
Hello,

Finally someone who managed to open the nozzle head. I cannot figure it out. I used two pliers and ruined my nozzle.

8681832877_65015201b7_b.jpg


Almost completely ruined it. Can someone please tell me how to open that thing? I don't get why its so tight.

thanks,

V

I've noticed that small debris can get into the supply tank and gets caught in the screens in the nozzles.

Unscrew the nozzle tip from the spray head.

View attachment 71882
View attachment 71884
Turn over the nozzle tip and remove the screen using a needle to gently lift it out
View attachment 71883

I use a hand sprayer set to stream and I direct a stream of water to back-flush out the screen. Place the screen back into the nozzle and screw the nozzle back on. The white stuff on the threads is pipe sealing tape and you can get it at any hardware store or home-improvement store if needed.

The screen below was used for 1 year before cleaning. I'm now going to be cleaning them monthly. I also run the pump with the nozzle removed to flush out the line on each of my spray heads.

I do detach my bucket and sanitize it with bleach on a monthly basis. I don't know if that is safe for the pump. I only use about a 2% bleach solution and I rinse very well.
 
As you've found out, pliers are not the best tool for the job.
Disassembly is much easier with wrenches.

For your now mangled-looking nozzle, your best bet would be able to disassemble it using 2 pairs of locking pliers (aka Visegrip pliers).
It should still be usable--just not as pretty ;)

Normally, for disassembly you will use 2 wrenches:

A 9/16" (or14mm) wrench for black plastic bodied nozzles
OR a 13mm wrench for silver metal bodied nozzles

AND

A 1/2" wrench for the nozzle tip

With the nozzle pinhole opening facing up, slide the 13mm or 9/16"(14mm) wrench onto the hexagonal main body of the nozzle
Next, slide the 1/2" wrench onto the hexagonal tip of the nozzle.
Holding the 13mm or 9/16"(14mm) wrench firmly, twist the 1/2" wrench counterclockwise and it will unscrew fully with repeated turns of the wrench.

They're initially tight, probably to prevent leakage.
 
The question I have is, why do you not have a filter on the part that is in the tank itself so you do not have to take apart the nozzles? I just used a small piece of hose and put a filter on a fitting inside my reservoir and now I do not have to worry.
 
Exactly what filter do you use, Video Master?
How often would you replace the filter?

I've considered using a filter in the past, but wondered if it would create a strain on the pump.
In areas with "hard" water, you eventually need to clean the screens, anyway, as the filter will not prevent mineral deposits from forming.
It is so simple to clean the nozzles that I haven't bothered researching further.
 
Thanks. I used a wrench and a pair of vise grip pliers to pry it open. Wow! It was tight. I even bought a husky socket set.

5b17d002-9756-483f-91ae-ce879203c43f_300.jpg


But darn thing is absolutely useless to open. It was useful to tighten afterwards.

But I replaced the nozzle head with a brand new spare.

8684434827_cb4eed70ef_b.jpg


8684435161_1920a6522a_b.jpg


8684382053_d4992942fa_b.jpg


But so annoying though. The nozzle looks like crap now. Still have to test it out, but I am sure it should be functionally in good condition.

A bit of history, this is why I went to all this trouble:

http://youtu.be/LKoIuuT_kmM

You can see the nozzle with the problem.

thanks again for the description and detailed help. :)

V

As you've found out, pliers are not the best tool for the job.
Disassembly is much easier with wrenches.

For your now mangled-looking nozzle, your best bet would be able to disassemble it using 2 pairs of locking pliers (aka Visegrip pliers).
It should still be usable--just not as pretty ;)

Normally, for disassembly you will use 2 wrenches:

A 9/16" (or14mm) wrench for black plastic bodied nozzles
OR a 13mm wrench for silver metal bodied nozzles

AND

A 1/2" wrench for the nozzle tip

With the nozzle pinhole opening facing up, slide the 13mm or 9/16"(14mm) wrench onto the hexagonal main body of the nozzle
Next, slide the 1/2" wrench onto the hexagonal tip of the nozzle.
Holding the 13mm or 9/16"(14mm) wrench firmly, twist the 1/2" wrench counterclockwise and it will unscrew fully with repeated turns of the wrench.

They're initially tight, probably to prevent leakage.
 
Back
Top Bottom