After doing tons of research I started looking into all the specs for getting my enclosure ready, and starting ordering and preparing. Here's some details...
1. Plants.
I'm not known to have a green thumb, but I am determined to keep live plants live and happy in my enclosure to help with humidity, keeping water droplets, shade, etc. I also grew up with lots of live plants around the house and so this has always been a goal of mine anyways! I read that people recommend using organic soil because it is safer for a chameleon in case he eats a little bit (even if you use rocks to cover it), but I never had any experience with it. I also never had any experience with any of these house plants that are safe for chameleons, except for spider plants.
Anyways, my first medium-large pot ended up with mostly organic soil...I had to use regular potting soil at the bottom to make sure it filled up. I thought it was a great start. I gave it a good first watering, watched it a few days and would water it when the soil looked really dry on top. However, the water seemed to drain out of it REALLY fast compared to other pots I've had. This was issue number one, it just didn't seem to hold water correctly and I was concerned about my plants not getting enough water. Naturally I watered it a bit more, but because it just kept draining out I ended up with puddles of water. Problem number two was the deal breaker though. Organic soil smells like pure manure. The water that drained from this plant smelled even worse...like twice baked rotten manure excreted from a sickly animal. It was RATCHET! Not only was there NO way in hell I was keeping this smelly thing in my bedroom, but I highly doubt that any animal wants that in their enclosure.
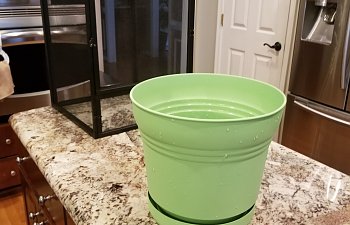
I'm sure I did a few things wrong with the organic soil, probably watered it too much or the mix of regular potting soil and organic. Whatever it was, that pot had to go. Round two here we go! Those original plants I got were pretty small and would take time to grow, so I went back to the nursery to get some larger ones anyway. I potted everything in just regular potting soil this time. The original pot that had the organic soil in it smelled so bad even after washing it with a very strong bleach mix so I had to recycle that pot. (see picture of plastic green pot next to the reptibreeze enclosure)
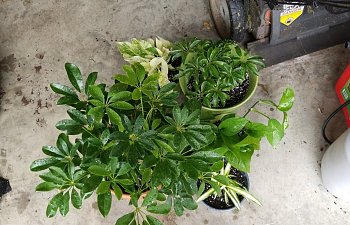
I've also included a picture of my newly potted plants all bunched together. Not all of them will end up in the enclosure. Some will be outside for free range time, or when I'm cleaning the enclosure. The croton plant was the only one that didn't make it and died somewhere in this process. For now I've got individually potted: one small umbrella, one medium umbrella, one baby spider plant, one small pothos that has some vines growing out, and one small golden pothos.
2. Enclosure.
I wanted desperately to find a discounted enclosure since these things can run expensive. I have the skills to make one myself, but for the timing right now I decided to buy one suited for my small fella and then maybe I'll build a DIY enclosure for when he gets bigger. I really lucked up and found one on Facebook marketplace for a very nice price. The obvious downside to this was having to THOROUGHLY clean this sucker. Not only had this owner kept the cage gross, but they had also put hot glue around the entire bottom of the enclosure to keep feeders from escaping. I totally understand that concern...however the bottom opening to the front of the enclosure couldn't open at all because this person didn't really think it through and just put hot glue everywhere! Maybe I'm crazy, but I took the time to dig out all of this old hot glue without damaging the enclosure, which took several hours and TONS of patience. SO glad I did it though because there were actually worms and crickets (alive and dead) still under parts of the hot glue.
First I did a rough scrub down with super soapy water and a hose outside. I used a heavy duty scrub brush to get most of the gunk out, and the soapy water all over the place. Everywhere I could. Next I basically filled my bathtub with a bleach mixture just deep enough to soak one side of the enclosure at a time. I let each side soak for about 15 minutes and then I'd rotate it. After the soaking I went back in with my heavy duty scrub brushes... various sizes...and made sure to get every nook and cranny. I rinsed the enclosure afterwards by leaving it directly under the shower running for quite a while, and rotating it every which angle I could. I let the enclosure dry completely on some paper towels for days.
Also, I decided I was going to have to ditch the bottom piece of the enclosure because it wasn't worth trying to salvage. Instead I bought some mesh material on amazon that isn't wire, it's more rubbery, but I'll be using that.
3. Decorations and lights.
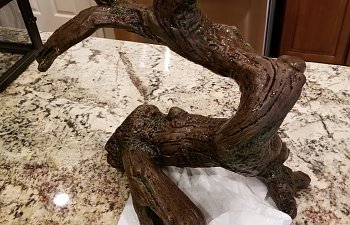
The same person that sold me the enclosure gave me a few fake leafy vines, one fake climbing vine (no leaves), a fake tree limb looking thing (see picture), and a few light fixtures. All of the vines and tree limb things I soaked in bleach and scrubbed thoroughly as well. Again, SO glad I did this. The fake tree limb looking thing ended up having some odd holes in it here and there which I thought was just weird...but maybe there's a reason for this? Anyways, not until I dunked the thing in bleach did I see a few worms come out of the holes that were still alive. In any case, the concept that those had been in there made me think, "what the hell else is in there?" I trashed that thing. It didn't seem worth anything to me or my future chameleon. The fake leafy vines and the one fake vine will come in handy though!
The light fixtures...oh dear lord... They did give me everything they had, so I gladly took them, because why not? This person did not have a linear UVB bulb fixture, so I ordered one of those on my own. They had one of the double dome fixtures as well as another single bulb holder. They told me what bulbs were in it, but I didn't care I threw them out and was starting from fresh anyways.
I did order a T8 fixture and it seems like on the forums people prefer the T5 fixtures. I also order just a regular 5.0 UVB bulb but some people seem adamant on 5.0 HO or 10.0 or 10.0 HO bulbs AND T5 fixtures... I think this is something I'm just going to have to do more research on as I upgrade. From what I can tell, as long as I have the linear 5.0 bulb (24'' btw), that should be enough especially for my small enclosure for now. *If anyone truly thinks otherwise and thinks I'm going in endanger my chameleon, please shoot me a message or reach out.*
I did end up going to purchase things like fake bamboo sticks, extra vines, coated wire for attaching things in the enclosure, extra fake leafy vines, etc. These were all bought at nurseries I got plants at, craft stores, or the home improvement stores.
4. Misting and Automated Systems.
I am usually a fairly busy person, working professional and all. Therefore, I wanted to automate as much as possible to make sure my chameleon gets used to a somewhat regular routine. This just seems like a no-brainer. Automating the lighting and the misting means that the chameleon can have his space and I can have mine. Less stress for both of us. Obviously this also helps tremendously if I need to go out of town as well.
Anyways, I did go ahead and order a Mistking starter system. I understand why people are drawn to the monsoon and the reptirain systems. However, with all the reviews of them breaking down with a few months of usage, you're just going to end up spending more money in the long run. Not to mention, the added stress on you and your chameleon when it breaks and you all the sudden have to replace the thing. For me, Mistking was the way to go FOR SURE. The the one pain-in-the-ass aspect is the hole for your reservoir, but overall still worth it. I didn't have the right size drill bit, nor did my dad, and I went out and bought it ($15), and so this ONE hole in a bucket was a very expensive hole. Again, still very much worth it.
At the store I bought a few timers for the lights too.
5. Support and Structure.
I wanted a good place to put all of this, especially considering height for a chameleon. I bought a plastic shelving system at a home improvement store (much like you'd see in someone's garage) that has holes all in it. This will be a part of my draining system. (pics to come later) It was actually very cheap and it's very sturdy for the needs of this enclosure and so it was a perfect fit. If you do this, definitely check dimensions for the right width and depth.
Also another big point on these plastic shelves is that even though they do have holes in them, it isn't enough for my drainage system. I need to drill more holes, or even cut out pieces of one of the shelves to provide proper drainage.
6. Food, Feeders, and Miscellaneous.
The person I bought the used enclosure from also gave me a small cricket cage and a few things to feed crickets with.
I ordered a bundle of cardboard egg cartons on amazon. I bought a plastic container of my own that I plan to keep crickets in.
Also, I have several large plastic containers from years of moving that can be cleaned and used for various purposes (drainage, storage, crickets, etc.), but I also bought a few that were more fitting for the purposes of a chameleon setup.
I promise to post pics as soon as I get my setup all done as well as my own new little guy!
Until next time,
Allie
1. Plants.
I'm not known to have a green thumb, but I am determined to keep live plants live and happy in my enclosure to help with humidity, keeping water droplets, shade, etc. I also grew up with lots of live plants around the house and so this has always been a goal of mine anyways! I read that people recommend using organic soil because it is safer for a chameleon in case he eats a little bit (even if you use rocks to cover it), but I never had any experience with it. I also never had any experience with any of these house plants that are safe for chameleons, except for spider plants.
Anyways, my first medium-large pot ended up with mostly organic soil...I had to use regular potting soil at the bottom to make sure it filled up. I thought it was a great start. I gave it a good first watering, watched it a few days and would water it when the soil looked really dry on top. However, the water seemed to drain out of it REALLY fast compared to other pots I've had. This was issue number one, it just didn't seem to hold water correctly and I was concerned about my plants not getting enough water. Naturally I watered it a bit more, but because it just kept draining out I ended up with puddles of water. Problem number two was the deal breaker though. Organic soil smells like pure manure. The water that drained from this plant smelled even worse...like twice baked rotten manure excreted from a sickly animal. It was RATCHET! Not only was there NO way in hell I was keeping this smelly thing in my bedroom, but I highly doubt that any animal wants that in their enclosure.
I'm sure I did a few things wrong with the organic soil, probably watered it too much or the mix of regular potting soil and organic. Whatever it was, that pot had to go. Round two here we go! Those original plants I got were pretty small and would take time to grow, so I went back to the nursery to get some larger ones anyway. I potted everything in just regular potting soil this time. The original pot that had the organic soil in it smelled so bad even after washing it with a very strong bleach mix so I had to recycle that pot. (see picture of plastic green pot next to the reptibreeze enclosure)
I've also included a picture of my newly potted plants all bunched together. Not all of them will end up in the enclosure. Some will be outside for free range time, or when I'm cleaning the enclosure. The croton plant was the only one that didn't make it and died somewhere in this process. For now I've got individually potted: one small umbrella, one medium umbrella, one baby spider plant, one small pothos that has some vines growing out, and one small golden pothos.
2. Enclosure.
I wanted desperately to find a discounted enclosure since these things can run expensive. I have the skills to make one myself, but for the timing right now I decided to buy one suited for my small fella and then maybe I'll build a DIY enclosure for when he gets bigger. I really lucked up and found one on Facebook marketplace for a very nice price. The obvious downside to this was having to THOROUGHLY clean this sucker. Not only had this owner kept the cage gross, but they had also put hot glue around the entire bottom of the enclosure to keep feeders from escaping. I totally understand that concern...however the bottom opening to the front of the enclosure couldn't open at all because this person didn't really think it through and just put hot glue everywhere! Maybe I'm crazy, but I took the time to dig out all of this old hot glue without damaging the enclosure, which took several hours and TONS of patience. SO glad I did it though because there were actually worms and crickets (alive and dead) still under parts of the hot glue.
First I did a rough scrub down with super soapy water and a hose outside. I used a heavy duty scrub brush to get most of the gunk out, and the soapy water all over the place. Everywhere I could. Next I basically filled my bathtub with a bleach mixture just deep enough to soak one side of the enclosure at a time. I let each side soak for about 15 minutes and then I'd rotate it. After the soaking I went back in with my heavy duty scrub brushes... various sizes...and made sure to get every nook and cranny. I rinsed the enclosure afterwards by leaving it directly under the shower running for quite a while, and rotating it every which angle I could. I let the enclosure dry completely on some paper towels for days.
Also, I decided I was going to have to ditch the bottom piece of the enclosure because it wasn't worth trying to salvage. Instead I bought some mesh material on amazon that isn't wire, it's more rubbery, but I'll be using that.
3. Decorations and lights.
The same person that sold me the enclosure gave me a few fake leafy vines, one fake climbing vine (no leaves), a fake tree limb looking thing (see picture), and a few light fixtures. All of the vines and tree limb things I soaked in bleach and scrubbed thoroughly as well. Again, SO glad I did this. The fake tree limb looking thing ended up having some odd holes in it here and there which I thought was just weird...but maybe there's a reason for this? Anyways, not until I dunked the thing in bleach did I see a few worms come out of the holes that were still alive. In any case, the concept that those had been in there made me think, "what the hell else is in there?" I trashed that thing. It didn't seem worth anything to me or my future chameleon. The fake leafy vines and the one fake vine will come in handy though!
The light fixtures...oh dear lord... They did give me everything they had, so I gladly took them, because why not? This person did not have a linear UVB bulb fixture, so I ordered one of those on my own. They had one of the double dome fixtures as well as another single bulb holder. They told me what bulbs were in it, but I didn't care I threw them out and was starting from fresh anyways.
I did order a T8 fixture and it seems like on the forums people prefer the T5 fixtures. I also order just a regular 5.0 UVB bulb but some people seem adamant on 5.0 HO or 10.0 or 10.0 HO bulbs AND T5 fixtures... I think this is something I'm just going to have to do more research on as I upgrade. From what I can tell, as long as I have the linear 5.0 bulb (24'' btw), that should be enough especially for my small enclosure for now. *If anyone truly thinks otherwise and thinks I'm going in endanger my chameleon, please shoot me a message or reach out.*
I did end up going to purchase things like fake bamboo sticks, extra vines, coated wire for attaching things in the enclosure, extra fake leafy vines, etc. These were all bought at nurseries I got plants at, craft stores, or the home improvement stores.
4. Misting and Automated Systems.
I am usually a fairly busy person, working professional and all. Therefore, I wanted to automate as much as possible to make sure my chameleon gets used to a somewhat regular routine. This just seems like a no-brainer. Automating the lighting and the misting means that the chameleon can have his space and I can have mine. Less stress for both of us. Obviously this also helps tremendously if I need to go out of town as well.
Anyways, I did go ahead and order a Mistking starter system. I understand why people are drawn to the monsoon and the reptirain systems. However, with all the reviews of them breaking down with a few months of usage, you're just going to end up spending more money in the long run. Not to mention, the added stress on you and your chameleon when it breaks and you all the sudden have to replace the thing. For me, Mistking was the way to go FOR SURE. The the one pain-in-the-ass aspect is the hole for your reservoir, but overall still worth it. I didn't have the right size drill bit, nor did my dad, and I went out and bought it ($15), and so this ONE hole in a bucket was a very expensive hole. Again, still very much worth it.
At the store I bought a few timers for the lights too.
5. Support and Structure.
I wanted a good place to put all of this, especially considering height for a chameleon. I bought a plastic shelving system at a home improvement store (much like you'd see in someone's garage) that has holes all in it. This will be a part of my draining system. (pics to come later) It was actually very cheap and it's very sturdy for the needs of this enclosure and so it was a perfect fit. If you do this, definitely check dimensions for the right width and depth.
Also another big point on these plastic shelves is that even though they do have holes in them, it isn't enough for my drainage system. I need to drill more holes, or even cut out pieces of one of the shelves to provide proper drainage.
6. Food, Feeders, and Miscellaneous.
The person I bought the used enclosure from also gave me a small cricket cage and a few things to feed crickets with.
I ordered a bundle of cardboard egg cartons on amazon. I bought a plastic container of my own that I plan to keep crickets in.
Also, I have several large plastic containers from years of moving that can be cleaned and used for various purposes (drainage, storage, crickets, etc.), but I also bought a few that were more fitting for the purposes of a chameleon setup.
I promise to post pics as soon as I get my setup all done as well as my own new little guy!
Until next time,
Allie