Time for New Enclosure - Build thread!

mujino

Established Member
My panther is only 5 mo. but he’s started roaming his cage. When I open the door to feed him, he makes a mad dash for the frame of the door but then just hangs out. This has been going on for about 2 weeks. With the national aluminum screen shortage, the enclosure I wanted to get for him at 6 mo. is unavailable. I was expecting to have another month or two to upgrade, but I can’t stand the thought that he’s unhappy in his space.

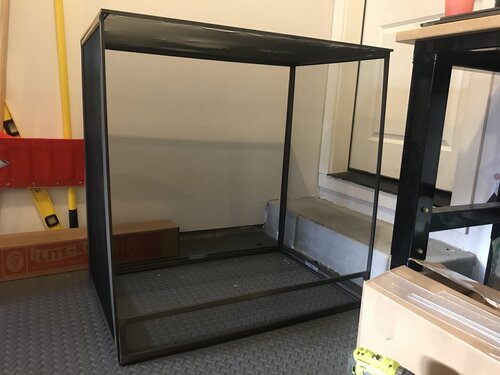
After seeing the amazing enclosures members have built themselves, I figured I’d give it a go! I bought some of the raw materials this week, like 5/8” screen frame, hinges, hardware. Still waiting for the aluminum screen to arrive. In the meantime, here’s the frame for his new enclosure! What do you all think?

36”x24”x36”
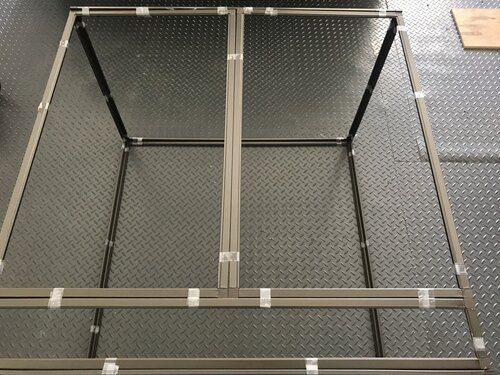
First pic is door side up.

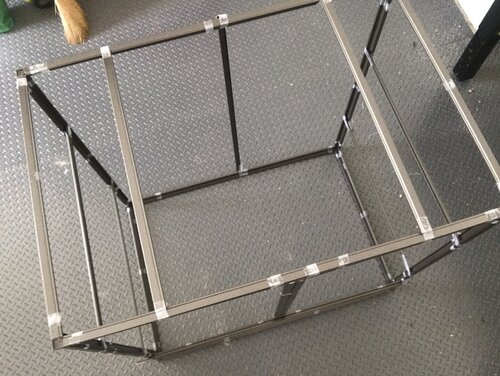
Second pic top side up, with the additional struts in place.
 

Attachments

  • 5C63E5F8-7C03-4BD8-820B-C0C6CBAA593F.jpeg
    5C63E5F8-7C03-4BD8-820B-C0C6CBAA593F.jpeg
    354.3 KB · Views: 109
  • B0A8E722-E563-473B-9716-F50B8DC2B0CC.jpeg
    B0A8E722-E563-473B-9716-F50B8DC2B0CC.jpeg
    323.9 KB · Views: 110
Looking pretty good! Can't wait to see it finished and kitted out with plants! I had an idea of doing this similar type frame with some screen kits as well. Hopefully everything goes good for ya ^_^
 
A way a few of those braces are set, it’s not gonna work if you try to screen them. Unless you have double grooved frame so you can cut individual screened rectangles for it. Also make sure not to pull the screen too tight as it will pull everything in and warp the panels. You’ll want to make sure that the screen lines are parallel and perpendicular with the direction of the framing
 
Update: So far, 3 of the 5 sides are screened. Looking pretty good. Thanks for the encouragement, @Mace and @Hydra_cosplay. I’ll post the next pics for you once the screen is complete. :)

Thanks for the advice, @JoshOfTheJungle! Sounds like you’ve done screening before. Good eye. I am only using single groove framing. The cross braces will be installed last. They are only taped in place for the pic so I can see where the ledges will go. They definitely were not kidding at the hardware store - aluminum screening is MUCH HARDER to work with than fiberglass! The first 36”x36” section took me about an hour because I was so nervous about screwing it up! It paid off...I think. The largest panel is only 1/4” shorter in the middle than the edges with minimal warping, which they said was pretty good for a first timer. Here’s hoping I can maintain the ratio :)
 
Medium Tall atrium to match it. New baby is wonderful. Thinks he runs the world lol

Do they still sell the Medium Tall? I was eyeballing it but cannot find a sale link. Unless you bought it a while ago...?
 
Do they still sell the Medium Tall? I was eyeballing it but cannot find a sale link. Unless you bought it a while ago...?
I got mine in January of 2019... I know he plans to produce this size again as well but he is doing everything in build cycles. You would want to email Bill via his website to get exacts on timing of certain builds. He keeps making changes to products as he gets the availability of things like the clearside material for doors. My Large atrium is a hybrid one so sides and back are the white pvb panels and the entire front is screen. So I totally took a part my medium one and added panels to match the Large. I am a bit picky on things matching lol. https://www.chameleonforums.com/media/albums/my-enclosures.6672/
 
Update #2! All aluminum screening is complete. I now know 1 good way to spline a screen, and even more ways not to. Then I did something that was either really smart or really dumb. Probably the latter. After cutting down the excess mesh, I made sure to run my finger over all of the edges/spline when I was done to catch any aluminum splinters or screen “needles”. I was thinking that if it hurt my finger, it would probably hurt my cham...so I figured I’d rather cut myself than him! And yeah...I found them alright. Having finished that part, then I attached the sides, top, and bottom panels. I’ve tried drilling into this kind of frame before, and I made sure to predrill all the screw holes. Then I had to redrill anyway when the holes on a side panel were misaligned by less than an 1/8”. Last visit to the hardware store I bought these nice black 3/4” screws to match the frame and it’s looking good so far.


Todo: Because the bottom is just the frame (not screened), I’ll have to add an aluminum or pvc sheet in as the cage floor. Next is the doors...the hinges I bought ended up having too much distance between the mounting holes. As a result the door alignment wasn’t going to work out. ...Back to Amazon. I found a lot of “metal” hinges that looked doable, but my main concerns were strength and weather related durability. Currently I’m waiting on new “marine grade” stainless steel hinges to be delivered later this week, then it’ll start to look like a real enclosure.
 

Attachments

  • D878B56B-A7BB-437D-9E50-7914ED85F3BA.jpeg
    D878B56B-A7BB-437D-9E50-7914ED85F3BA.jpeg
    177.6 KB · Views: 82
Great job! just don't forget to remove the left over tape pieces when you set up. I forgot to remove the labels on my dragon strand and it was no bueno trying to do it when it was set up lol.
 
Great job! just don't forget to remove the left over tape pieces when you set up. I forgot to remove the labels on my dragon strand and it was no bueno trying to do it when it was set up lol.
Lol. I still have the stickers on my reptibreeze because I'm too lazy to remove them X)
 
Update! Ledges are in and the doors on. The doors lock using magnet strips for cabinets and they hold on pretty strong. The bottom door even swings out and up just like the store bought cages. If you look closely you can see the doors don’t have handles yet - still waiting on USPS.

At this point, it’s ready for a background and to start filling in with branches. Now the fun begins :)
BDD94CF1-3BF7-46AD-B34A-4A2EFBA6969C.png
 
“We learn wisdom from failure much more than from success” -Samuel Smiles
Sadly, the frame didn’t hold up once I put the doors on and let it sit. The material I bought - 5/8” residential aluminum framing - simply isn’t weight bearing at these dimensions. It torqued and pulled a few of the screws out just by slowly leaning towards to doors, despite the “reinforcement” cross braces. Before scrapping it, I considered then building a wood frame to fit and bolt to the outside to try to salvage it...but given that it’s just “good money after bad” I think it’s best to just start over, with sturdier materials, and a better design.

Lessons learned:


  • Test material strength before building
  • Integration test your components before fully assembling
  • Still worth it
Damn sorry to hear man, like you said though we learn from our mistakes. Least you got a general frame structure in your mind for when you use stronger materials now. ? I'll be excited to see what you come up with!
 
Back
Top Bottom