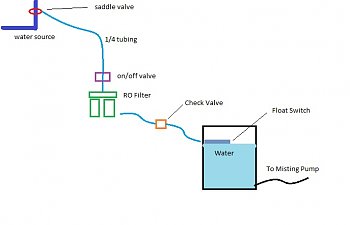
This includes routing thru a RO Filter
Shopping list @ www.purelyh2o.com
You should now have ro filtered water feeding your misting system and no longer need to fill that bucket manually!

Shopping list @ www.purelyh2o.com
- RO Filter - Hydro Maxx Nano 3 A low end filter that does some cleaning, which is better than nothing! But this item can be omitted if you choose.
- 1/4" John Guest Tubing - 20 ft. - the tubing needed to run from water line to 5 gal bucket/reservoir.
- Quick Connect Ball Valve 1/4"OD x 1/4"OD - safety 1st! always good to have a way to turn the water off by the reservoir.
- Saddle Valve - 1/4" Compression - this is used to tap into your waterline.
- Auto float upgrade kit - this will be installed in the misting reservoir.
- Find a cold water line close to your setup and use the saddle valve to tie into that water source. leave the saddle closed we don't want waterer coming out yet!
- Run the 1/2 tubing from the saddle valve to your misting bucket.
- Install the float top off valve into the bucket. This will require drilling and mounting the float into the bucket at the height you want the water to fill to. I suggest about a .25 down from the top.
- Run the tubing to the 5 gal bucket and put the shut off valve on the line so you can get to it. leave the valve in the open position for now.
- Then put some tubing in the out of the tubing 12 inches or so.
- Then put in the check valve that came with the top off kit. This will prevent water from coming out when the float provides any resistance (in the off position).
- Then from the check valve connect to the top off float you installed in the 5 gal bucket.
- Go back to the saddle valve and open it slightly slowly until water starts to fill the 5 gal bucket.
You should now have ro filtered water feeding your misting system and no longer need to fill that bucket manually!

