Custom Viv Thread

extrajordinary

Established Member
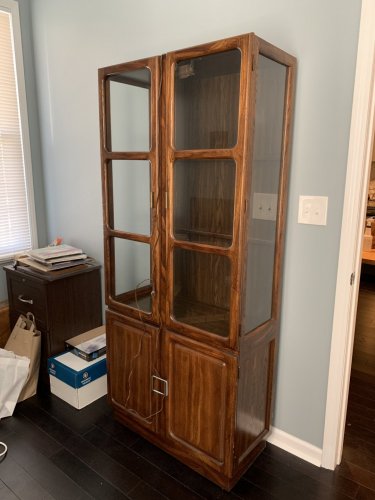
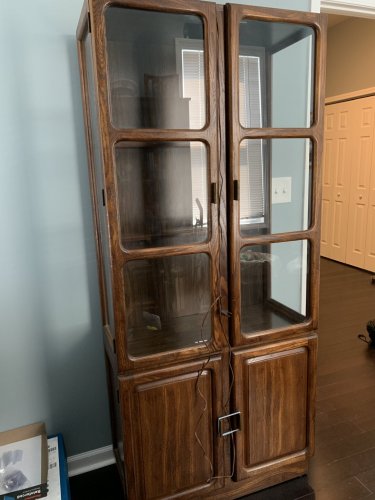
Just purchased this cabinet from FB Marketplace for $50. Going to repurpose it for Leo’s new, permanent home. Here’s the plan:
  • Take out the glass in the doors and replace with screen
  • Remove the top and replace with screen — this is where the lights will sit
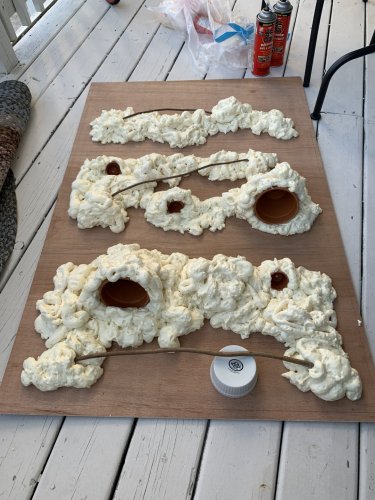
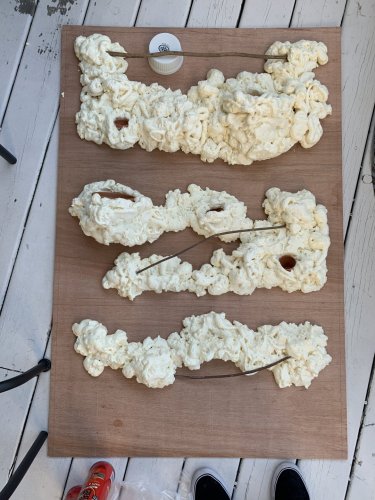
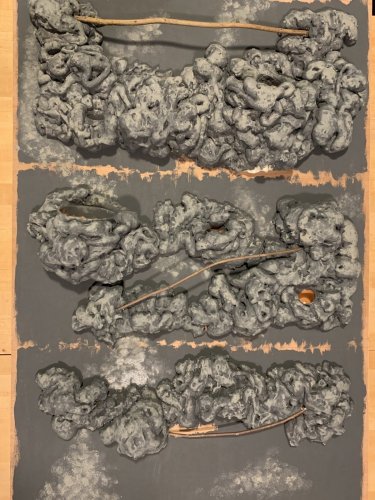
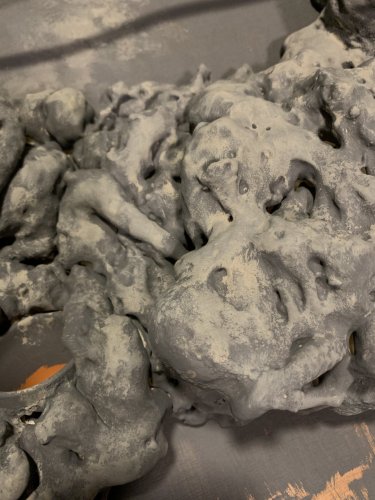
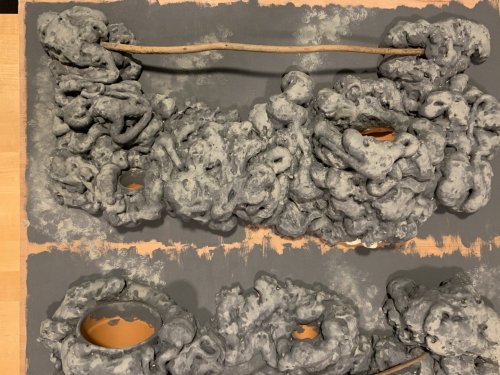
  • Remove the back (it’s stapled to the frame) and build a faux rock wall complete with branches and pots for a few plants then reattach
  • Seal the wood and the faux rock wall with Olympic Multi-surface Sealant
  • Cut a hole for a drain and PVC pipe in the bottom of the cage — there will be a bucket below for drainage
Questions I have:
  1. What kind of screen should I buy and how would you attach it?
  2. I’m looking to buy a MistKing. How and where would you set this up? I was thinking I’d put the reservoir and pump on the shelf below and then run a hose up to the top where the nozzle would be...but I’m still not well versed in how a MistKing functions.
  3. Would the Olympic Multi-surface Sealant be sufficient if I paint the faux rock wall with acrylic paint or will I need a different sealant?
 

Attachments

  • CBB74C2F-A3D6-48B2-AA84-3B6B55F4476E.jpeg
    CBB74C2F-A3D6-48B2-AA84-3B6B55F4476E.jpeg
    204.4 KB · Views: 196
  • 692B7EC8-7E21-4FAA-A0F1-F2BAC0B2A334.jpeg
    692B7EC8-7E21-4FAA-A0F1-F2BAC0B2A334.jpeg
    221.6 KB · Views: 187
You can use regular window screen which you could staple to the wood. Your pump and reservoir for the mistking could be setup in the cabinet below. You will have to drill a hole in the bottom rear of the cabinet for the lines and power cord to exit. Run the tubing up the back wall (on the outside) and drill two holes for the tubes. The mistking runs on a loop, from, and then back to the pump. You need to decide if you want to use one or two nozzles.
 
Thank you! That’s very helpful! Does the MistKing come with two nozzles?
The starter system comes with 1 nozzle, the hose, the pump, and some hose clips with screws to mount the hose to the enclosure. It is gravity fed so your water reservoir needs to sit above your pump.
 
The starter system comes with 1 nozzle, the hose, the pump, and some hose clips with screws to mount the hose to the enclosure. It is gravity fed so your water reservoir needs to sit above your pump.
So the reservoir would need to sit on the top of the cage? Or just above the pump? There's a shelf in the cabinet -- would it work to have the pump on the bottom shelf and the reservoir on the top shelf?

Also, how would I cover up the edges of the screen once it's been stapled in? The glass panes were held in with strips of rubber. Would that suffice?

So for the misting system your doing something like this. reservoir above it on a shelf. tube goes from reservoir in flow on pump then tube goes from outflow on pump to your first or only nozzle. IF you are using more then one nozzle be sure your first nozzle is a T shaped assembly and then it flows to the last nozzle that comes in the kit which is an L shaped assembly.
IMG_2587.jpg
 
So for the misting system your doing something like this. reservoir above it on a shelf. tube goes from reservoir in flow on pump then tube goes from outflow on pump to your first or only nozzle. IF you are using more then one nozzle be sure your first nozzle is a T shaped assembly and then it flows to the last nozzle that comes in the kit which is an L shaped assembly.
View attachment 229807
Thank you! I’m very much a visual learner so photos help!
 
Update on custom build:
  • The glass panels in the doors have been removed and we bought aluminum window screen in charcoal to attach where the glass was
  • The top has been removed and we have plenty of aluminum window screen to cover the top as well
  • The plywood panel for the back of the enclosure has been cut and measured -- the next step here is to use the Great Stuff to attach some pots and branches to the back panel
For aesthetic purposes, I think I'm going to paint the Great Stuff (once it's dry) with a layer of gray or brown paint before spraying some of the Krylon Stone Fine Texture spray paint in Pebble on top. Then I'll seal everything with the Olympic Multi-surface Sealant. What my boyfriend and I are trying to figure out now is how to attach pots using the Great Stuff. So here are my current questions:
  1. Does the Great Stuff attach to itself once it's dried? So if I spray some of it and let it dry, can I spray more on top later and it'll attach?
  2. How have you guys attached pots and branches to the back of your enclosure using Great Stuff?
 
Thank you! This is helpful. I'm still a bit unsure how to get the pots to stay still while spraying Great Stuff though. Unless...I suppose I could spray some foam, stick them on that, then spray around them...
 
I dunno about this working... But if you use the pot in a pot method... Attach wood blocks to your frame. Then screw in the pots to the blocks So it would pull out from the wall. Spray in your great stuff around them and then you should be able to drop in the potted plant in the same pot.
I suppose you could even do different sized blocks from the wall to create different distances from the wall.

I see it in my head kinda hard to explain lol

I would imagine you would need to seal the wood first prior to applying great stuff but I am just guessing there lol.

Yeah, I think I see what you mean! Using the wood as "spacers" to pull the pots away from the walls at varying distances to create more depth/texture, right? I plan on doing something similar, but using layers of foam as spacers (kinda hard to drill wood into a glass terrarium haah!).
 
Yeah, I think I see what you mean! Using the wood as "spacers" to pull the pots away from the walls at varying distances to create more depth/texture, right? I plan on doing something similar, but using layers of foam as spacers (kinda hard to drill wood into a glass terrarium haah!).
Yes exactly! Thank you for being my brain today and interpreting what I meant in real sentences! :hilarious:
 
Began the faux rock wall this afternoon! There’s three tiny pots for air plants and two medium pots for some pothos that I’m hoping will grow down the wall eventually. Here’s a view from the top and the bottom. These aren’t the only branches. The remaining branches just have to be added after we attach the plywood to the cabinet because of the structure of the cabinet. Also, here’s a photo of Leo all fired up. He’s been doing this periodically as of late. I assume it’s because he’s 9-10 months old now.
 

Attachments

  • EBE8465B-9459-4D84-A8AF-A7D2ED0BB386.jpeg
    EBE8465B-9459-4D84-A8AF-A7D2ED0BB386.jpeg
    315.4 KB · Views: 185
  • 9DD79C58-B804-454E-844D-8674D2EC1609.jpeg
    9DD79C58-B804-454E-844D-8674D2EC1609.jpeg
    317.8 KB · Views: 193
  • 1B7B2844-00EC-4179-91C9-7DA64D5846CA.jpeg
    1B7B2844-00EC-4179-91C9-7DA64D5846CA.jpeg
    315.3 KB · Views: 197
First layers of paint are on the faux rock wall! My latest question: are fake plants from Michael’s okay? I will be buying live plants but I wanted to add some fake ones too and Michael’s has a larger variety than pet stores...
 

Attachments

  • A3BB6350-1DF3-4859-AFA0-119FAAD49855.jpeg
    A3BB6350-1DF3-4859-AFA0-119FAAD49855.jpeg
    327.2 KB · Views: 207
  • 6B58EE20-FCD9-4B5B-835D-B571E4E917FD.jpeg
    6B58EE20-FCD9-4B5B-835D-B571E4E917FD.jpeg
    255.7 KB · Views: 198
  • DBA62C4A-328A-4AF5-BA41-DBD5DCE872E1.jpeg
    DBA62C4A-328A-4AF5-BA41-DBD5DCE872E1.jpeg
    324.7 KB · Views: 171
Began the faux rock wall this afternoon! There’s three tiny pots for air plants and two medium pots for some pothos that I’m hoping will grow down the wall eventually. Here’s a view from the top and the bottom. These aren’t the only branches. The remaining branches just have to be added after we attach the plywood to the cabinet because of the structure of the cabinet. Also, here’s a photo of Leo all fired up. He’s been doing this periodically as of late. I assume it’s because he’s 9-10 months old now.

Nice!! I was following your thread because I too am interested in building a custom habitat. When you mentioned building the wall my mind started running boy! Lol and this is exactly what I imagined!! But I have never built a wall with cliffs like this, what is that opaque substance you used to create the ledges?? Holding the pots in place.
 
Back
Top Bottom