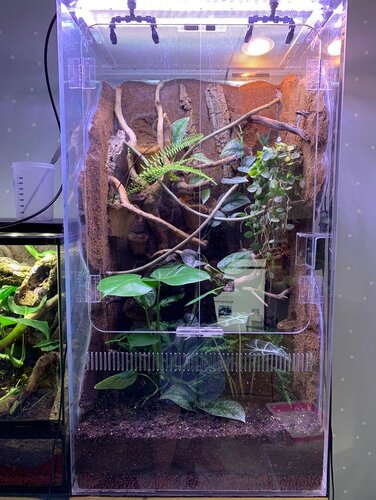
Bio active enclosure for panther

Mark

Member
Hello, Im looking to build my first bio active enclosure for my future panther chameleon. I was wondering if anyone could give a list of their favorite things to use
(cuc, substrate/substrate mix, plants, drainage layer, lights, etc.
Any suggestions will help a ton and I will really appreciate feedback.
 
Hi there! I dont have a lot of time to respond right now, but I'll do what I can. Feel free to ask more specific questions, and I'll elaborate to the best of my ability.

So, here's a rough breakdown of my substrate and drainage layers, with PVC pipe drainage access. I ended up using screen between the substrate and drainage.

20190410_032715.jpg


Picture of the access pipe, offset about an inch off the glass, which makes it virtually invisible once substrate is added:

20190911_110522.jpg


With soil:

20190911_173342.jpg


Soil: Substrate wise, I ended up primarily using ProMix HP (equivalent to Sunshine Mix #4) with some orchid mix stirred in. It has excellent drainage, but retains just enough water to keep things evenly moist without overwhelming my plants.

CuC: Running dwarf white isopods, red wiggler compost worms, black soldier fly larvae, and detritus milipedes in my ExoTerra build, and the same but with dalmatians in my ReptiBreeze.

Lights: I'm running 2 HLG 65 quantum boards on my 36x18x36 ExoTerra, and 2 T5HO 6500k SunBlasters on my 16x16x30 ReptiBreeze. I absolutely adore my HLG 65's but they're extremely bright and run a tad hot, and I needed to suspend them 8" off the screen to avoid burning plants (and reptiles!) when the enclosure was in a room with an ambient temperature of 72F. The SunBlasters aren't anything special, but they're doing alright for low/moderate light plants.

Plants: I dont think I actually have 1 favorite plant! I'd have to think on that more, haha!

ExoTerra 36x18x36, ~4 months old:

20200103_095853.jpg
 
For the pvc drainage does it stick through the substrate or how far up does it go

The PVC drainage access pipe goes all the way through the substrate so that I can get a siphon through it when the drainage layer needs water suctioned out (every 2 weeks for me on average). The exit point is covered by a PVC end cap, and is about an inch off of the substrate. I hide it with a piece of moss in the ExoTerra build, and some bark pieces in the ReptiBreeze.

20200105_204225.jpg


20200105_204251.jpg


20200105_204301.jpg
 
Oh I see so you siphon the excess water through the top and don’t let it drain out. Correct?
 
I’m new to this as well. Been on here for guidance building my wife’s nosy be a vivarium from an old entertainment center armoire whatchamacallit we found on Craigslist.

Here is my thread:

https://www.chameleonforums.com/threads/ive-just-become-a-chameleon-step-dad.172710/

I also came across this one and pulled ideas from it. @Brodybreaux25 also chimed in with some sage advice on mine.

https://www.chameleonforums.com/threads/bioactive-mentor.167174/

I incorporated a shower drain into the bottom of mine. I’ve got clay balls for the drainage layer, but in case I don’t have enough, I’ve got some regular old drainage rock handy too. Still researching soil info, but I’ve got sphagnum peat moss, organic raised bed soil, some plantation soil and charcoal to create my mix.

I’m running a single 36” T5 ho uvb, two regular can style basking lights and an led for plant growth.
Running a mist king system and a couple of fans to control heat and provide ventilation.

Looks like @GoodKarma19 has a wealth of knowledge and experience too. I may read over some of his stuff tomorrow when I’m supposed to be working...
 
Last edited:
Hello, Im looking to build my first bio active enclosure for my future panther chameleon. I was wondering if anyone could give a list of their favorite things to use
(cuc, substrate/substrate mix, plants, drainage layer, lights, etc.
Any suggestions will help a ton and I will really appreciate feedback.
The plans Seejay linked above^ are for a 100% automated display cabinet viv. Lights 100% automated, no filling MistKing or fogger resoviors, or draining your system, you just feed your Cham and enjoy.

Can’t wait to see what you come up with! Ask tons of questions, plan your work, and work your plan!
 
Cork bark, for sure. My guys like to climb on it, but the CUC uses it as a freeway to move around the cage. I just put a huge 3' piece of cork in my enclosure last night and an isopod was at the top of it within a minute!

I am using Giant Canyon, dwarf white isos, and springtails. There's some subterranean millipedes in there, too. The millipedes are surprisingly good at CUC, and they're tiny. I added powder orange to my veileds, and they multiply like mad - but becareful with those guys. I use them because I want them to eat Clarice's unfertilized eggs, in addition to the chams hunting them down regularly. I was going to add some prettier species, but I can never see the CUC due to dense plants, so why bother. Giant Canyons are huge so they make for a good snack, too.

Make sure your soil has good drainage. My bottom layers have some chunky stuff like charcoal, wood chunks, orchid bark, etc to add to drainage, and I also mix in a bit of sand.

NEHERP had a good drainage layer that was light weight, much lighter than clay balls. I have both, don't notice a difference other than weight.

I love my SANSI grow lights, my plants grow like crazy. I had to remove half the plants from the cage I did last night because they grew in so dense the cham didn't use the bottom 3" of his enclosure.
 
Oh I see so you siphon the excess water through the top and don’t let it drain out. Correct?

Nowhere for the water to go in a solid glass ExoTerra terrarium, haha! It's either add some way to access the drainage layer via a pipe/etc, or drill through the glass and install a bulkhead for external drainage. I didnt trust myself to drill a hole in such an expensive cage, so I went with the alternative. :)

Looks like @GoodKarma19 has a wealth of knowledge and experience too. I may read over some of his stuff tomorrow when I’m supposed to be working...

Ehh, I wouldn't call myself especially experienced - just keen! If you find yourself with specific questions while digging through some of my posts, let me know! I haven't necessarily explained all of my design choices or processes. (y)
 
This all is helping me so much I thank you all for the amazing tips and design ideas

this is a very non detailed version of my plan, basically I will have plexiglass for the walls(bc I’m in Minnesota and it’s super dry) screen top.
I did quite a bit of research and found if I have some air flow it should be fine.
Let me know if any questions or concerns about my plan(preferably before I build it)
70339A10-1F79-44C7-8F84-063927715608.jpeg
 
This all is helping me so much I thank you all for the amazing tips and design ideas

this is a very non detailed version of my plan, basically I will have plexiglass for the walls(bc I’m in Minnesota and it’s super dry) screen top.
I did quite a bit of research and found if I have some air flow it should be fine.
Let me know if any questions or concerns about my plan(preferably before I build it)View attachment 255501

I strongly suggest adding either more screen to your enclosure, or some sort of ventilation strip. Just the top will not be enough ventilation to prevent the air from becoming stale, and stagnant, humid air is a recipe for disaster. The placement of lower vent strips on the wall will help promote airflow via the chimney effect, and a DC fan on the top of the enclosure pulling air out (and thus drawing air in through lower vents) would actively help in this process. Personally, I'd make one of your walls screen - ideally the same side as your basking element. Then you can have any misting nozzles aimed toward your solid corner, and control overspray and humidity while also promoting excellent air flow.

My experience doesn't lie in building enclosures of my own, however. @Brodybreaux25 - how did you go about handling ventilation in your cabinet conversion? I've forgotten. Any tips for OP?
 
This all is helping me so much I thank you all for the amazing tips and design ideas

this is a very non detailed version of my plan, basically I will have plexiglass for the walls(bc I’m in Minnesota and it’s super dry) screen top.
I did quite a bit of research and found if I have some air flow it should be fine.
Let me know if any questions or concerns about my plan(preferably before I build it)View attachment 255501

If you plan to use plexiglass for the doors as well they will warp like crazy from the misting and humidity. I very, very strongly recommend against it. I have made custom acrylic enclosures for some geckos and tanks for fish and the sections that were not cemented on at least 3 sides all warped within days, despite using half-inch thick acrylic. This is why plexiglass/acrylic can be used without issue for fish tanks but not the covers. You could create an acrylic enclosure and glass for the doors but I'm not sure there is a very cheap and practical way to do it - maybe wooden frames with glass inserted inside?
 
I strongly suggest adding either more screen to your enclosure, or some sort of ventilation strip. Just the top will not be enough ventilation to prevent the air from becoming stale, and stagnant, humid air is a recipe for disaster. The placement of lower vent strips on the wall will help promote airflow via the chimney effect, and a DC fan on the top of the enclosure pulling air out (and thus drawing air in through lower vents) would actively help in this process. Personally, I'd make one of your walls screen - ideally the same side as your basking element. Then you can have any misting nozzles aimed toward your solid corner, and control overspray and humidity while also promoting excellent air flow.

My experience doesn't lie in building enclosures of my own, however. @Brodybreaux25 - how did you go about handling ventilation in your cabinet conversion? I've forgotten. Any tips for OP?

This is an old photo of one of my acrylic enclosures just after planting (and before the doors started warping too severely).

20200107_160034949.jpg

I had the acrylic shop CNC slits in the front panel below the doors to provide chimney effect ventilation. Aside from the front doors warping the enclosure worked quite well but the cost ended up being quite similar to the large glass enclosure.
 
I strongly suggest adding either more screen to your enclosure, or some sort of ventilation strip. Just the top will not be enough ventilation to prevent the air from becoming stale, and stagnant, humid air is a recipe for disaster. The placement of lower vent strips on the wall will help promote airflow via the chimney effect, and a DC fan on the top of the enclosure pulling air out (and thus drawing air in through lower vents) would actively help in this process.
OP- GK19 was kind enough to suggest this but I’m a bit more direct. To me, they are requirements given your plan and you would do well to heed her advice. The chimney effect is critical to the performance of a solid sided viv.
 
Last edited:
how did you go about handling ventilation in your cabinet conversion? I've forgotten. Any tips for OP?
Mine are all screen, I had a CPU fan at first but ultimately it wasn’t needed.

I am also concerned about your plans for the acrylic doors. Not for your choice of material, but for how you intend to use them. When doing large acrylic doors they have to be sliding doors, not hinged. Hinged puts too much stress on the anchor points.
 
This all is helping me so much I thank you all for the amazing tips and design ideas

this is a very non detailed version of my plan, basically I will have plexiglass for the walls(bc I’m in Minnesota and it’s super dry) screen top.
I did quite a bit of research and found if I have some air flow it should be fine.
Let me know if any questions or concerns about my plan(preferably before I build it)View attachment 255501

Sizing:

I would cut that cage size in half, to start. 48inches deep is going to be a challenge to work with. It's really not necessary, and will cause difficulty in maintenance and such. I would cut that to 24inches deep. The rest of your dimensions are fine.

The issue is with a 48 deep, you know have a walk in, you are going to have to actually step into the cage to do maintenance, and its really just not ideal.

I love the 6ft height, I wish I would have built my viv to the ground, and not have a cubby for a misting setup that is no longer a thing. I have sense directly connected my mister to my RO system and now have an unused shelf below the cage. However I have plans to alter that, and use that bottom area, for another cage for another species soon.

Venting:
I'm with them, 100% you need venting. Not a ton, but you need it.

If you want a clean Front, with no vents to see even the ground plants, that can be done, but you still need vents. Even the Exoterra vent strips, such as GKs will bolster little airflow and very very high humidity. Which is why they suggested a fan (which one is still useful no matter what vent size.)

If your going to stick with your fully acrylic design (I wouldn't, more on that in a min) you can use the round 3 inch vents for soffits. Or you can procure rectangle ones.

If you do 24 inches deep, and your other dimensions the same. My ultimate vent suggestion is an easy one. Use Soffit vents, or registers with screen in them. This is something I wish I would have done differently in my build, I designed the vents, without looking at the venting options. Mine are 18 inch wide hole, that's slightly to big for a soffit, which forced me to make them out of screen frame. Soffits are designed 16 on center, for homes. Follow that guideline.

After that, I would suggest either between 4-6 inch tall vents. Put them, right at the top of the soil layer, on the sides. This will allow the vents to be hidden from the front viewing, and so your ground plants are in full view.

Material Choice:

Fully Acrylic is not going to work. Not within any reasonable price range especially. For something this large, you would need 1/2 inch acrylic all the way around, pricing in the thousands for materials. Its not an ideal situation, and you can use cheap bracing ideas to go other routes.

The first decision to make, is how you want to do the background do you just want to do the back or do you want to do the sides as well. Personally I like the 3 sided backgrounds, however just the back is a thing as well.

If you want to do just the back, and want Acrylic sides/Front. My suggestion would be a Plywood back, with a 1/2 frame. No sense in using expensive acrylic that isnt that rigid on the back, vs a cheaper ply that will be sealed anyway. I would build a 1/2 frame, in L shaped fashion (Can detail more if this is what you want) you will then be able to attach your acrylic side to this frame, and your door solution (more on this later)

Another option is Forex, this is using aluminum framing that holds the acrylic, the price is increased dramatically, however if metal is more your thing, I can explain the hows of it as well.

If you want a 3 sided background, you just saved alot of $$$ and added a ton of rigidity and simplicity. In this case, you will build your box from 1/2 - 3/4 in plywood. The next cage I build, will be this. You will use some 1x2s to add rigidity in certain areas, the doors will cost more than the entire cage :p.

Acrylic, and why I dont like it. Acrylic is not very rigid in large sections. A small piece of 24x24x1/4in acrylic is very rigid, a 24 x 6ft piece of acrylic is not. There is also the fact that it scratches STUPID EASY. Good Acrylic, the Acrylic your going to have to use, is going to cost the same amount as Tempered Glass, of the same thickness. I would use the glass, it weighs more, and can shatter (mostly the edges are weak) however it will not scratch.

Door Choice:

Now we have arrived at doors, there is going to be 2 choices of doors.

1 is to use hinged doors, you can craft these from 1x2s. and inset the glass/acrylic into it. The biggest downside to this is the huge chunk in the center thats not clear, though there is ways to not have that issue.


The second and my personal favorite is Sliding doors, these give you the ability to open the door less. My current viv has these, and I love being able to slightly open the door and put in Black Soldier flys, when they try to fly out, they hit the glass and realize the viv is home till they get eaten. There is some really nice fancy tracks out there that I can turn you on to. The downside is the gap, between the doors, and crickets may be able to squeeze though though they rarely try in my experience.

Misters:

Something I learned the hardway, in my build is misters only carry about 14-16 inches deep. Which means you will need misters on the front and back for a 24 deep, and you will need misters in the center for a 48 inch depth if your set on that.

With a wooden build, I am partial to mister bars. On the front and back, where you would have topside 1x2s, use 1x3s or 1x4s, and drill your mister holes into the wood instead of trying to mount through the screen. This is something to consider when building.

I have this solution in place for the front, but currently my back is through the screen. I aim to modify that, but its greatly difficult in a built/backgrounded vivarium. Your sizing, if 24 deep, I would do 4 in the front and 4 in the back.


I will leave it with that flood of Info for now, as its already alot. Lets get those thoughts and plans finalized, then once you get that all decided and budgeted, then we can start with the rest.
 
Last edited:
Back
Top Bottom