melble68
Established Member
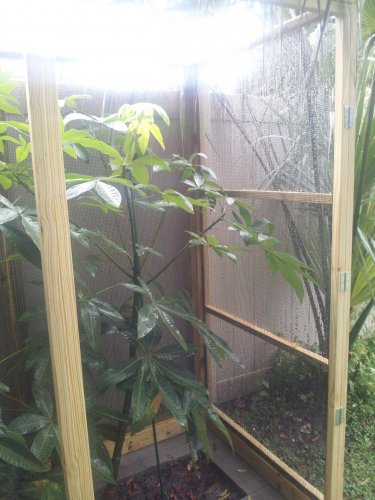
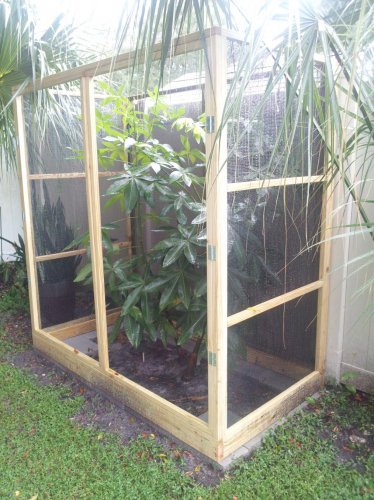
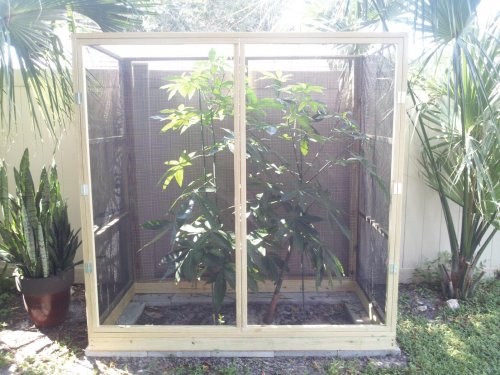
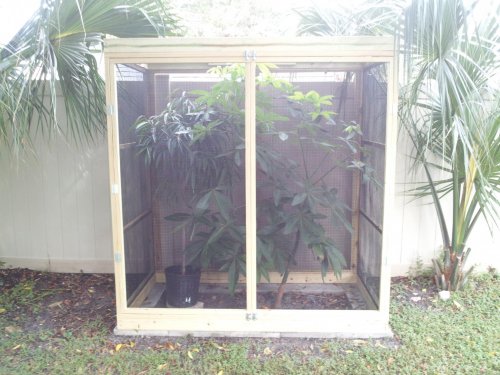
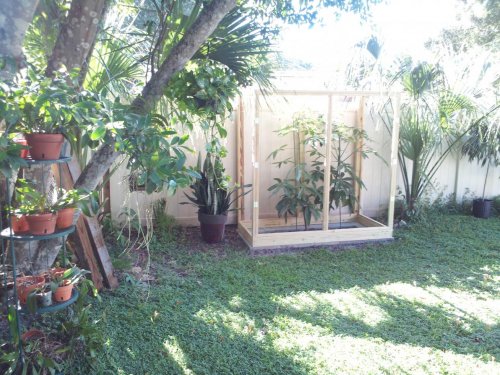
Ok, I've been designing an outdoor enclosure in my head for months, doing my research, and then again re-designing it. I relocated a schefflera about 6 months ago, and have pruned it once since then with the intentions of covering it w/ a 6'x6'x3' custom enclosure. The thing that took me the longest is how I was going to "seal" the bottom of the cage from the rest of mother nature. One evening sitting out there listening to some Pandora and sipping on an ice coolie, kapow i came up w/ the idea.
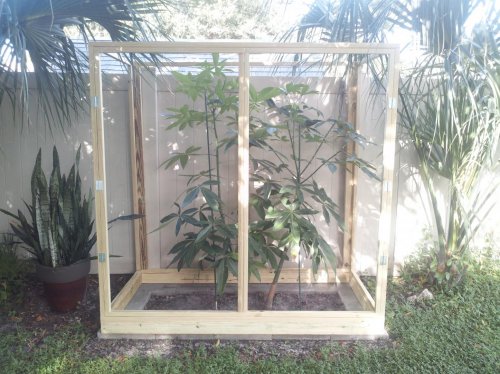
I placed a border of concrete pavers in the sand for a 2x4 base to set on. This took a lil while to level everything out w/ my 4' level, but I finally got it. Then came the mock up of the basic structure.
I made my trip to the Depot on Saturday evening to pick up the lumber and hardware. I had already secured the ¼” pvc coated hardware cloth that is 36” wide. Sunday morning I broke out my cordless drill, chop saw, and tape measure. Don’t get me wrong, I love this kind of a project. I love building things, I love plants, and I’ve always loved reptiles.
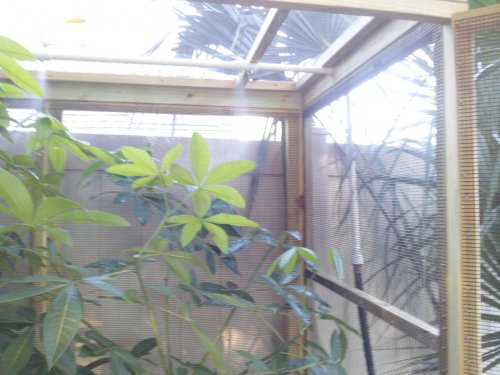
I designed the entire enclosure around 3’x6’ panels. I’m hoping to leave the front two 3’x6’ doors open with hardware cloth only, but I may need to add some additional horizontal bracing. I’m definitely adding at least 2 horizontal braces for each side panel. I still have the top panel to do, and the bottom panel to do. All panels will have the ¼” pvc hardware cloth stapled onto them. Here in a week or two I’ll remove each panel to attach the hardware cloth. I also am thinking that I will tape off the hardware cloth and spray the corners w/ Rustoleum Leak Seal stuff to protect my cham from the edges of the hardware cloth. I’m going to split the hardware cloth of the bottom panel so I can manipulate it around the two stems of the schefflera, and the zip tie back together.
In addition to the two planted scheffleras, I have a nice pathos, a fig ficus, and a small baby’s tears. The baby tears I’m going to split in two so that I can rotate them from time to time if he likes to munch of um. I have some ideas for some verticals, and some suede vines. That is still down the road.
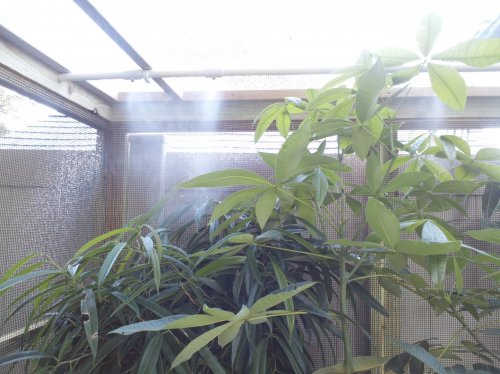
I have a good idea for the misting system to also, when it runs, fill up one or two drippers each time the mister runs. I would imagine having it run at least a few times a day, but I’ll test that out down the road also. I’m also planning on running some low voltage wires to the enclosure so I can install a camera or two that I’ll be able to view him from my smart phone while I’m not at home. I have a few ports open on my existing DVR for the cams around my home.
Yikes did I ever get chatty. Enough for now. Whatcha all think of version #1?
I placed a border of concrete pavers in the sand for a 2x4 base to set on. This took a lil while to level everything out w/ my 4' level, but I finally got it. Then came the mock up of the basic structure.
I made my trip to the Depot on Saturday evening to pick up the lumber and hardware. I had already secured the ¼” pvc coated hardware cloth that is 36” wide. Sunday morning I broke out my cordless drill, chop saw, and tape measure. Don’t get me wrong, I love this kind of a project. I love building things, I love plants, and I’ve always loved reptiles.
I designed the entire enclosure around 3’x6’ panels. I’m hoping to leave the front two 3’x6’ doors open with hardware cloth only, but I may need to add some additional horizontal bracing. I’m definitely adding at least 2 horizontal braces for each side panel. I still have the top panel to do, and the bottom panel to do. All panels will have the ¼” pvc hardware cloth stapled onto them. Here in a week or two I’ll remove each panel to attach the hardware cloth. I also am thinking that I will tape off the hardware cloth and spray the corners w/ Rustoleum Leak Seal stuff to protect my cham from the edges of the hardware cloth. I’m going to split the hardware cloth of the bottom panel so I can manipulate it around the two stems of the schefflera, and the zip tie back together.
In addition to the two planted scheffleras, I have a nice pathos, a fig ficus, and a small baby’s tears. The baby tears I’m going to split in two so that I can rotate them from time to time if he likes to munch of um. I have some ideas for some verticals, and some suede vines. That is still down the road.
I have a good idea for the misting system to also, when it runs, fill up one or two drippers each time the mister runs. I would imagine having it run at least a few times a day, but I’ll test that out down the road also. I’m also planning on running some low voltage wires to the enclosure so I can install a camera or two that I’ll be able to view him from my smart phone while I’m not at home. I have a few ports open on my existing DVR for the cams around my home.
Yikes did I ever get chatty. Enough for now. Whatcha all think of version #1?

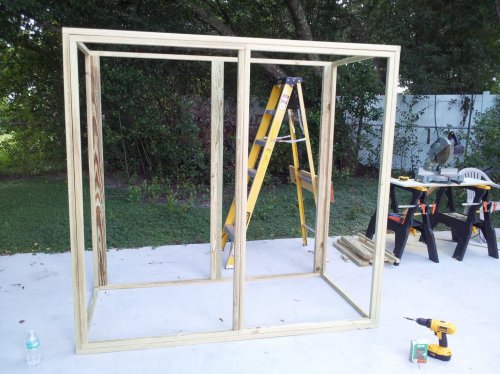

") I pre-drilled all the screws holes, and used 2 1/2" stainless deck screws to tie everything together. Once everything has "cured" for a little while, I'll most likely gorilla glue all the joints. I'll do this at the same time as I tack the hardware cloth on. I'll remove one panel at a time and do both the glue and hardware cloth.
I pre-drilled all the screws holes, and used 2 1/2" stainless deck screws to tie everything together. Once everything has "cured" for a little while, I'll most likely gorilla glue all the joints. I'll do this at the same time as I tack the hardware cloth on. I'll remove one panel at a time and do both the glue and hardware cloth. 


")