ehdee6
Chameleon Enthusiast

Hello out there!
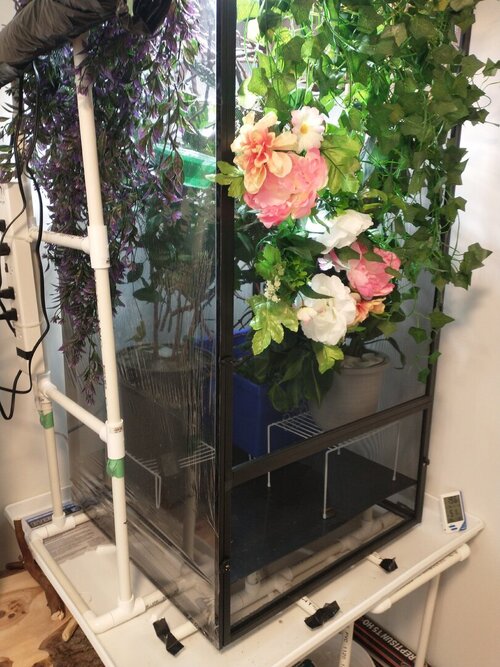
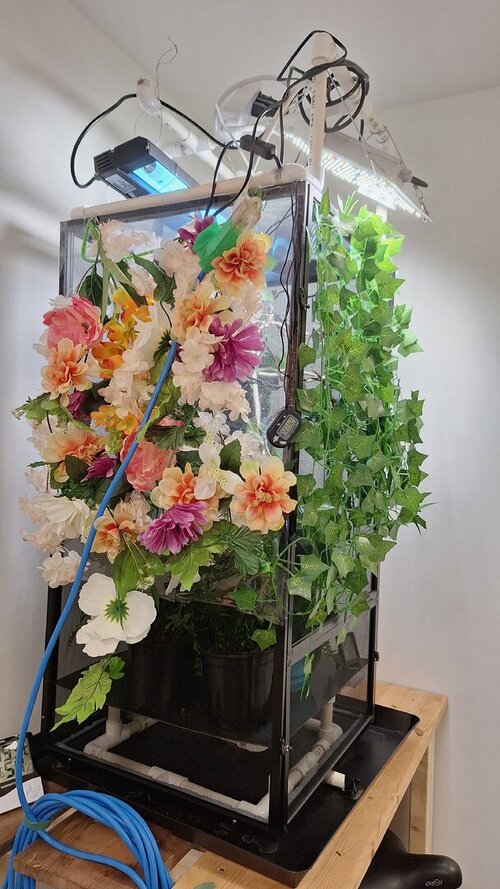
I recently upgraded my vailed female, Littlefoot, to her big girl cage; and just wanted to share my XL reptibreeze build. It's a bit outside of the box and thought it might inspire others. All the materials are from Home Depot.
The base stand is built out of 1/2 inch PVC pipe I had leftover from a home project. The back left end also sits partially on my homemade entertainment stand. The front legs are cut 1/4" shorter than the back to make the water pool towards the front, where the drain would be installed on the drip pan. The drip pan is originally for a washing machine, it comes with a PVC drain attachment. I've not had to install the drain, yet; but I will if I get an automated mister. It's set up to drain into the 5 gallon bucket below.

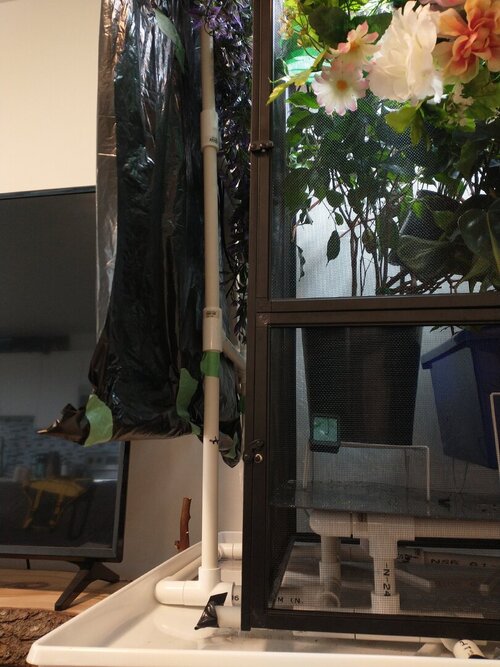
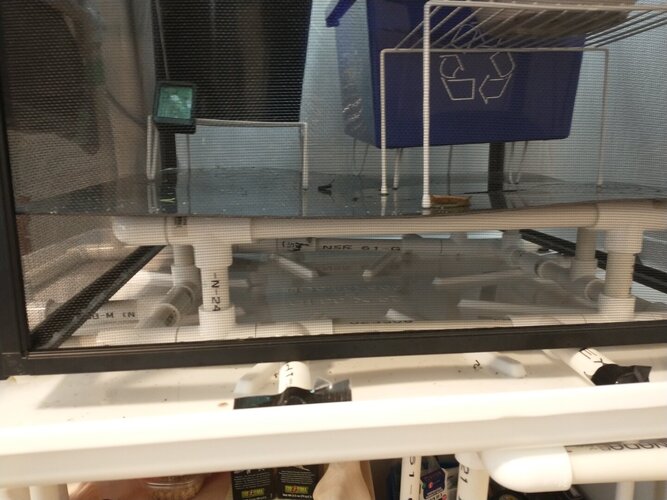
I didn't like the idea of having the cage sitting in stagnant water; so, I made a PVC base to sit inside the drip pan and place the cage over top. I also built a privacy screen/power bar holder. I put electrical tape over the lights on the power bar so they won't disturb Littlefoot in the night. I actually did this with all the little lights in the room that can't turn off in the night. The base also has a middle section to raise the floor of the reptibreeze 3" for ease of cleaning under. The unsealed ends of the PVC pipes are covered with tape so bugs don't get in.
For the reptibreeze itself... I didn't like how it has a groove on the bottom. It's completely unhygienic! I call it a death pool slurry. Bugs get in, poop water gets in, add some dirt, and voila! We have bacteria up the wazoo... So, I caulked it with mold resistant and food grade kitchen acrylic. I had to put two layers because the first shrunk in quite a bit. It's not the prettiest, but it gets the job done and makes the bottom more sturdy. I had the back bottom end pop apart while placing the branches a few times, this stopped that too.
For the branches I didn't like the look of using support branches on the side. It seemed bulky and unnatural. So, I built it to appear as if the branches were floating. I used 18 gauge aluminum wire to hold up bigger branches off the top. I then wrapped up the exposed wire with tweed rope. From there I used zip ties to connect the network and basking branches. The branches are mostly arbutus, because I like the way they twist and very in diameter. There's also some apple, maple and driftwood.
Looking over top:
Front view:
She has a Benjamin ficus, palm tree, pothos, and an umbrella tree in her lay bin. The palm is in a double pot hanging in the back and the ones on the floor are on wire cupboard spacers. I have a plant rehab corner to swap out the plants and try and nurse them back when they look sad. I also invested in a jungle dawn for this cage.
The hydro/temp gauges are wrapped in a few small fluker's bend a branches. She was climbing on the wires in her old cage and it didn't seem safe. She also conveniently uses this as her basking branch sometimes.
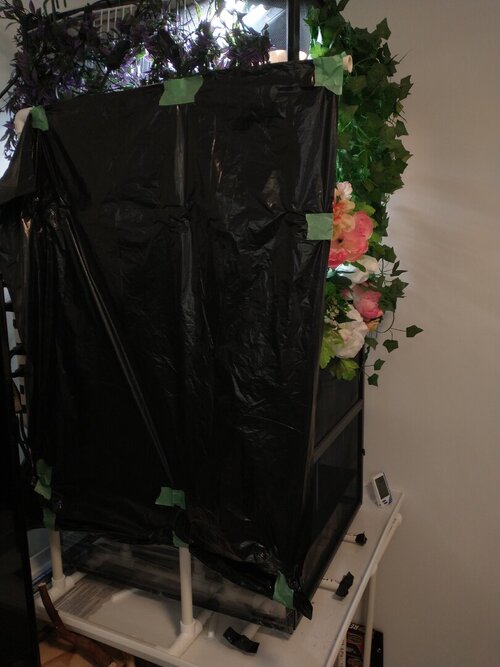
Three sides are covered with window plastic to keep the heat and humidity. It's worked so far and is easy to poke holes in if more airflow is needed.
It took a lot of trial and error; over all sitting back looking and making adjustments for a month, letting her run about in it for a few tryouts. I also have to drill a small hole in the reptibreeze floor to drain where the water pools; but I like how it worked out!
Now to build one for this handsome Jack to call home...

Comments/suggestions?
I recently upgraded my vailed female, Littlefoot, to her big girl cage; and just wanted to share my XL reptibreeze build. It's a bit outside of the box and thought it might inspire others. All the materials are from Home Depot.
The base stand is built out of 1/2 inch PVC pipe I had leftover from a home project. The back left end also sits partially on my homemade entertainment stand. The front legs are cut 1/4" shorter than the back to make the water pool towards the front, where the drain would be installed on the drip pan. The drip pan is originally for a washing machine, it comes with a PVC drain attachment. I've not had to install the drain, yet; but I will if I get an automated mister. It's set up to drain into the 5 gallon bucket below.
I didn't like the idea of having the cage sitting in stagnant water; so, I made a PVC base to sit inside the drip pan and place the cage over top. I also built a privacy screen/power bar holder. I put electrical tape over the lights on the power bar so they won't disturb Littlefoot in the night. I actually did this with all the little lights in the room that can't turn off in the night. The base also has a middle section to raise the floor of the reptibreeze 3" for ease of cleaning under. The unsealed ends of the PVC pipes are covered with tape so bugs don't get in.
For the reptibreeze itself... I didn't like how it has a groove on the bottom. It's completely unhygienic! I call it a death pool slurry. Bugs get in, poop water gets in, add some dirt, and voila! We have bacteria up the wazoo... So, I caulked it with mold resistant and food grade kitchen acrylic. I had to put two layers because the first shrunk in quite a bit. It's not the prettiest, but it gets the job done and makes the bottom more sturdy. I had the back bottom end pop apart while placing the branches a few times, this stopped that too.
For the branches I didn't like the look of using support branches on the side. It seemed bulky and unnatural. So, I built it to appear as if the branches were floating. I used 18 gauge aluminum wire to hold up bigger branches off the top. I then wrapped up the exposed wire with tweed rope. From there I used zip ties to connect the network and basking branches. The branches are mostly arbutus, because I like the way they twist and very in diameter. There's also some apple, maple and driftwood.
Looking over top:
Front view:
She has a Benjamin ficus, palm tree, pothos, and an umbrella tree in her lay bin. The palm is in a double pot hanging in the back and the ones on the floor are on wire cupboard spacers. I have a plant rehab corner to swap out the plants and try and nurse them back when they look sad. I also invested in a jungle dawn for this cage.
The hydro/temp gauges are wrapped in a few small fluker's bend a branches. She was climbing on the wires in her old cage and it didn't seem safe. She also conveniently uses this as her basking branch sometimes.
Three sides are covered with window plastic to keep the heat and humidity. It's worked so far and is easy to poke holes in if more airflow is needed.
It took a lot of trial and error; over all sitting back looking and making adjustments for a month, letting her run about in it for a few tryouts. I also have to drill a small hole in the reptibreeze floor to drain where the water pools; but I like how it worked out!
Now to build one for this handsome Jack to call home...
Comments/suggestions?
Last edited:
 Is that a diy pvc pipe structure you’re using as risers to hold the floor panel up and support the plants? Did you drill holes in the floor panel to drain water into the tray? Interesting