Melons new cage build

Lennoncham

Chameleon Enthusiast
When I got melons old cage I thought I got a good deal but it was only because it was one of the old steel cages that rusts. It was still somewhat holding up but looking worse and worse everyday. So I finally got around to building her a new cage.

I started with a brand new xl reptibreeze cage ( 2x2x4)

767F787A-20AD-474C-8412-F23F095278C0.jpeg


First I put the cage together

FEA3962D-0C82-4DEB-A5DE-1F84991300BF.jpeg


Next I drilled a bunch of holes in the bottom panel for drainage. I may have gone a little over board but hey it will drain.

69EA2BA2-80F2-4086-A0CC-BB11D0CA6512.jpeg


Next I got a piece of corrugated platic 48x96” and cut it to fit inside the back and 2 side of the cage. I used thin wire to hold it onto the screen then used clear packing tape to seal the back 2 joints and around the bottom

36A9FC12-ED90-4D7A-A81B-CFA1FC657B45.jpeg
00296F2E-39B5-4F53-A568-4871A1A663FE.jpeg


Next I prepared my flower pots. Since I’m spray foaming them into the background I needed some way for water to drain out. So I got some tubing and put a couple piece into the holes and sealed it up with a hot glue gun. I sealed the rest of the holes shut with duct tape inside and out.

36C7FAA0-0D32-421F-A510-B45D3F81FAA2.jpeg
EADEC06E-4CDC-4696-A5AD-05B39D3F690A.jpeg


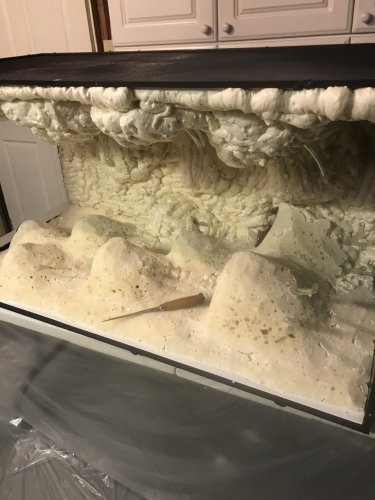
Now for the spray foam. I use the great stuff gaps and cracks spray foam. I started with one side and put the spray foam from top to bottom then placed my flower pots kinda randomly kinda planed.


9E17BCED-7AAD-4708-952C-4D93A72267EC.jpeg
43A7E73C-A67B-4277-BCED-7A1EE525BFC4.jpeg


I let that sit for about an hour and went back and spray foamed over the pots then let it sit overnight to completely set. I repeated this for all 3 sides.


FA982362-9F79-4281-B268-2E9F922E8943.jpeg
 
5872405E-F133-4B05-BC29-EEB3E4C5498E.jpeg
1038A58C-8B24-41E0-A0F0-23FF4D900CFD.jpeg
AA32EC7F-1683-40FA-B5EB-280501110F58.jpeg


Once the foam was all set it was time to trim. I trim the foam up for 2 reasons. One so I can get the desired shape. And two because silicone won’t stick to the shiny outside coat of the spray foam.

I trimmed all 3 sides and then touched up any spots that had big holes or where I didn’t put enough foam in the first place.

2B06A779-7D0C-46F8-89DD-814E1780F1A8.jpeg

AD588B3F-E1A4-4981-9338-FEB49C5E0AD8.jpeg
5AEF26B1-2406-4F2E-949B-22B45D57E250.jpeg


Next up I got some manzanita driftwood or is it grapewood? and figured out where I wanted to put them. Surprisingly some of them look like they were made for where I put them and I didn’t buy them until right before I put them in.

I spray foamed them in place let it sit then trimmed the foam.

10D5E04B-024C-4FBE-AC64-8E39BDC9585A.jpeg
80532487-A7B6-46E5-B5D8-2C4E54135AC9.jpeg
22799A28-79C0-4E7E-B20E-8BD1625DA12E.jpeg
 

Attachments

  • DB1E9CCA-7F63-4330-BE52-D924F7C993FD.jpeg
    DB1E9CCA-7F63-4330-BE52-D924F7C993FD.jpeg
    213.1 KB · Views: 203
Last edited:
3B4152CA-7AFD-40D2-8782-6C72FBB8955C.jpeg
D5F53D73-417D-4234-9C60-879547E4866E.jpeg
F712E0CA-F92F-40DB-8BA0-2767BEBEB465.jpeg
10D37B0D-D3B7-4BF4-85E7-73110DB7247F.jpeg


Once that was done it was time for silicone and coconut fibre. I use the ge silicone ii windows and doors. And canna coconut fibre. I started from the bottom and applied a bunch of silicone. Then I put some coconut fibre on top and press it in. I do t cover all the silicone I just put down I leave a inch or 2 then apply some more and more coconut fibre working my way up. I let that sit for several hours and repeat for each side. Standing it up in between sides to knock off the excess coconut fibre and clean up as much as I can by hand and with a vacuum.


C77BE3CD-E10D-4EDB-AAD8-3904BB32C8BF.jpeg
0CC43070-C0ED-42E8-9107-3532D78D4DCA.jpeg
2A464A78-3D4F-4772-939C-DD9C01D138B7.jpeg
BEAB8FD0-E77F-4401-8F5C-3833EDF96816.jpeg
EA6DD6C7-16B3-4DA1-BE53-BB2D9D8FDFBD.jpeg
2B06EFCE-E713-459E-9917-D09046E39F1C.jpeg
 
I let the cage sit for 5 days with a fan blowing on it so the silicone could off gas. It has a very strong smell.


62F04829-7A83-4083-8EE8-006B6D09C715.jpeg


Next I prepared the plants. I got flower pots and put HydroBalls in the bottom then a piece of screen ontop. I cleaned all the plants and reposted them with a mix of organic soil playsand and coconut fibre then topped the pot of with just coconut fibre


D2861069-04A4-4785-8CC3-172BCDC9A2C2.jpeg
C66360E4-923C-4602-8209-FEF27EAF9B1F.jpeg
8F0476AA-0DF1-4A4E-A44B-60FAC8E2491D.jpeg
4BD8695C-CE39-42F0-A6F7-551F458F3D78.jpeg
41C1B969-6287-4ED3-833A-45827EBDA6F5.jpeg


Once the plants were ready I started putting them into the enclosure. I kinda played around with them a bit until I thought it looked good.


5345FF80-55D5-48F5-BA62-9BE83160E3C3.jpeg
E15AE46F-4102-40CC-B0B6-B2F8E143CA04.jpeg
31CB3623-58F3-4DF8-B006-6642F844A8DD.jpeg
D1383853-B33E-4F8A-8972-F5D90E74F58C.jpeg
 
Vines! She needs more area to climb around on! I got a bunch of different sized vines for her.


1A222D74-661B-4421-819B-573354BD2F5E.jpeg


These zoo med naturalistic vines have all these little nubs and thing on them the pull out fairly easily. I don’t want melon to accidentally ingest one so I went through the vines and pulled them all out. Then I twisted up the vines to make them look better.

0137D7BF-C918-451F-B503-D320C88784B8.jpeg
0DDA04F4-A793-464E-833F-57C3B0AAA4E1.jpeg
F289A094-F973-417E-BD81-7C1774A38511.jpeg


I Used a hot glue gun to attach the vines to the background trying to give her as much climbing area as possible.


F2CDB83F-BD5B-4FC1-9CA9-ED2BCE5A1272.jpeg
1E2F4F15-708C-450A-95B2-9A356B8E9E01.jpeg
F5F8BB6C-F62C-4DF6-8708-C098B32AC1FE.jpeg
A91EF993-064C-4A0F-8C0E-490DE86DE95F.jpeg
6DC219B4-AF67-4FF2-92E5-EE53E433923D.jpeg


The middle was looking a little bare so I attached another flower pot to one of her branches with zip ties and put another plant in.

44F86E5A-69EB-435F-BF04-E287823E3C8E.jpeg
 
36E0D172-7408-41BE-BFB6-546D1C28E6DB.jpeg
45845E20-2161-4E59-98E1-132951C3E3B5.jpeg
CE673E5A-4D70-43EF-A962-ED722BACC6D4.jpeg


I also got her a new light fixture that holds 4 t5 bulbs. I have 3 6500k plant bulbs and one reptisun 5.0 uvb.


2543D325-B87B-4CB4-9500-B07FA1C65A1F.jpeg


I got her misting nozzles I stalled. 2 spraying from the front towards the middle/back.

I put her cage up into her drainage table put the lights ontop attached the misting system. Gave the misting system a test run then introduced melon to her new home.


51211DE1-E50D-4E15-9C09-2EE555CF086A.jpeg
534DE384-A7A8-481A-A88F-FDA02B04D370.jpeg
00F38272-B9A3-4FAB-82F7-7C6E965F6EC3.jpeg

2CBFA392-720D-4E11-838F-C006D49EF61C.jpeg
 
AWESOME CAGE!!!! Bad @$$!!! I’m so jelly right now. Good job let us know how she likes her new mansion.

Thanks. Definitely my best cage build yet.

Well she was glad to get into it but just because she was off of me lol. She sat there for a bit taking it in then started to explore a bit. Im sure she will be happy in a few days or so.
 
Awesome setup! Your chameleon probably loves it! Probably thinks it’s his own little section of his jungle in there haha
 
Keeping this up all day while I build my new guys viv!

If you are doing the same thing or similar I have a couple suggestions. Although it may be to late lol.

I would do the spray foam in smaller sections. The corrugated plastic kind of bowed out from the foam expanding.

I would also stuff the pots with newspaper or something a couple of mine kind of caved in from the foam expansion.
 
Back
Top Bottom