Navigation
Install the app
How to install the app on iOS
Follow along with the video below to see how to install our site as a web app on your home screen.
Note: This feature may not be available in some browsers.
More options
You are using an out of date browser. It may not display this or other websites correctly.
You should upgrade or use an alternative browser.
You should upgrade or use an alternative browser.
Lola's cage build
- Thread starter dshuld
- Start date
dshuld
Chameleon Enthusiast
So one thing I feel should be mentioned in case anyone else buys that pool bulb, measure your temps below the bulb. That is one thing I have forgotten to mention before. At the top row of willow the temp controller probe is seeing ~83/ 84°, at her casque height I've been seeing 91/ 92° with the infrared thermometer. The bulbs are roughly 2 inches above the cage currently.
GreenChameleons
Established Member
Looks pretty good!I adopted Lola on June 28th from @curtm1985 with some help from @jannb (thank you both of you) and this has been a longer process then I originally planned on it being. Weekend weather held me up for the first couple of weeks and some spar urethane issues held me up for another week of this process. I'm hoping to have her setup and back in her home this coming weekend if everything goes well. I moved her out of her home this past Sunday to work on the cage portion after finally getting the base and stand set in place and planted that morning.
I didn't take many pictures for most of this process so I apologize for that. The stand is made of 2x4 and I have the height at 31.75". I made it the same way I've made my diy fish tank stands for years so it is more then capable of supporting the weight it is carrying. It is a design I think I found on "king of diy" way back when with a support piece between the upper and lower plates screwed to the backer that the top and bottom plates are screwed to. That way rather then the screws carrying the load the wood structure does all of the carrying.
The plant box is 1x12 boards and 23/32 plywood cut to fit the outside dimensions of the 30x18x30 exo terra she came with. Though I probably went way overboard on this step, it is sealed with three layers of epoxy paint, three layers of spar urethane inside and out and two layers of liquid flex seal inside. I drilled the hole for the 1/2" bulkhead being used for the drain before putting the epoxy paint and urethane on and then sealed every thing. Once those coats were on I sealed the bulkhead in with silicone and followed that up with the two coats of liquid flex seal. The outside of the box was then painted flat black.
This brings me to something that is still semi controversial, naturalistic hydration. I've had several pm's with @JacksJill bouncing ideas off her wonderful brain on how I wanted to do my entry point into all of my cages as I go along setting them all up this way. I don't recall if I brought up the low profile strainer to her but that is what I decided to go with. I went with 1.5" low profile strainers that will be mounted towards the top center of the enclosures. I plan on using ocean mist maker foggers in the long run but haven't gotten them in yet so for now it will be temporarily plumbed 1" at the cool mist humidifier side going into the 1.5" that will run up and into the enclosure since I do have a spare cool mist humidifier atm.
This past Sunday I took apart her exo terra and cut plastex panels to mount inside of the enclosure and then reassembled it. I cut the hole for the low profile strainer and siliconed the seams on the back wall and lower sides. Though I have read that krylon quit making fusion, Lowes still carries it in several colors so I grabbed some blue for the white walls/ black strainer.
I still have a lot of work to try and get through this week but I'm hopeful lol. I still have to put leaf litter in the box, assemble the fogger plumbing after sitting the cage on the plant box, run my rope/ vines, adjust the pothos that is on the bottom for ground cover once the cage is on top, get the lighting set up on the timers and probably some other miscellaneous stuff I'm forgetting about atm. I will be grabbing some willow branches from probably hobby lobby to add in with everything else. I may try some of the parks around but of the parks around me are mostly pine trees so not hopeful there lol. Here are some pics of the progress so far though I don't have one with the blue paint sprayed in though.
View attachment 211910 View attachment 211911 View attachment 211912
GreenChameleons
Established Member
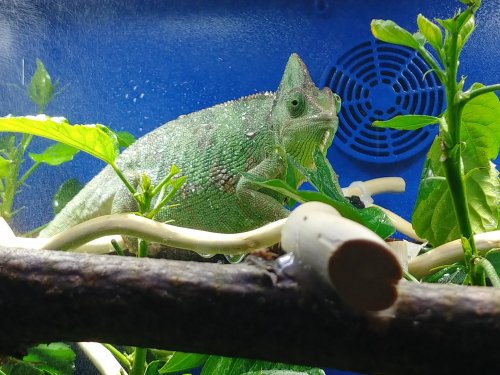
Very nice!And a fresh pic now that she's settled in a bit more.
View attachment 213219
dshuld
Chameleon Enthusiast
Thanks for measuring that for me. Very cool of ya.
So wait your saying those pool bulbs, heat up the cage.
Yes, they give a very noticeable amount of heat directly under them. Like a regular basking bulb it's only noticeable directly below them though. Since the fans are pushing the air down instead of up I'm not surprised by it tbh. Just was surprised by how much they heated the area directly below and felt it should be mentioned in case someone else bought them too. Once I build out the light rack they'll be higher up and not as big of a concern for me then. I took a reading from her casque tonight of 91.5 under the left side bulb. The right side bulb was giving 92.1 at the same height from a temp probe.
Last edited:
dshuld
Chameleon Enthusiast
Very nice!
Thanks
cyberlocc
Chameleon Enthusiast
Yes, they give a very noticeable amount of heat directly under them. Like a regular basking bulb it's only noticeable directly below them though. Since the fans are pushing the air down instead of up I'm not surprised by it tbh. Just was surprised by how much they heated the area directly below and felt it should be mentioned in case someone else bought them too. Once I build out the light rack they'll be higher up and not as big of a concern for me then. I took a reading from her casque tonight of 91.5 under the left side bulb. The right side bulb was giving 92.1 at the same height from a temp probe.
Oh, well that's the same sink as JDs, real easy to flip that fan. Just pop the couple screws out and flip the fan around. Easy peasy, and problem solved
When you take the housing apart (4 screws) the led, Heatink, and board are all attached, just flip the fan and screw it back toghether, I taken a JD apart, don't think you can really break it without trying. Shoot I tried, wanted to see what kind of LED it was, but still need the bulb for now so didn't try that hard.
dshuld
Chameleon Enthusiast
Oh, well that's the same sink as JDs, real easy to flip that fan. Just pop the couple screws out and flip the fan around. Easy peasy, and problem solved.
They are triangle drive screws. Oddly enough, one drive style I don't have yet lol. If I figure out the size I'll add that in for others too...unless you happen to know what it is?
GreenChameleons
Established Member
You’re most welcome!Thanks
GreenChameleons
Established Member
cyberlocc
Chameleon Enthusiast
They are triangle drive screws. Oddly enough, one drive style I don't have yet lol. If I figure out the size I'll add that in for others too...unless you happen to know what it is?
Nope mine are Phillips sadly
Assuming they are the same size as mine, I would say a 00, maybe a 0000 but I don't know anyone who uses that outside of Nintendo.
That said judging by the size of my screws. I would say a 0-0000 kit will likely have something to fit.
I wish mine would of had those, I have triwings in every size even Nintendo sizes
If your daring enough, and have a small enough flathead you can use that to get them out, getting them back in will be a challenge, but doable.
Last edited:
dshuld
Chameleon Enthusiast
Nope mine are Phillips sadly.
Assuming they are the same size as mine, I would say a 00, maybe a 0000 but I don't know anyone who uses that outside of Nintendo.
That said judging by the size of my screws. I would say a 0-0000 kit will likely have something to fit.
I wish mine would of had those, I have triwings in every size even Nintendo sizes.
If your daring enough, and have a small enough flathead you can use that to get them out, getting them back in will be a challenge, but doable.
Ok. I may order the set of ta drivers from Amazon then at some point.
Remkon
Chameleon Enthusiast
Make sure the LED bulb is a good quality one as cheap components can cause a LED to flicker....So looking for thoughts and opinions. I've drawn this to ~1/3 scale (1" =3"). I'm thinking about picking up two of these bulbs wifi bulbs to do sunrise sunset on the ends. Just not sure which configuration I want to go with. The dotted box is a second possibility incase I decide to put a third pool bulb up there.
View attachment 213137 View attachment 213138
The LED may even seem to produce a stable light to your eyes but to your animals eyes the flciker may be visible as he is albe to notice frequencies above 100Hz.
As a good quality wall mounted LED dimmer isn't cheap paying $15 for a dimmable and programmable LED bulb is likely to have some low quality components and will pretty sure cause flickering.
I had a 25euro LED controller (programmable) for 2 RGB LED bars in my ackie enclosure but I ended up disconnecting the thing because of it being a potential annoyance to my animal, I could see the flicker filming the light with my phone in the 120FPS setting.
http://www.premierltg.com/what-makes-an-led-bulb-flicker-how-to-solve-led-flicker/
dshuld
Chameleon Enthusiast
Make sure the LED bulb is a good quality one as cheap components can cause a LED to flicker....
The LED may even seem to produce a stable light to your eyes but to your animals eyes the flciker may be visible as he is albe to notice frequencies above 100Hz.
As a good quality wall mounted LED dimmer isn't cheap paying $15 for a dimmable and programmable LED bulb is likely to have some low quality components and will pretty sure cause flickering.
I had a 25euro LED controller (programmable) for 2 RGB LED bars in my ackie enclosure but I ended up disconnecting the thing because of it being a potential annoyance to my animal, I could see the flicker filming the light with my phone in the 120FPS setting.
http://www.premierltg.com/what-makes-an-led-bulb-flicker-how-to-solve-led-flicker/
Tbh, I've been going back and forth on adding that bulb the last day or so. I think where I'm at atm is something like the schedule below. My wife has been talking about doing a hue system in the house lately so I may add it on down the road with a hue bulb. But realistically, it is still likely a waste of money vs kicking on/ off the other lights at stages.
on
arcadia - 8:30
heat lamp - 8:40
pool bulb 1 - 8:50
pool bulb 2 - 9:50
pool bulb 3- 10:50
off
pool bulb 1 - 6:10
pool bulb 2 - 7:10
pool bulb 3- 8:10
heat lamp - 8:20
arcadia - 8:30
dshuld
Chameleon Enthusiast
@cyberlocc do you happen to have pics of the inside of the jd? I ordered a set of ta drivers that should arrive Sat if they are delivered on time. I'm hoping one of the six fits. If one does I'll snap some pics of the insides of these.
dshuld
Chameleon Enthusiast
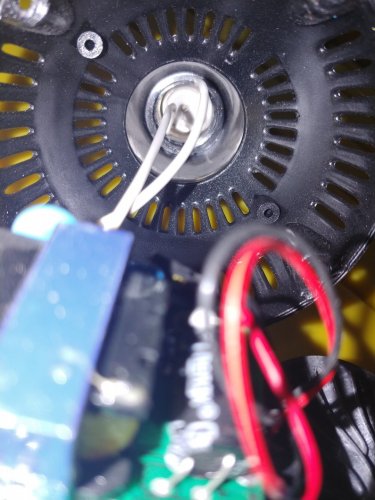
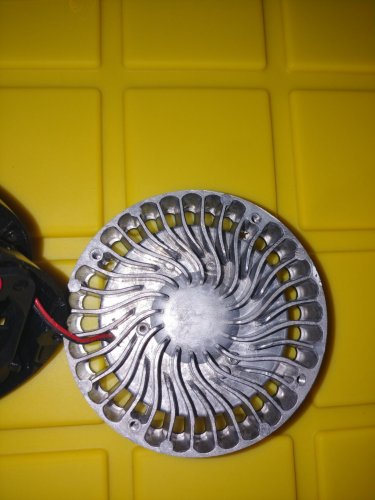
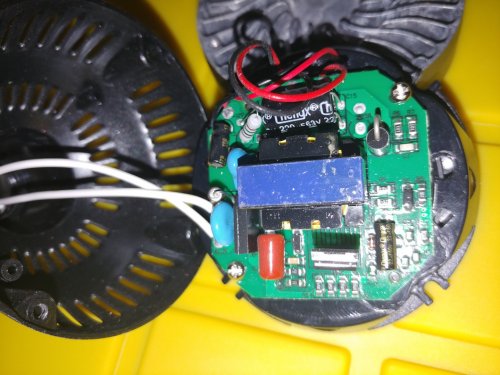
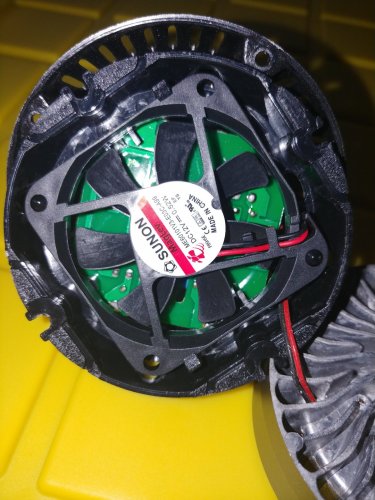
I have an interesting observation though I'm still tracking this habit for the time being before really bringing it up. It does pertain to the "warning" on watching the temps below the bulb and Lola's basking habits though. The screws on the pool bulb are ta 2.3. I was unable to get the snap ring out that hold the lens in and didn't want to destroy a brand new bulb just to get to the cob. So when one dies I'll crack it open for a cob pic but here's a few pics of the insides beyond the cob though.


Similar threads
- Replies
- 32
- Views
- 9K
- Replies
- 15
- Views
- 4K


