GoodKarma19
Chameleon Enthusiast

Hi cham fam! Construction has begun on the bioactive enclosure revamp for my panther girl, Lily, hot on the heels of my first build! This one I don't expect to take me terribly long, as I feel I've gotten a much better hold on the do's and don'ts of construction with Great Stuff, and Lily's enclosure is half the size of that glass monstrosity destined for my boy Pickle Rick. I'm also on vacation, and have a heck of a lot more time than I usually do! 
Lily's enclosure is a medium ZooMed (16x16x30 - yes, I know she could use larger, but she's a petite girl and it's going on a planter box, thus not losing any height), and my Grandpa very thoughtfully built me an external planter box for it! I don't have the planter yet (I'll be picking it up next week), but I thought I'd at least get the rest of the building done in the mean time!
The plan right now is to have a foam background on the back panel, and willow expanding trellises on both sides. First step was to get the eggcrate and trellises cut to size, and let me tell you: those trellises were a real pain in the rear end to work with! They were poorly constructed, and I essentially had to keep them together with strategically placed twist ties. They're ugly, but I figure I'll replace the ties with superglue when it's time to actually install them, if they bother me. Please excuse the terrible quality of the first couple of pictures!
Eggcrate to provide structure for the background (damaged it a tiny bit while using my hands to snap it to roughly the right size):

Rough mock up of the trellis:
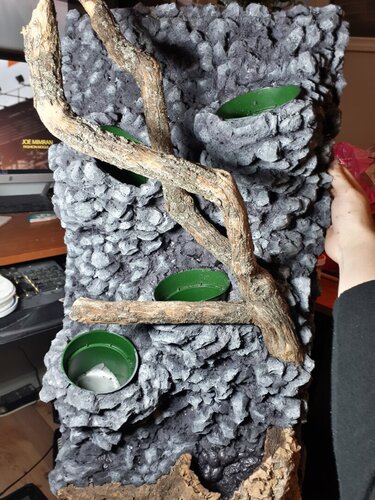
From there, I played with some positioning. I used a pair of cork half rounds to create a "stump" planter at the substrate level, and arranged a few 4" pots pointing at various angles for interest.
Picture of my focal background branch, and the cork stump for reference while I figured out my planter pots:
Planter pots/initial layer of foam:

I misted it and let it set for 4-5 hours, and then trimmed up the the edges, so I could check it for fit in the enclosure. The cork slipped a little (I weighed it down quite a bit on both ends of the egg crate to prevent warping), but it's not too bad and I can fix it with a bit of foam later:
Checking that the branch fits where I want it:
2nd pass with foam:
I gave it another mist, and I'll let it dry overnight. I'll start carving it down tomorrow, after I go and pick up some more #12 scalpel blades, and then I'll throw some liquid rubber and some cocofibre on it! Tues/weds I'll add detail pieces, then I'll fix it in the enclosure, get the trellises set up, and get cracking with the sticks! I'm planning on fixing most of the sticks to the trellises, with some contact points on the back.
This is a lot of fun! I wish I could do more projects like these. Gotta find some locals willing to pay for fancy things, haha!
Lily's enclosure is a medium ZooMed (16x16x30 - yes, I know she could use larger, but she's a petite girl and it's going on a planter box, thus not losing any height), and my Grandpa very thoughtfully built me an external planter box for it!
I don't have the planter yet (I'll be picking it up next week), but I thought I'd at least get the rest of the building done in the mean time!The plan right now is to have a foam background on the back panel, and willow expanding trellises on both sides. First step was to get the eggcrate and trellises cut to size, and let me tell you: those trellises were a real pain in the rear end to work with! They were poorly constructed, and I essentially had to keep them together with strategically placed twist ties. They're ugly, but I figure I'll replace the ties with superglue when it's time to actually install them, if they bother me. Please excuse the terrible quality of the first couple of pictures!
Eggcrate to provide structure for the background (damaged it a tiny bit while using my hands to snap it to roughly the right size):
Rough mock up of the trellis:
From there, I played with some positioning. I used a pair of cork half rounds to create a "stump" planter at the substrate level, and arranged a few 4" pots pointing at various angles for interest.
Picture of my focal background branch, and the cork stump for reference while I figured out my planter pots:
Planter pots/initial layer of foam:
I misted it and let it set for 4-5 hours, and then trimmed up the the edges, so I could check it for fit in the enclosure. The cork slipped a little (I weighed it down quite a bit on both ends of the egg crate to prevent warping), but it's not too bad and I can fix it with a bit of foam later:
Checking that the branch fits where I want it:
2nd pass with foam:
I gave it another mist, and I'll let it dry overnight. I'll start carving it down tomorrow, after I go and pick up some more #12 scalpel blades, and then I'll throw some liquid rubber and some cocofibre on it! Tues/weds I'll add detail pieces, then I'll fix it in the enclosure, get the trellises set up, and get cracking with the sticks! I'm planning on fixing most of the sticks to the trellises, with some contact points on the back.
This is a lot of fun!
I wish I could do more projects like these. Gotta find some locals willing to pay for fancy things, haha! Not the outside, anyway! Oh well. It's the inside that matters, and I can still clean that just the same. Not all that different from Pickle Rick's run, which is practically welded into the enclosure!

 You love yourcage build! Just come to America already and help me with my cage! You can live in a tent by the river

")


 (apologizing in advance for stealing oh so much inspiration from you Amanda, but you nailed the look I was going for!)