First Bio Build

Started working on branch placement today, and finished building the pull out drainage tray. Ignore the PVC... I'm still working on top placement for the fogger. It's raining every couple of days right now so again, been delayed. Someone remind me to start a bio build in the summer instead next time.
20210314_174454.jpg
20210314_175014.jpg
 
Looks great so far! When I do my build I wanna get some of those cork round pots from NEHERP 😁 but I might just make a DIY version to save some money.
Thank you! I bought this cork from Pangea Reptile, but I did leave spaces behind it and drainage holes in the bottom so I can plant my neoregalias and air plants! It's coming together nicely but I'm definitely ready to be done with it.
 
Getting there. Still working on finishing the paint job and then will be sealing it with clear Drylok and giving it plenty of time to air out. Luckily it's been dry and hot here the last few days, so this should gas off easily. I did not use spray paint, but I do have a really cool gadget that turns acrylic into a spray.

Went to the expo this weekend and bought a couple of really cool cork rounds (one looks like a saxophone)!

20210328_174152.jpg
 
Hi All!
View attachment 291345
I've learned so much in the last week alone about chameleons. I've watched hours of husbandry and enclosure build videos, read countless forums here, read everything on Chameleon Academy, and reached out to a few members (@MissSkittles @ERKleRose @jamest0o0) to ask them additional questions. It was suggested that I share the progress of my first build, so that's what I'm here for! This build is for my female veiled chameleon, Ivy. She's just a baby right now, so I have about a month to complete this build and then give it about 4 weeks to do its thing and regulate before introducing her. To the right is a picture of her current setup. I am hand-misting, and rocks were added to each pot after the photo was taken. The bottom is covered by a puppy pad.

Today I finished building the frame and painted it (my 7 year old got to choose the color - her favorite has been blue since age 3)!

View attachment 291357
This week I:
Purchased a 48" Arcadia ProT5 Hood and 6% UVB bulb, Arcadia Jungle Dawn 34" 51W LED, and clamp light/reflector with an incandescent bulb for her new basking spot. Purchased a MistKing and additional nozzle. Purchased a SolarMeter 6.5 (pulled the damn trigger, @ERKleRose). Picked up all of the needed supplies for the bioactive aspect of the cage: horticultural charcoal, play sand, orchid bark (small and large), sphagnum moss, hydroton, DTE 3-3-3 fertilizer, and FoxFarm Ocean Forest soil. I collected leaves and pods today and will be sanitizing them for the leaf litter. Purchased a clean up crew variety pack from @jamest0o0 (and I have some small pieces of cork bark on the way for my isopods to feel safe under). Purchased a feeder cup from Full Throttle Feeders. Installed digital hygrometers in her current setup which I'll be moving into the new one.

Here's my next steps:
- Build the drainage system and mesh tray for the bioactive layers in the box
- Maybe purchase more LED lights? I feel like the 34" isn't going to be enough since her cage is 48". Anyone have opinions on this?
- Plan and paint a geometric chameleon on the bottom/front of the enclosure
- Construct my own supports similar to the very popular DS ledges
- Consult with NE Herp regarding plants and placement (I've seen the plant lists/graphics - I just want to explore my options!)
- Wait for cork branches to arrive from Spain (I purchased my cork from here. The owner of this shop is incredibly kind
and was so excited to hear I'm using the pieces for Ivy's cage. She even mentioned throwing in an extra freebie as a thank you for my purchase!)
- Insert tubing for drainage holes in pots to attach to back board
- Foam, paint, seal back board
- Drill holes and rig 1.5" to .5" PVC for fogger
- Attach the hardware cloth
- Build door/latch system
- Purchase timed power strip (any recommendations are welcome, not sure which one to get), organize and cover cords
- Add branches and vines (nothing artificial, I promise)
- Add plants and isopods​

TL;DR I'm super excited about my first bioactive build.

🌱 Always learning and growing: Liv & Ivy
Beautiful
 
Finished up the drainage installation tonight. When I have more time I'll draw what it looks like to better explain but basically, there are two sheets of slanted glass that will sit under the stainless steel grate (which will have the layers of substrate above it). As everything collects on the glass it will naturally follow gravity and land in this converted flower box which will have paper towels and/or puppy pads in it (or I can slide it out to drain it if needed). The glass will be sealed with silicone on all but one side (in the center), and the gap will be large enough for me to lay on the ground under the cage and clean the glass as needed when the container isn't in place.

20210401_201503.jpg
20210401_201523.jpg


Also, almost ready to foam in branches. I got most of them attached tonight but need to leave room for the stainless steel bottom, so I'm waiting to foam them until that's done. Hoping to get the substrate in Saturday morning so that things can start to marinate while we are gone in Arizona for a week!

20210401_201549.jpg
 
Made a LOT of progress today.

Got the glass panels sealed for the drainage, and finished the bracket placement and installation for the stainless steel grate.
20210402_152642.jpg

20210402_162926.jpg

The metal doesn't sit directly on the glass, which is awesome.
20210402_170146.jpg

And got the layers completed for the substrate.
20210402_203347.jpg

When we get back from Arizona, I'll finish putting the mesh on the sides and install the doors, and get the lighting and MistKing setup. It feels good for this to finally come together.
 
Looking to add a few more plants to the front for better coverage, but here it is for now! I'm still misting by hand because even though I've watched videos and read the instruction manual about 15 times, I don't quite understand the Mist King setup. I'm going to try this weekend so we will see how that goes. I also haven't hooked up the fogger PVC yet but I have it fed into the top of her cage for now so it works. All in all very happy with how this build has gone!

For those concerned about the Spanish moss, please don't @ me. I'm aware of the risk of impaction, but she hasn't shown interest in it. She munched on one of her plants two weeks ago but has since not touched any.
 

Attachments

  • 20210430_125005.jpg
    20210430_125005.jpg
    321.5 KB · Views: 133
Hi looking good yeah lots of space for more little cham highways. My girl always sleeps in the same place so made sure it was/ is well foiliated for her to feel safe at night Ooh and the Spanish moss only joking good 👍
 
It looks great. Shes so teeny tiny in there. Lol. You could put a corn plant of something up front to hide her a little better, but in reality she has a lot of hiding spaces if she doesn't want to be out.
Nice build.
 
Hi looking good yeah lots of space for more little cham highways. My girl always sleeps in the same place so made sure it was/ is well foiliated for her to feel safe at night Ooh and the Spanish moss only joking good 👍
Thank you! Yes I am going to be adding more branches soon. I've moved some of the plants around. In the beginning the kangaroo paw in the bottom right was burning because of the direct light from the LEDs. I've since added a zebra plant to that side and it's much happier now and I often find her under its large leaves. She likes to sleep in the very top left corner of the cage, so i may hang a pothos above her cage and have the leaves come through the top!
It looks great. Shes so teeny tiny in there. Lol. You could put a corn plant of something up front to hide her a little better, but in reality she has a lot of hiding spaces if she doesn't want to be out.
Nice build.
Right? It's often very difficult for me to find her. Sometimes I pull a plant out to water it and I hear her hiss but can't find her :ROFLMAO: 
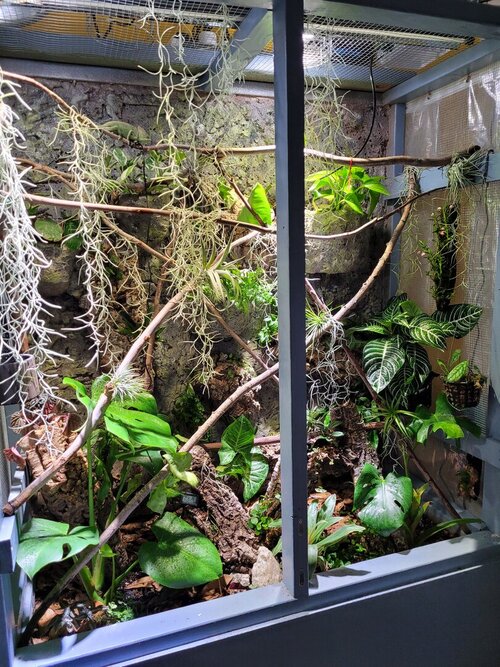
I thought about putting a croton up front, but more than likely for now I'll buy a couple of mature ferns and a larger pothos and use those for additional coverage. I've also got some trailing plants that I'm propagating right now, so those will be added once their roots are more established.
 
Back
Top Bottom