Building my first cham enclosure (Progress thread)

Dave

Avid Member
Well I finally started my first cham enclosure. It's going to be 2.5'Wx2.5'Lx5'T. The frame consists of whitewood 1x2's, with a plywood back and floor. All pieces are sealed with Wolman's Advanced Waterseal, a waterbased sealer. I'll post updates on the progress on here as it's being completed. I cut and sealed all the pieces this morning, and are now sitting out curing in the Atlanta sun.

-Dave

7.jpg

8.jpg
 
Last edited:
No no no I think it's a good idea to post right from scratch 'cuz I mean, if people are interested in how they think this project will end then it's best to start from scratch.
 
^lol, I think he probably called it that because he's going to keep the thread going as he works on the cage.

anyways looks good so far, but, are you sure it's only 2.5' tall or was that a typo? (judging by the pics it's not going to be a cube shaped cage)
 
i know i'm just kidding, you actually do make a good point, if someone sees something he can do better, it would be best to point it out before its constructed, i withdrawl my dumb joke just messing with the kid
 
Nico - Im keeping a female veiled right now. She's still small, but this cage will do quite nicely for her I think.

Electric - No, it's 2.5' wide x 2.5' long x 5' tall. Total typo lol. After typing all those 2.5's, a man gets confused sometimes. Thanks for catchin that.

Dank - Electric was right, I figured I'd post from the start all the way till the end. That way maybe it can help someone else, and maybe catch a lil advice for myself.

tryme - Thanks for the compliment :)

-Dave
 
The typo would have been perfectly suitable dimensions for a female veiled.

-Brad

Well I wasnt too sure what was really required, other than the equation I got from a site with the length of the cham from nose to vent. And I also wanted to have a cage that I could have a small indoor garden n maybe use it for something else one day, hence it being so large. I'm sure Liz will love her new mansion tho :)

-Dave
 
Bigger is better in my opinion. Females can lay eggs regardless of being mated so you def have enough room to keep a nice laying bin in there and Im sure she will enjoy the extra room.
 
I know it's been a lil bit since I've updated, but I've been really concentrating on completing this sucker. Here's the last few images, as I just completed it today!

In addition to the frames that I started to build, I also got 4 2x2's for posts, which maybe one day in the future I'll fasten wheels to. Cut em n seal em...
21-3.jpg


Set em out to dry for a few days, along with the extra frame I decided to build instead of having a solid plywood back...
22-1.jpg


Now it's time to screen up the frames. I laid screen across the frame, then fastened identical pieces to each side of the frame, essentially "sandwiching" the screen in the frame...
23-3.jpg

24-1.jpg

25-3.jpg

26-3.jpg

27-3.jpg


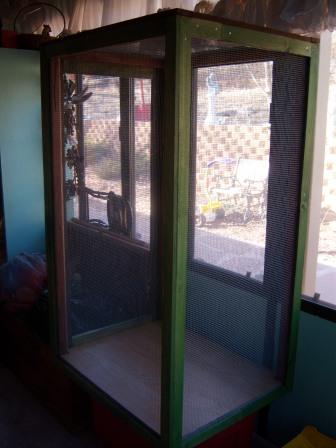
Then I pieced the side frames to eachother after fixing them to their corresponding posts, then fastened on the bottom piece of plywood and top frame. I don't have pictures of this progress as I got extremely frustrated when certain pieces were quite squaring up like I hoped (consequences of using a buzzsaw n angle, rather than a tablesaw). But with a lil elbow grease and some mindset, I got the cage right. I had to put 2 thick corner brackets on the bottom plywood to correct a slight lean that was affecting the door. As for the door, I put 2 small hinges to hook it to the rest of the frame, and then put rubber weatherseal around the inside trim of the door to fit tightly against the cage. As for a door latch, I used 2 lever hook n ring rigs on the top n bottom, worked great.

As for plants, I used a Pothos and Bridal Veil as hanging plants, which I hung from a 1x2 I fastened in the top middle of the cage, and a hibsicus in the bottom. I also put a 5 gallon bucket of 10" of playsand in the cage, as I think Liz is gettin close to that time because I saw her digging in the corner of her old smaller cage.

28-4.jpg

29-2.jpg

33-2.jpg


As for lighting, I bought a 2 bulb 24" florescent fixtures and for the time being, bought 2 24" Plant and Aquarium bulbs from Lowe's (until my 1 24" reptisun 10.0 comes in) and fixed a 2x2 on each side of the fixture, which rests upon 2 2x2's I fastened on top of the top frame. I also transferred the old heating lamp I had on the last cage.

34-2.jpg


And here is the girl herself, Liz in her new home...
35-1.jpg


Thanks for all the great advice I got from yall here, really appreciated. Any further comments or advice would be awesome now. I'd love to make some improvements!

-Dave
 
Must be that time of the year...I too built a new habitat,not as big as yours,and as I dont have a cham to put in the enclosure yet, I took a few days to map it out. I say you did a fine job, I used a larger mesh 1/4 square chicken wire, and knotty alder, a little oak, but design wise the same.I went 52 tall,32wide and 28 deep. How is that water based sealer? I used shellac as it is all natural and can be tinted, not mention it is hard as diamonds when dry. I made a neat green shellac, stain like in apperance. Ill put up some pics. Nice job, in all, it sure beats the store bought cages when you get done.
 
yep, it must be that time of the year where prople like to bring out the saws. I'm waiting for some stain to dry on mine before I put on coats of spar urithan. I made mine out of oak and stained it a dark "red oak" with a natural finish birch background:) 40hx36wx20d
 
Sounds like a winner there kevin, spar is great stuff, keeps the stain looking new, and is super waterproof...we gotta gets pics up!
 
Must be that time of the year...I too built a new habitat,not as big as yours,and as I dont have a cham to put in the enclosure yet, I took a few days to map it out. I say you did a fine job, I used a larger mesh 1/4 square chicken wire, and knotty alder, a little oak, but design wise the same.I went 52 tall,32wide and 28 deep. How is that water based sealer? I used shellac as it is all natural and can be tinted, not mention it is hard as diamonds when dry. I made a neat green shellac, stain like in apperance. Ill put up some pics. Nice job, in all, it sure beats the store bought cages when you get done.

Wolman's waterseal dried pretty nicely. I think Thompson's would've probably done a lil bit better of a job as far as the solidity of the seal, but the water is beading off nicely. Appreciate all the comments, and although I probably spent a lil more on my cage than if I wouldve bought it, it looks a lot nicer, being cedar-colored wood, and it's got heart into it.


The only thing right now is that Liz hasnt really been exploring the cage much, just bouncing between the hanging plants here n there. Generally she just stays on the Pothos plant all day, I'm wondering if she'll explore more when the time comes? Will she actually head to the 5 gallon bucket to lay eggs, or eat the mealworms n waxworms I laid out at the bottom? Hope so...

-Dave
 
yep, it must be that time of the year where prople like to bring out the saws. I'm waiting for some stain to dry on mine before I put on coats of spar urithan. I made mine out of oak and stained it a dark "red oak" with a natural finish birch background:) 40hx36wx20d

Spar Urethane? What's that?

-Dave
 
Spar varnish, similar to poly urathane, it has more UV protective qualities, used to seal wood boats amongst other things. High dollar stuff a quart can run 15-25 bucks. Shellac which I used is similar in price, but if your concern is the animal licking the wood shellac is all natural and non toxic and ultra fast drying. But I should add one note, if you finish off with a fine sand paper, it closes up the wood grain thus keeping it water tight with less effort from the clear sealers. Alot of sealers out there I would just avoid the laquer based products as they peel off and are petroleum products. Thanks to technology, alot of water bourne stuff is on the market and safe for all...except our wallets.
 
Fliks

Here is my set up. I promised pics so here they are. This thread is busy!:rolleyes: Let me know what you think...hardwood floors...only the best! Dont worry I added a drip pan under set up.
 

Attachments

  • 100_0190.JPG
    100_0190.JPG
    53.2 KB · Views: 132
  • 100_0191.JPG
    100_0191.JPG
    53.3 KB · Views: 128
Back
Top Bottom