Kaianuanu
New Member
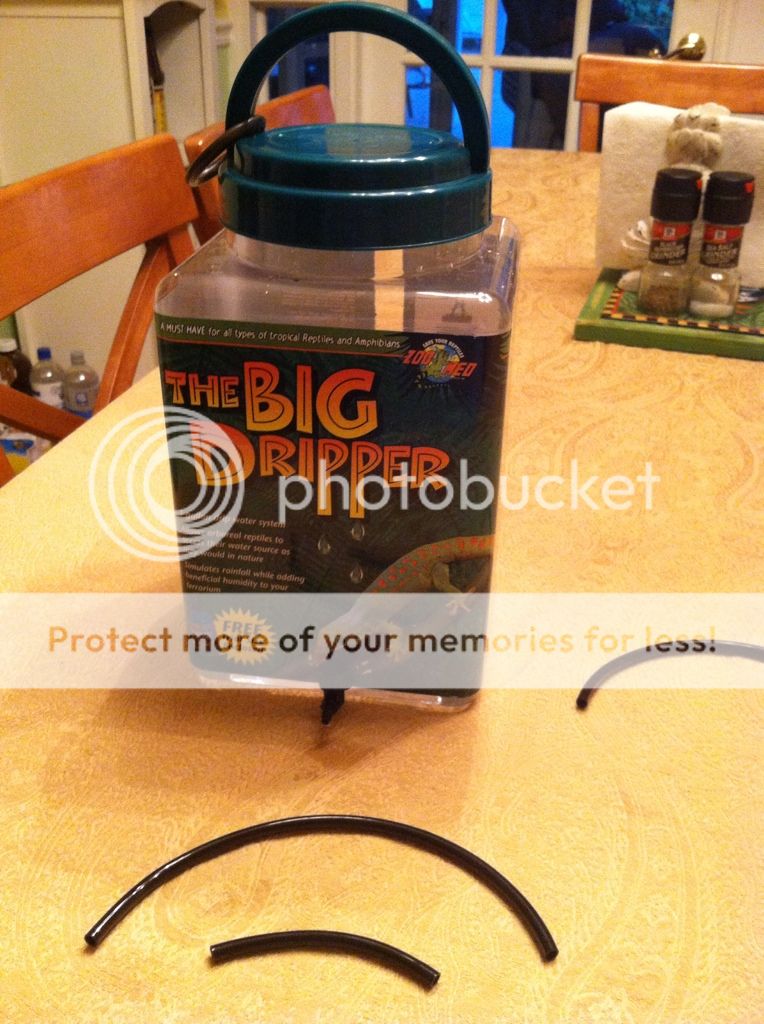
Okay, so just about everyone on here has at least tried the zoo med drippers, and many complain about problems with the valve, such as the drip rate slowing drastically by the end of the day due to the lower level of water, and therefore water pressure. I experienced this during my first attempt at cham keeping 3 years ago with a "little dripper." Despite this, I still bought one one of these for a few reasons: they come with a very sturdy handle on the lid that is very secure if you want to hang it, and the valve has threaded ends that mount to the bottle using a rubber gasket and a derlin nut, whereas most diy drippers have glued in valves with barbed ends, that can easily spring a leak. I am preparing to get another cham and have been testing out this dripper for a few days. Here is an improvement that I have found to make the dripper much more effective and easy to use.
Benefits of this mod:
-More consistent drip rate throughout the day as opposed to using just the factory valve.
-Easier and more precise fine adjustment of the drip rate.
-You do not have to readjust the drip rate every time you want to turn off the drip in order to refill
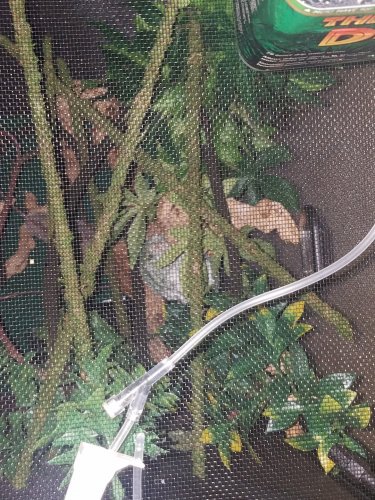
-Thinner IV tube means smaller holes in the screen if you like to have the tube actually inside the enclosure.
-The IV tube is much softer and more flexible than any airline tube.
So to do it, all you need is:
-the zoo med dripper and tubing that comes with it**
-A medical IV drip
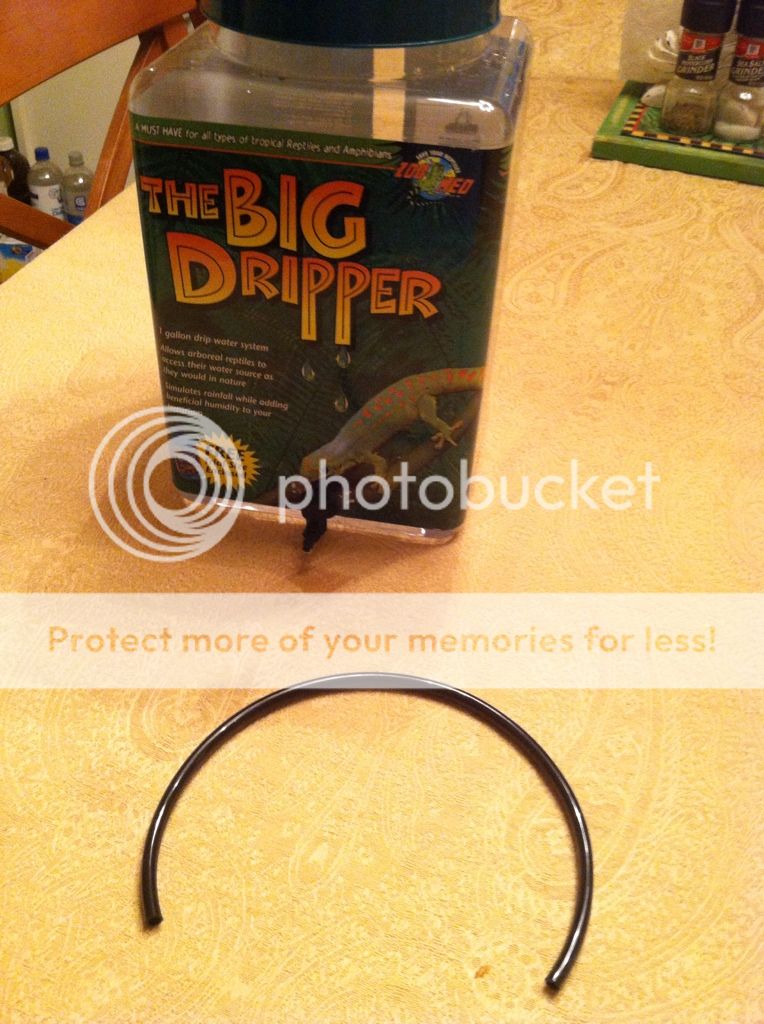
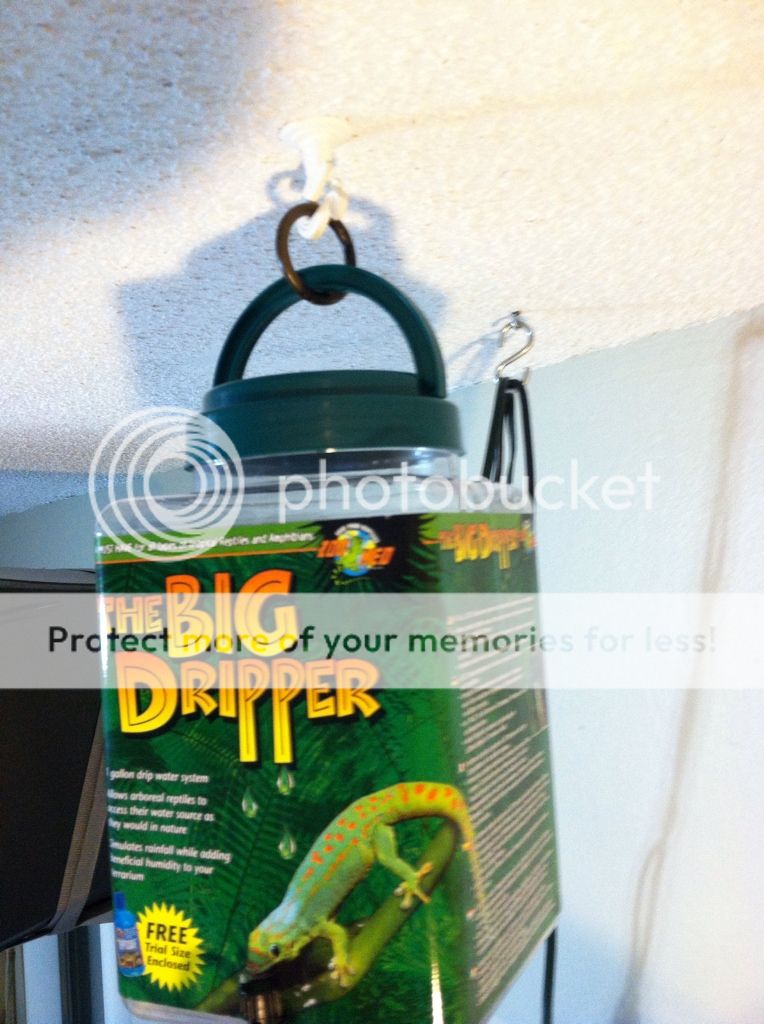
**I recommend "the Big Dripper," having a larger amount of water, even if you only use a fraction of it over the course of the day, it very beneficial because it minimizes the relative change in static pressure of the water as the water level falls, resulting in a more consistent drip. So even if your dripper only uses a small amount of water during the day, its best that you keep it filled to the top. Also, the big dripper comes with a spare valve(w/ hardware) and tube, which is nice if you want to make another using another container for a reservoir.

You know where to get the dripper. I ordered mine with my cage from LLL for about $9 i think, my local stores sell them for like $16! And you can find the IV's at hospitals, most nurses will give you one if you ask, your vet, and pharmacy will probably have them. I got mine a year or two ago when my grandmother was ill in the hospital (she's fine now), the nurse had dropped it under her bed and forgotten about it. It was unused and sealed in the package, I'd advise against using a used one, even if it was just used for saline solution. It had been laying around my fish room unopened since then. They cost less than $2 so its no big deal.
NOTE: the IV's come with a much longer tube than shown in the pics, but mine was already shortened to the length I needed, I just made it look uncut to illustrate this step by step.
Now let's start:
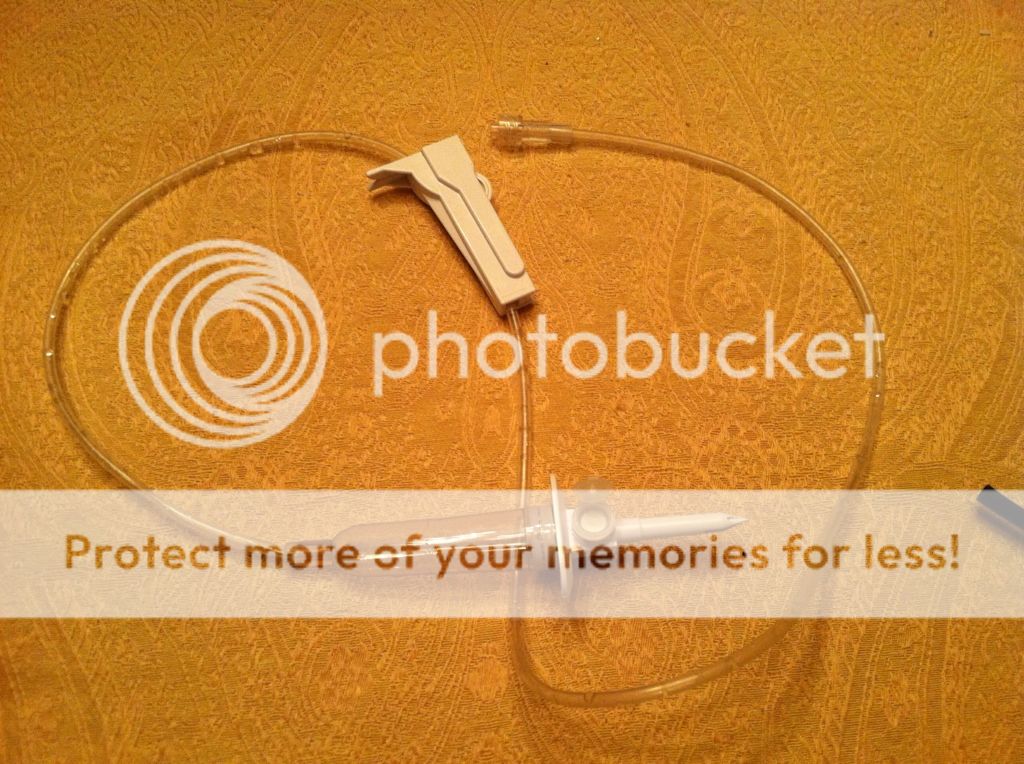
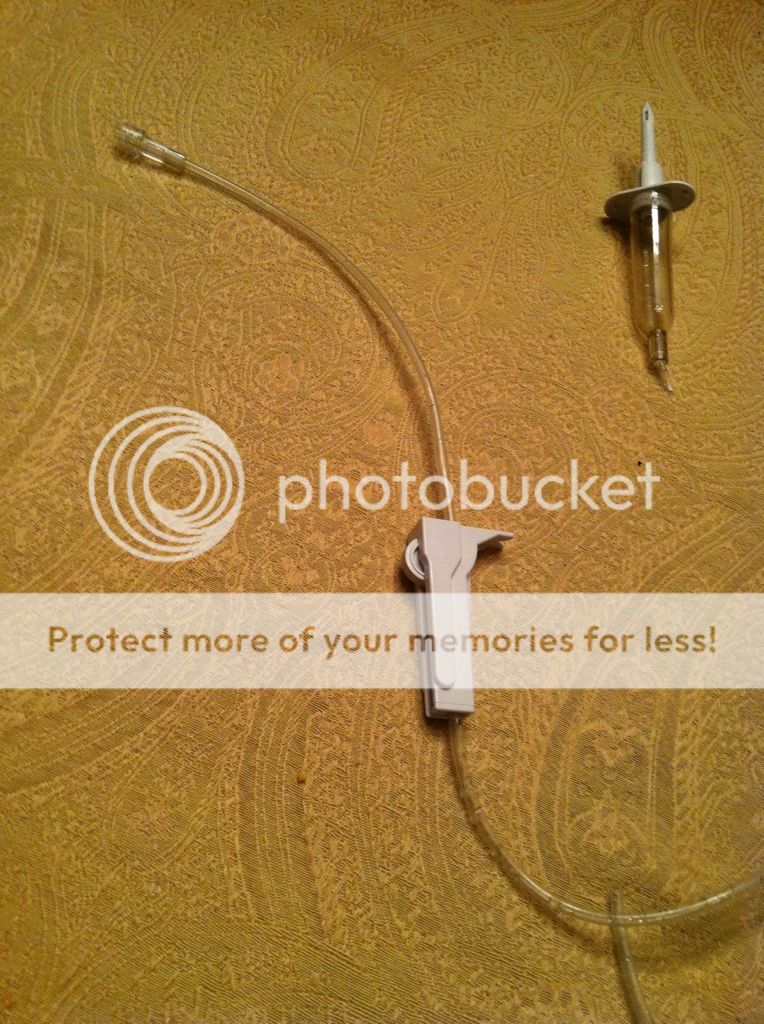
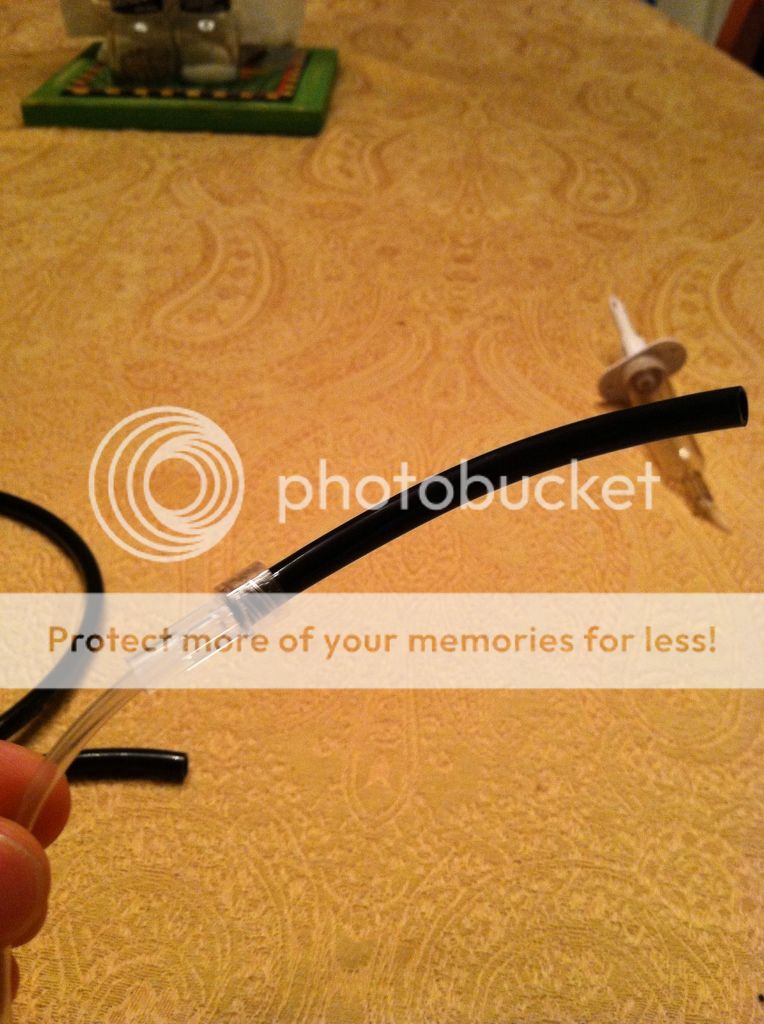
Step 1: cut the drip chamber off of the IV. Its the big clear rubber thing with the white plastic spike on it. You can toss this, as I have not found any use for these.
Step 2: See the white plastic thing, its a clever little device that allows you to fine tune the constriction of the tube, its called a "Roller Clamp" and it is much more precise for fine adjustment than the Zoo Med valve. Anyway, slide it off, flip it around, then slide it back on, so the big end is now on the side of the tube with the little clear plastic tip that the hypodermic needles screw onto. This is kind of common sense but make sure the tube is under the wheel, like how it came. I honestly don't think this step makes a difference but that's how it was meant to be oriented by design so that's how I do it.
Step 3: The IV tubing is too small to fit over the tip on the dripper valve. So now we take the original black tube that came with the dripper, and cut off a section of about 3 or 4 inches. And slip it onto the clear plastic tip on the IV tube. If for some reason, you need a really long tube, longer than the IV comes, you can leave this tube uncut, or even use a length aquarium air line tubing, however, do not use the soft silicone airline tubing, in my case, it would not fit tight enough over the clear tip on the IV, YMMV.
Step 4: Now, all you do is slide the other end of the black tube we just cut onto the dripper valve.
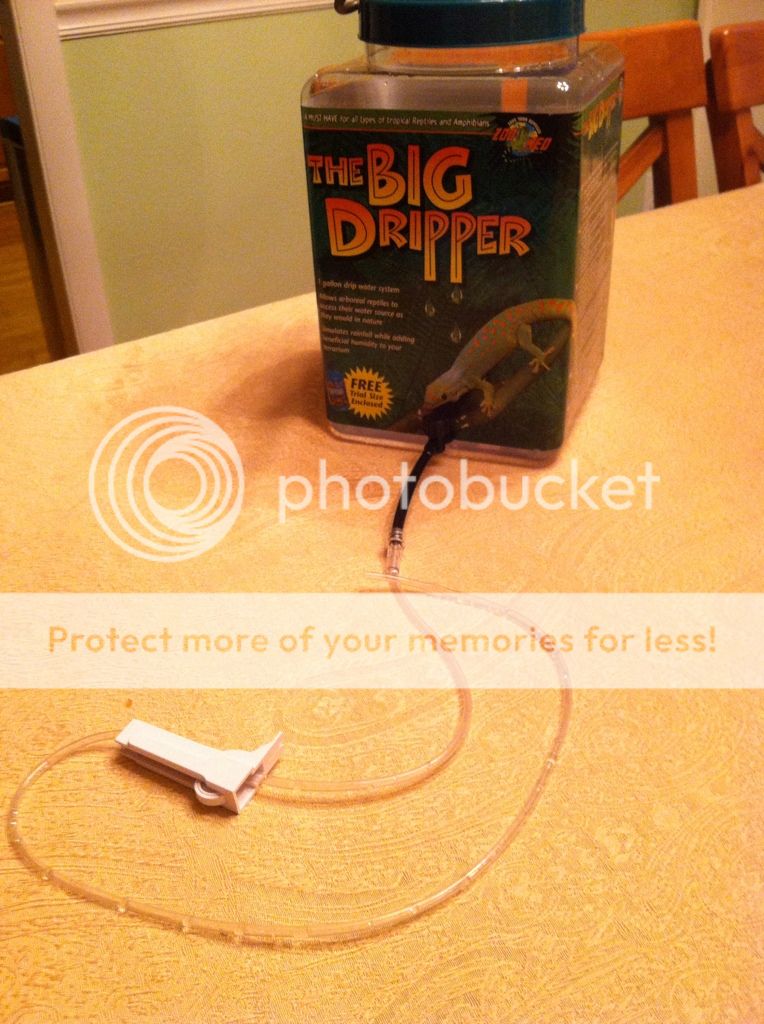
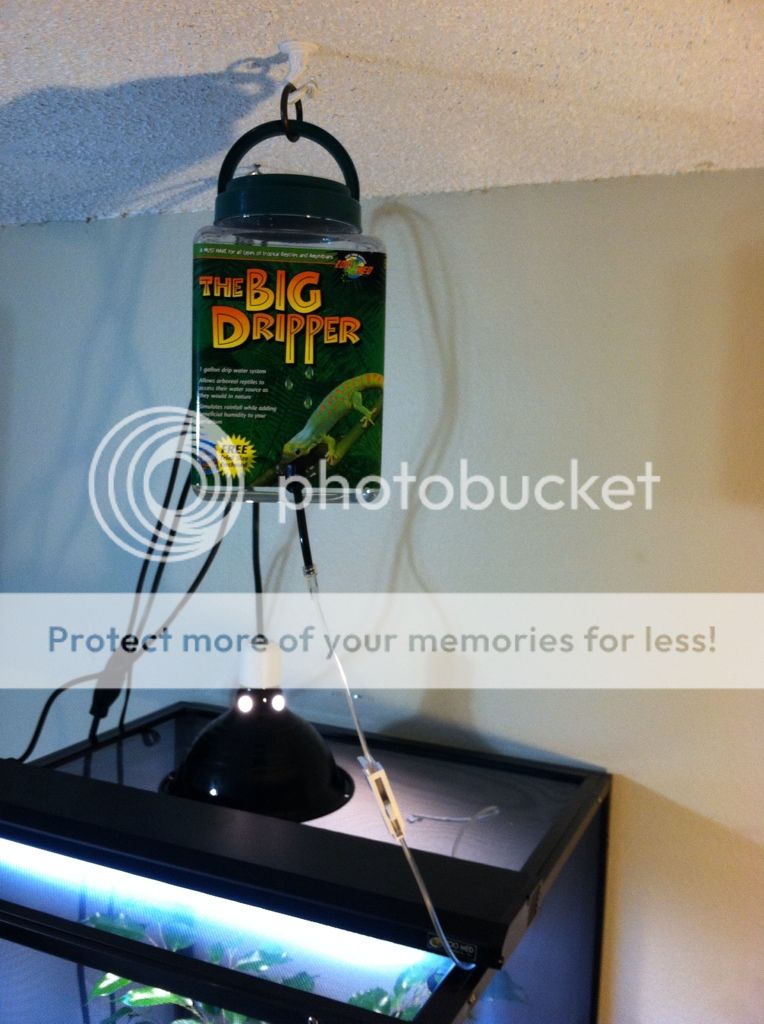
To use: Just close off the valve, pull off the black tube, fill, replace tube, and hang. Now, you put the end of the tube wherever you want it to drip, and now fully tighten the roller valve buy rolling the wheel all the way down (towards the smaller end). Then turn the valve to the fully open position. Now slowly roll the wheel on the roller clamp upward until you achieve the desired drip rate. You might want to momentarily open up the roller clamp to get all of the air out of the tubes. Once set, you can leave the roller clamp in place, now you can shut off the drip by just closing the valve every time you have to refill it, as opposed to having to readjust the valve every time.
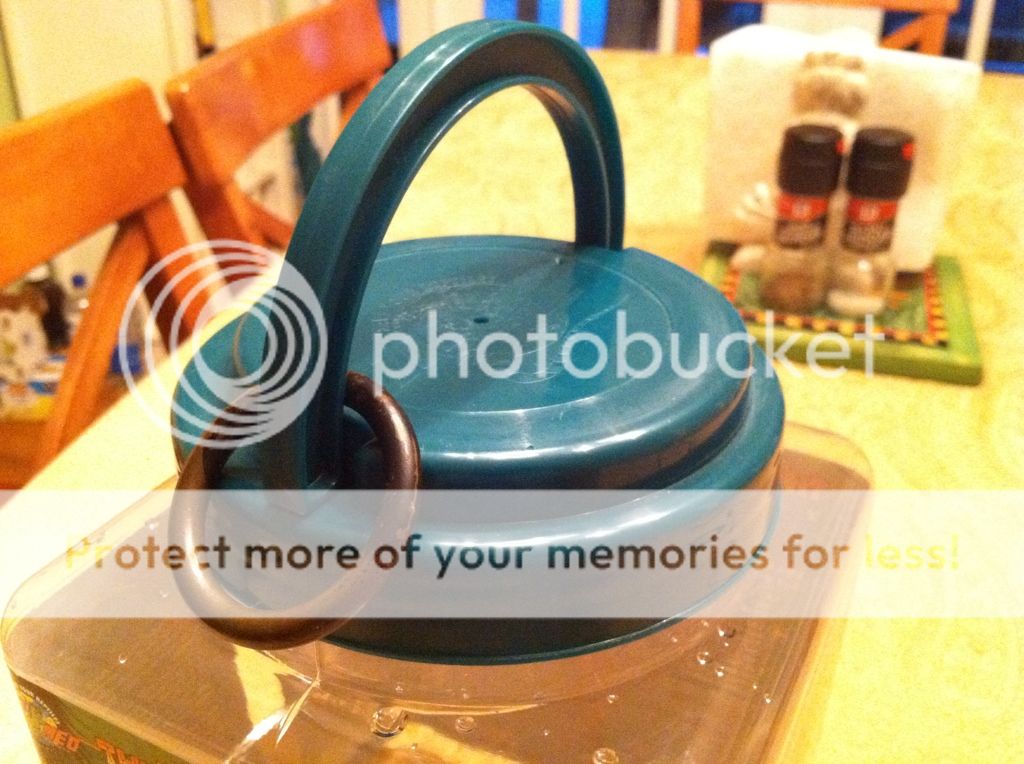
Tip: The handle that comes on the dripper is kind of thick, if you don't want to have a large hook in your ceiling with a gap wide enough. Just pull off the handle, and slip on a ring, I happened to have this solid brass ring laying around, a more readily available alternative would be one of those split rings you use to hold your keys.
Another tip, the lids on these drippers have a hole in the center so it does not create a vacuum inside, stopping your drip. Sometimes, these holes can be clogged with excess plastic from the molding process, or a pet shop's price sticker might happen to obstruct it. Just check the hole and make sure its clear. If you bought a big dripper and are making another dripper with the spare valve it came with, make sure you drill, poke, or ream a similar hole in the lid of the new jar.
Benefits of this mod:
-More consistent drip rate throughout the day as opposed to using just the factory valve.
-Easier and more precise fine adjustment of the drip rate.
-You do not have to readjust the drip rate every time you want to turn off the drip in order to refill
-Thinner IV tube means smaller holes in the screen if you like to have the tube actually inside the enclosure.
-The IV tube is much softer and more flexible than any airline tube.
So to do it, all you need is:
-the zoo med dripper and tubing that comes with it**
-A medical IV drip
**I recommend "the Big Dripper," having a larger amount of water, even if you only use a fraction of it over the course of the day, it very beneficial because it minimizes the relative change in static pressure of the water as the water level falls, resulting in a more consistent drip. So even if your dripper only uses a small amount of water during the day, its best that you keep it filled to the top. Also, the big dripper comes with a spare valve(w/ hardware) and tube, which is nice if you want to make another using another container for a reservoir.
You know where to get the dripper. I ordered mine with my cage from LLL for about $9 i think, my local stores sell them for like $16! And you can find the IV's at hospitals, most nurses will give you one if you ask, your vet, and pharmacy will probably have them. I got mine a year or two ago when my grandmother was ill in the hospital (she's fine now), the nurse had dropped it under her bed and forgotten about it. It was unused and sealed in the package, I'd advise against using a used one, even if it was just used for saline solution. It had been laying around my fish room unopened since then. They cost less than $2 so its no big deal.
NOTE: the IV's come with a much longer tube than shown in the pics, but mine was already shortened to the length I needed, I just made it look uncut to illustrate this step by step.
Now let's start:
Step 1: cut the drip chamber off of the IV. Its the big clear rubber thing with the white plastic spike on it. You can toss this, as I have not found any use for these.

Step 2: See the white plastic thing, its a clever little device that allows you to fine tune the constriction of the tube, its called a "Roller Clamp" and it is much more precise for fine adjustment than the Zoo Med valve. Anyway, slide it off, flip it around, then slide it back on, so the big end is now on the side of the tube with the little clear plastic tip that the hypodermic needles screw onto. This is kind of common sense but make sure the tube is under the wheel, like how it came. I honestly don't think this step makes a difference but that's how it was meant to be oriented by design so that's how I do it.
Step 3: The IV tubing is too small to fit over the tip on the dripper valve. So now we take the original black tube that came with the dripper, and cut off a section of about 3 or 4 inches. And slip it onto the clear plastic tip on the IV tube. If for some reason, you need a really long tube, longer than the IV comes, you can leave this tube uncut, or even use a length aquarium air line tubing, however, do not use the soft silicone airline tubing, in my case, it would not fit tight enough over the clear tip on the IV, YMMV.
Step 4: Now, all you do is slide the other end of the black tube we just cut onto the dripper valve.
To use: Just close off the valve, pull off the black tube, fill, replace tube, and hang. Now, you put the end of the tube wherever you want it to drip, and now fully tighten the roller valve buy rolling the wheel all the way down (towards the smaller end). Then turn the valve to the fully open position. Now slowly roll the wheel on the roller clamp upward until you achieve the desired drip rate. You might want to momentarily open up the roller clamp to get all of the air out of the tubes. Once set, you can leave the roller clamp in place, now you can shut off the drip by just closing the valve every time you have to refill it, as opposed to having to readjust the valve every time.
Tip: The handle that comes on the dripper is kind of thick, if you don't want to have a large hook in your ceiling with a gap wide enough. Just pull off the handle, and slip on a ring, I happened to have this solid brass ring laying around, a more readily available alternative would be one of those split rings you use to hold your keys.
Another tip, the lids on these drippers have a hole in the center so it does not create a vacuum inside, stopping your drip. Sometimes, these holes can be clogged with excess plastic from the molding process, or a pet shop's price sticker might happen to obstruct it. Just check the hole and make sure its clear. If you bought a big dripper and are making another dripper with the spare valve it came with, make sure you drill, poke, or ream a similar hole in the lid of the new jar.


") Does your dripper tube go into the cage itself? or is it sitting on top.
Does your dripper tube go into the cage itself? or is it sitting on top.