Very large DIY bioactive build

Ok I like the pvc pipe in front idea. Aslo how did you setup the MK to your RO system? I was planning 18 inches of sunshine mix #4 with some charcoal mixed in.
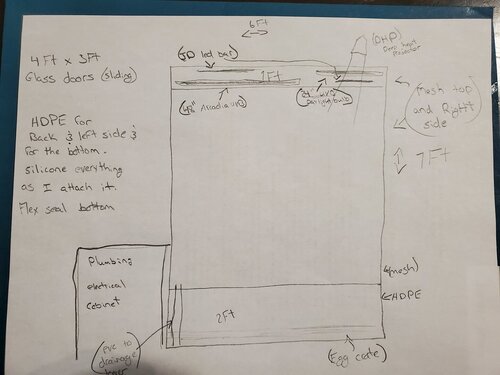
As for the sides and back the HDPE looks like a better option for sure. And I may try to from the front in a way so I dont need 5ft tall glass but maybe 4ft or less.

Probably best, I have 4 foot doors ATM, 1/4 tempered, they way quite alot lol, and now I want to build another cage, this one to the floor (my current one has a 12 inch shelf below the soil, so doors start 20 inches off the ground or so). They are quite heavy lol.

I just ran tube to the MK :p,

JK. So my RO, has the tank and Faucet, I connected a T between there, to run over, then ran it through the cupboards and under the carpet where it meets the hardwood, up to the MK where I have a electric solenoid before the pump that activates at the same time as the pump. If you dont do solenoid it will leak, if the solenoid fails it will leak, and this is where a drain that is tied to sewer (or just through the floor to your garden or something) comes into play. If the solenoid was to fail, and if you run two, then if the controller was to fail.

You could still drain your build, just put a hole in the side or bottom as close to the floor panel as you can, and use a false bottom that goes higher than that. It likely will never drain anything, but its a good Just in case thing.

You dont really need 18 inches of soil, 7-10 would be plenty, and a 3-4 inch false bottom for extra safety.

I like Egg Crate Light Diffuser False bottoms, it holds the most water and weighs the least.
 
Ok. I tried to put more in this drawing. The frame would be aluminum extrusions. Top and right side mesh. The bottom would be 2 ft deep with HDPE all the way around and flex sealed. Then egg crate lined with weed screen. Then soil on top. And still have a few inches from soul to my sliding door track, to keep dirt out of it hopefully. The back and left side would be HDPE. I would drop down a foot in the front up top and use HDP in that 1ftx6ft section to hide my lighting. I want to hang my lights inside instead of putting on mesh. I would probably put the Deep heat projector outside the mesh on right side. I may use 2 so I have more than just one basking spot. Mist king system. Not sure how many nozzles yet for this size and placement with lights inside. Herpstat 2 for the DHP's. For the drainage I do plan to use a pvc pipe in the front left side to have access to pump out if needed. Sorry my brain is scattered lol so that's how it's coming out.
Any questions on anything I missed or anything to critique?
 

Attachments

  • 20200131_170618.jpg
    20200131_170618.jpg
    153.9 KB · Views: 123
Should I use 12% or 6% uvb inside the enclosure? There will be alot of plant life and the closest I'll allow him to get to a uvb bulb is 15 to 18 inches I think
 
Should I use 12% or 6% uvb inside the enclosure? There will be alot of plant life and the closest I'll allow him to get to a uvb bulb is 15 to 18 inches I think

Why so far away? That's like twice as far away as basking branches usually allow chameleons to get. And keep in mind that UVB's efficacy drops considerably the further away the bulb is. With your current setup, for example, the UVB light should really be resting directly on the screen top of your enclosure and not be propped up the way you have it
 
In my current setup it's about 7 in from his back. 6% arcadia. I've been told if a 6% inside cage then keep it 12 to 14" away. Distance would depend on percentage uvb bulb.
 
In my current setup it's about 7 in from his back. 6% arcadia. I've been told if a 6% inside cage then keep it 12 to 14" away. Distance would depend on percentage uvb bulb.

A 6% bulb is just fine to be 8 to 10 inches from the branch which will be closer to the Cham in there.

A 12% you have to be a little more careful about. It's still fine to be 10 inches from the branch, but you need to have lots of foliage for it to be escable. Which you still should have with a 6%.

With a cage this size, I would likely try to do lots of foliage and a 12% so you have UV light going further down. Or 2 6%s.
 
Now that I have my design finalized. I now need to get the aluminum extrusions. Unfortunately I'm going to have to wait for a bit. Funds are a bit tight atm lol. But this build will be worth the wait. Hopefully I can find good deals on some HDPE sheets and glass.
I'm thinking to get some white plastic lattice to space of the back wall and left wall to make it easier to attach vines and branches it will also give the pothos lots of places to grow.
15805676197303859360416524357064.jpg
 
What are some good options for led lighting? I would like to try and create sunrise, sunset, and cloud cover when misting. Only problem is I'm not very good at makeshift electrical creations :)
 
What are some good options for led lighting? I would like to try and create sunrise, sunset, and cloud cover when misting. Only problem is I'm not very good at makeshift electrical creations :)

Depends heavily on what kind of lights your going to dim, how much you want to spend, and what kind of LEDs you have/want.

I am altering drastically the way I do things to include basking light control, so I will have a thread up on that soon. Once I have a firm, and easy solution that can be easily recreated by less techy folks. So if you can hold out a week or 2, I will have an answer for you. I have a lead on a way to do this very easily and safely, just have to get it all worked out and make sure it will work.
 
I am open to solutions and not in a rush. I'm looking to use a deep heat projector with a herpstat and have my uvb on a simple timer. The led's would be what I figured on dimming. Not set on any brand or style yet due to the size and depth of the enclosure I plan to build. But always open to better solutions to a happy and healthy cham. If this enclosure goes well my wife wants me to build a second one
 
I am open to solutions and not in a rush. I'm looking to use a deep heat projector with a herpstat and have my uvb on a simple timer. The led's would be what I figured on dimming. Not set on any brand or style yet due to the size and depth of the enclosure I plan to build. But always open to better solutions to a happy and healthy cham. If this enclosure goes well my wife wants me to build a second one

Ahh so this is the situation that I am moving away from.

The idea in theory is great, The Deep heat, provides the needed warmth and IR, while the LEDs provide the visible light. While this works, a glaringly large issue has came to light to me. The Arcadia Deep Heat, provides a very very low amount of IRA. Only 8% of the IR provided is actually IRA. So while the marketing and "Deep Tissue Heating" sound great, its just not true.

"Deep Tissue Heating" is actually the result of IRA, which the deep heat provides very little of, more than a Ceramic Heat Emitter, which provides zero, but much much less than a standard bulb. This makes a Deep Heat, good for raising ambient, and as night heat (which one will stay in my lighting arsenal for night heat) however inferior to an old fashion incan or halogen for daytime basking.

So my "Plan" as it were, same as yours, was killed off by this information. I have now changed to using a combination of WW Halogens (2900k), and CW LEDs (56-6500k), to assemble the lighting effects. With the addition of our UVB lamps, the spectrum should be brought back to around the 6500k + Mark, with the low light Halogens, Bright 5600-6500k LEDs, and mid brightness T5 UVB lamps.

Now you could use this idea in tandem with your previous, a herpstat. The Herpstat offers a ramping feature for basking lights Sunrise/Sunset, that could be put to good use. However it will hinder your cloud cover, as you cannot ramp back down and up for the mist. Unless you can have ramping for the nighttime cycle and use the "daytime" for the morning and "Nighttime" for the afternoon. Which may be an option, it will be a more costly one however then mine. I dont really want to set a temp "Limit" as it were, so that throws a stick in the Herpstats feature set.


Ok. I look forward to your thread then on how this change works out.
 
I regret to say but the reason I'm not in a rush is bc last weekish our little guy was put down. After several vet visits and force feeding, and meds we discovered the reason for his quick decline was something he was born with. The vet said there was absolutely nothing we could have done. My wife took it very hard and we learned a hard lesson on buying from petsmart :(

I want this vivarium to be perfect for our next guy. I have my eye on a few breeders this time instead of big box pet stores
 
Oh was going to post this earlier, forgot to go find it, and just found it by accident so figured I would throw it up. This is why I am dropping the deep heat down to night time only.
FB_IMG_1581133534383.jpg
 
Any update cyberlocc on the lighting you were testing? I looked to see if you made a thread on it yet but I could have missed it if you did.
 
Depends heavily on what kind of lights your going to dim, how much you want to spend, and what kind of LEDs you have/want.

I am altering drastically the way I do things to include basking light control, so I will have a thread up on that soon. Once I have a firm, and easy solution that can be easily recreated by less techy folks. So if you can hold out a week or 2, I will have an answer for you. I have a lead on a way to do this very easily and safely, just have to get it all worked out and make sure it will work.


Did you ever make that post? I have been very busy and put everything off for a bit but I want to get everything figured out so I can hopefully get this set correctly from the start
 
Did you ever make that post? I have been very busy and put everything off for a bit but I want to get everything figured out so I can hopefully get this set correctly from the start

Not yet no, trying to find a good easy DIY option, that will be easy to do, and not cost a ton, while providing good lighting.
 
Back
Top Bottom