Panther Clutches Help!

Dbash44

Avid Member
Hey Chameleon Forums,

This is a doozy of a thread, so strap in.

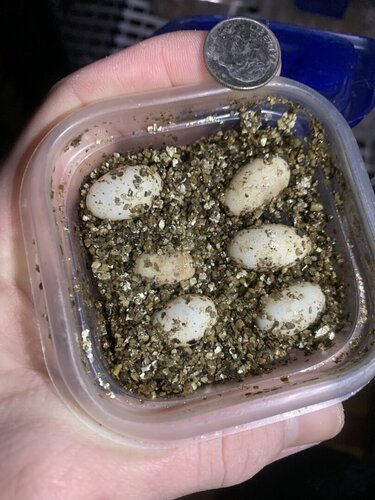
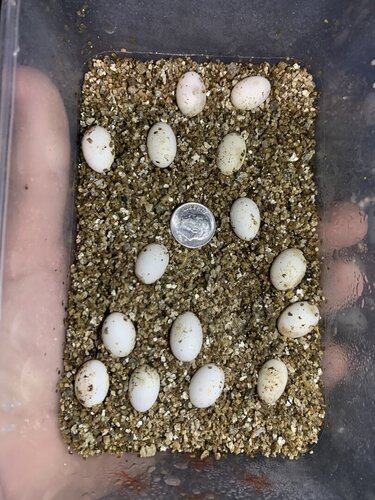
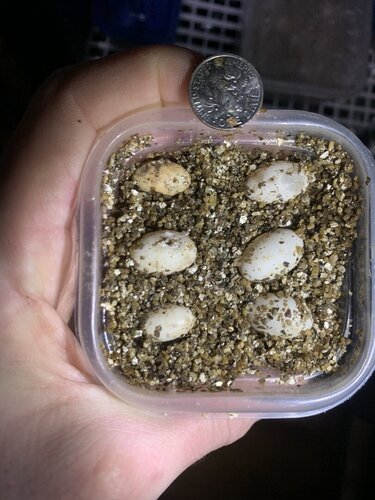
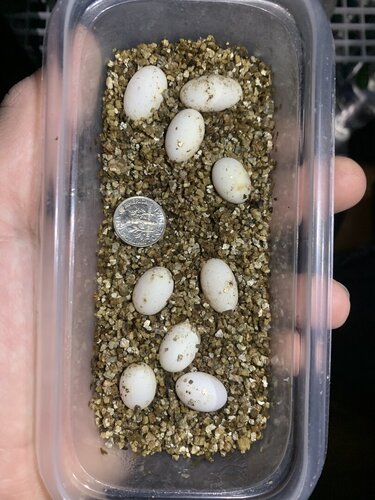
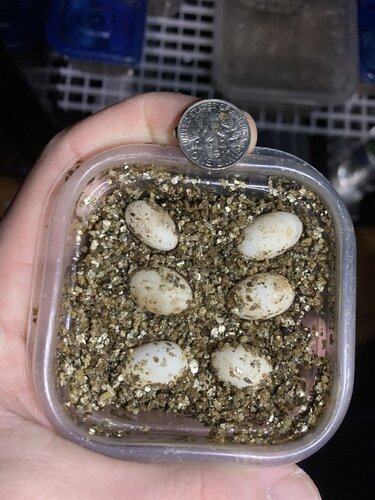
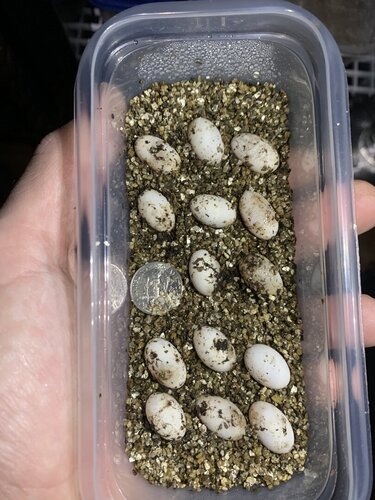
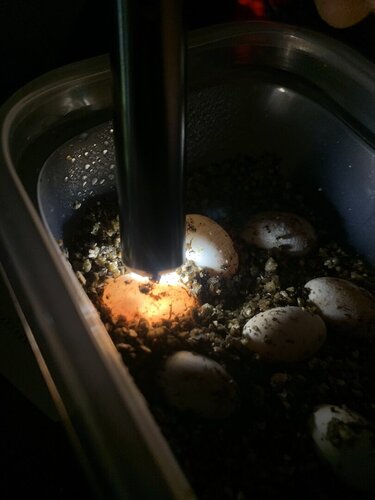
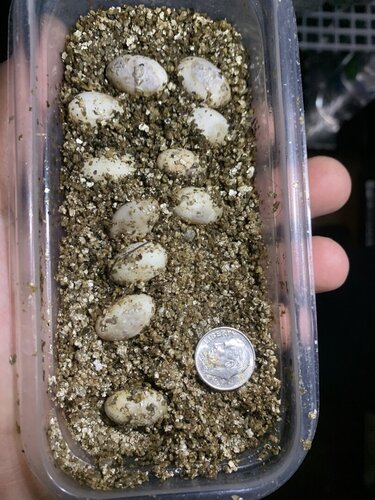
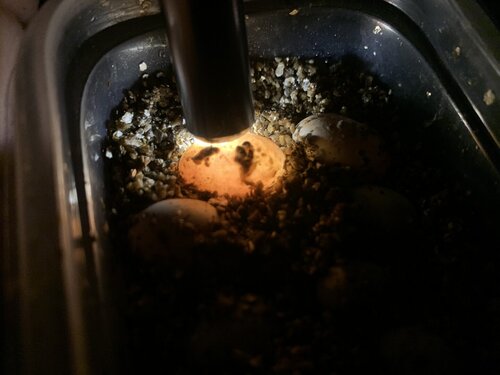
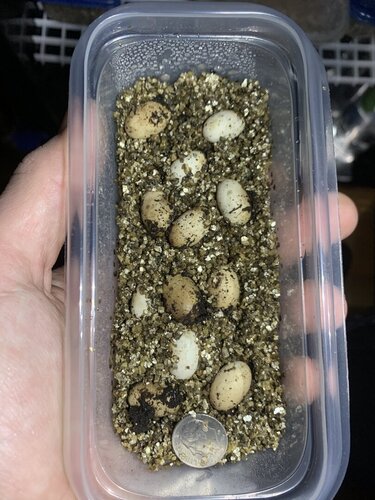
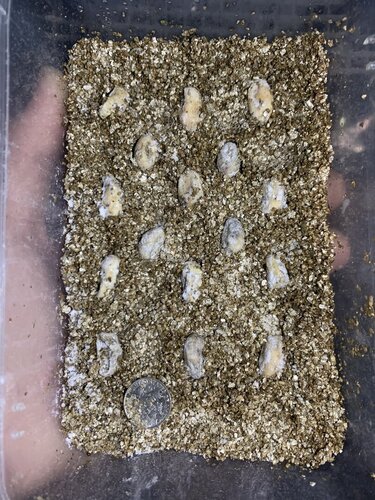
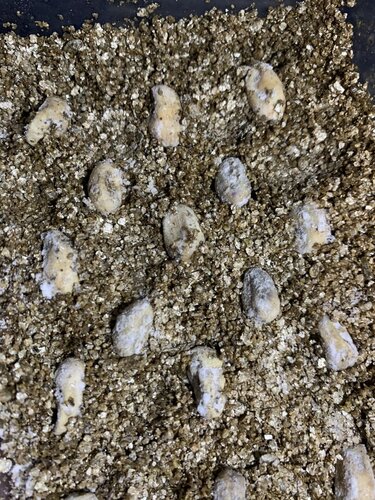
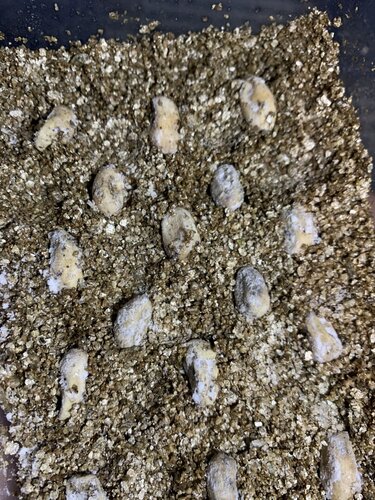
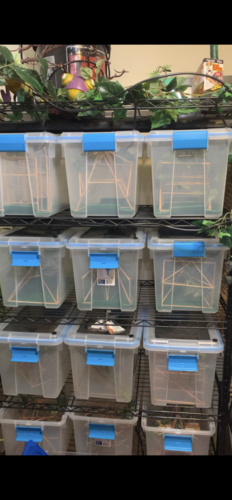
I'm new to incubation of chameleon eggs. I've done a lot of research, yet I'm still unsure if I'm doing everything correctly. I took over a large breeding project for some friends of mine in October 2019 so a lot of this was passed on to me. Not trying to play the blame game, I just don't want to get ahead of myself and do something to the eggs that won't be conducive to them hatching. I currently have them in vermiculite and incubating at 73-74 degrees Fahrenheit. There's six bottles of water and a tray of water at the bottom of the incubator. Glass door is covered from the inside with a cut up vinyl shower curtain adhered to it. Each container of eggs has two small holes poked in the lid or the sides (depending on what type of container).

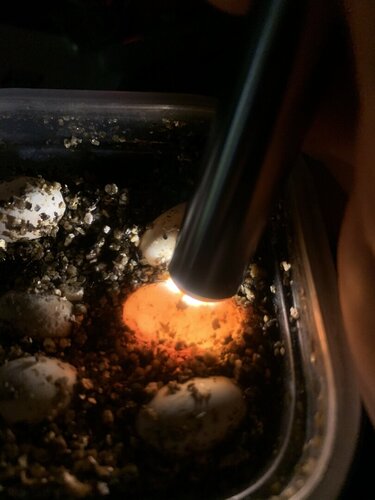
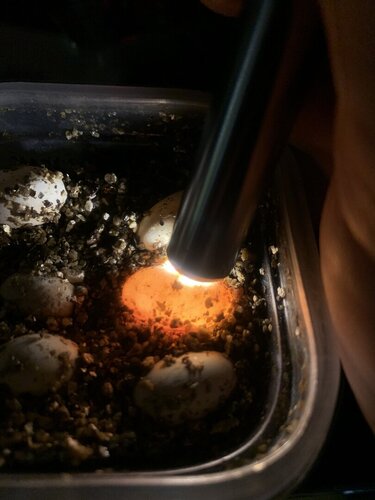
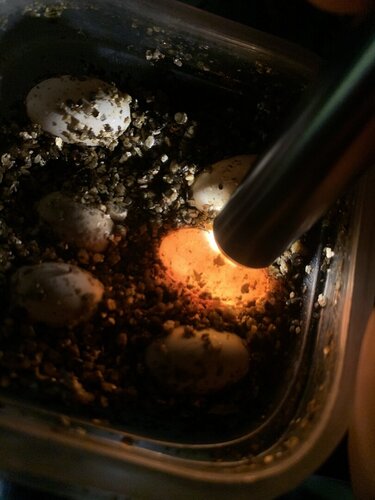
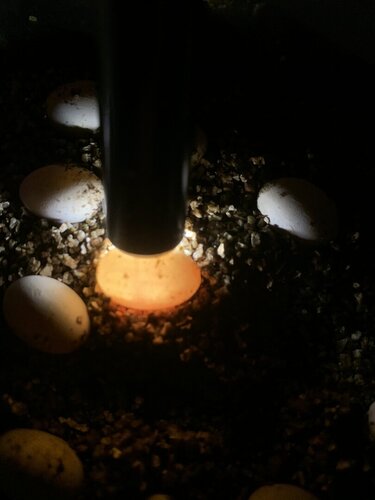
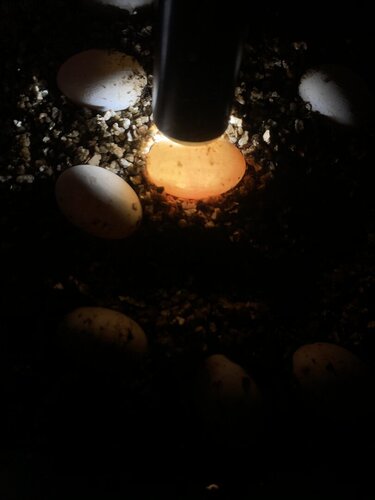
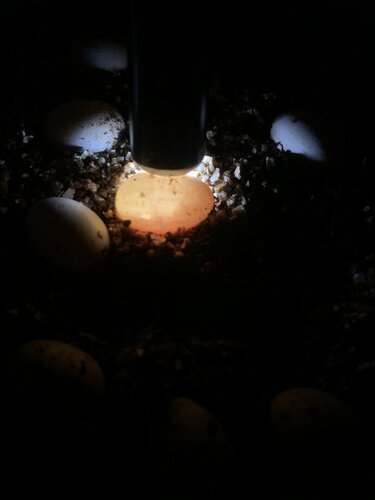
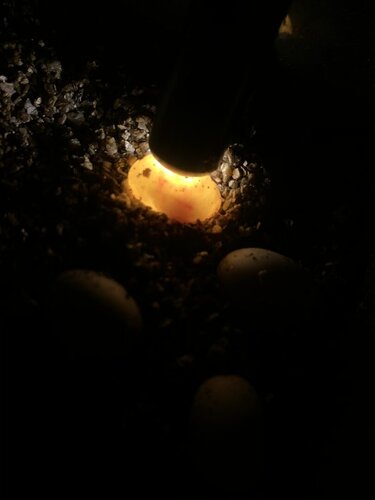
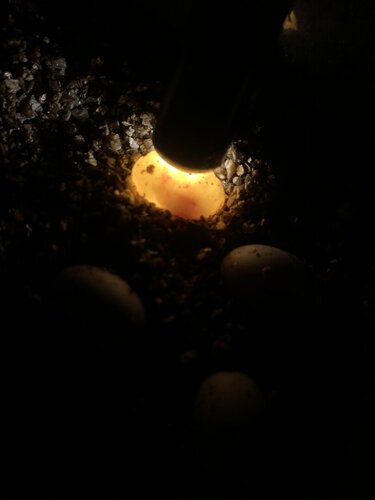
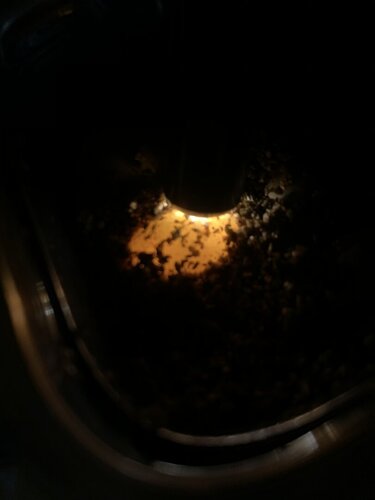
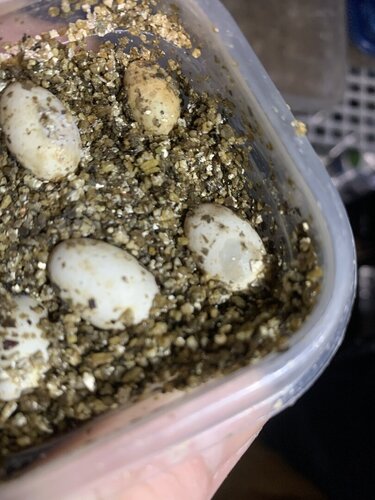
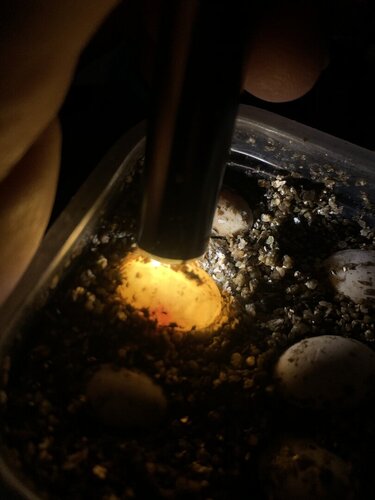
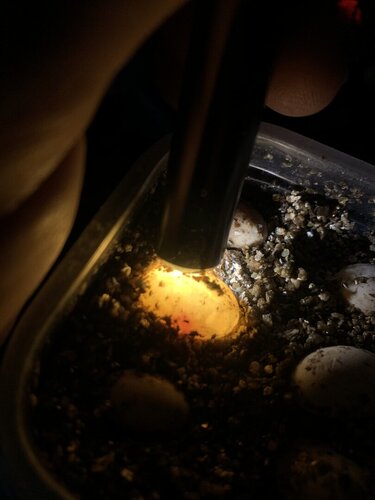
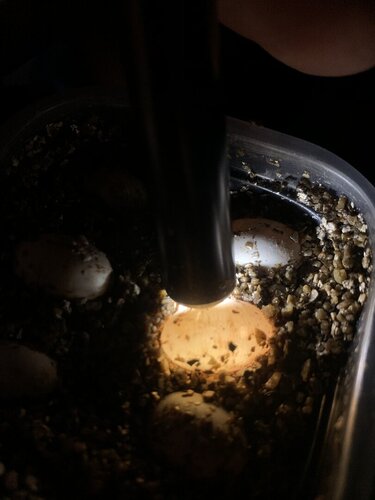
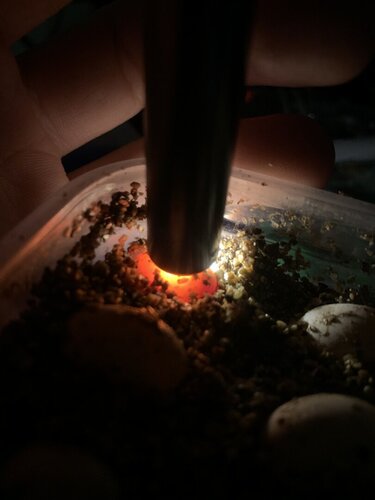
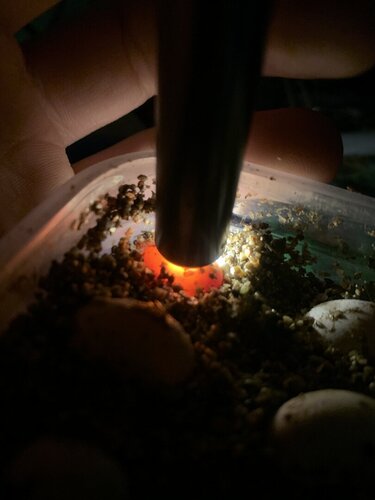
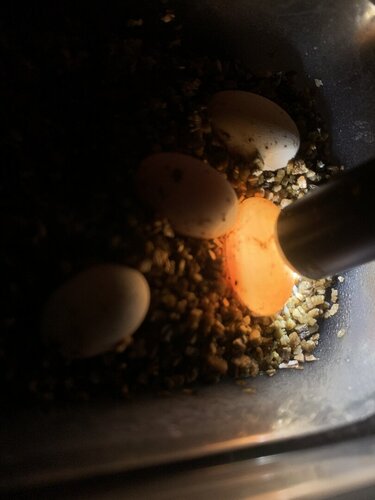
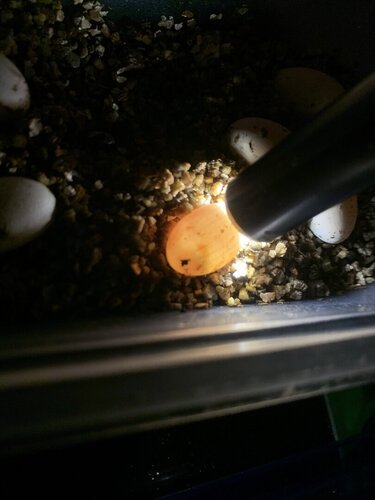
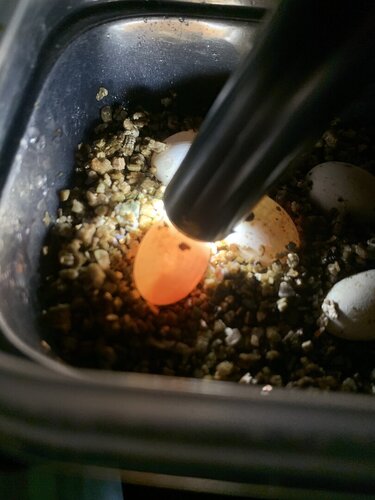
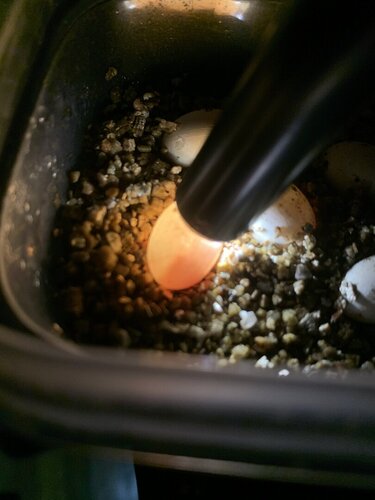
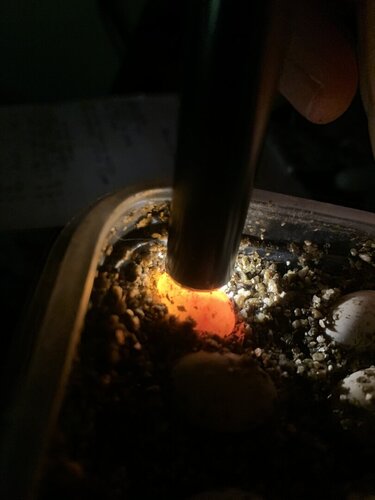
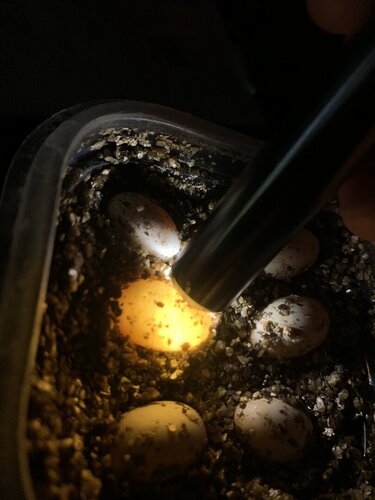
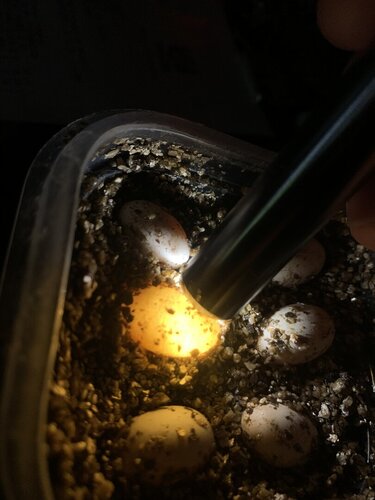
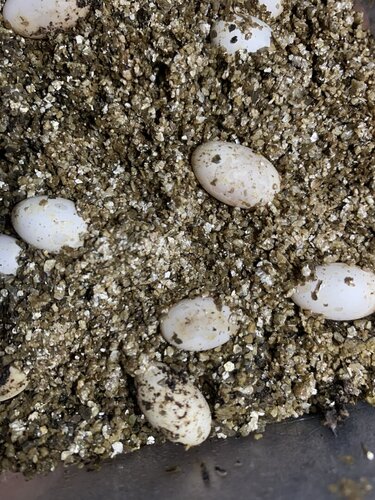
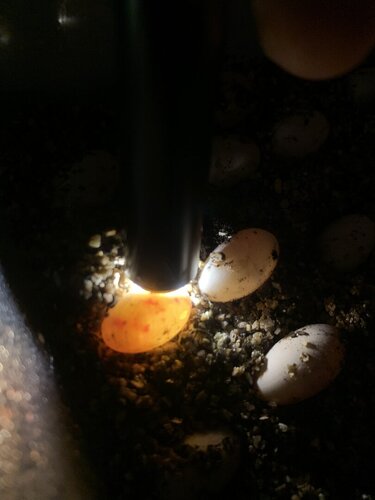
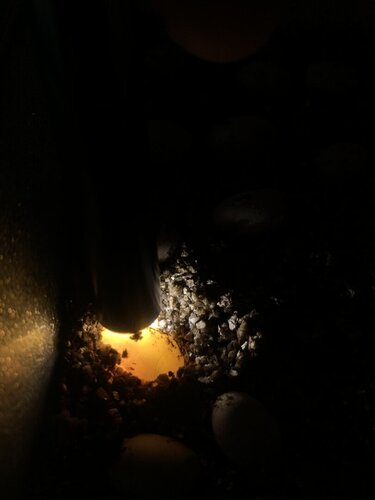
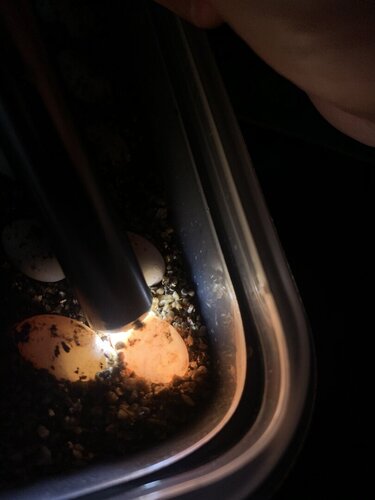
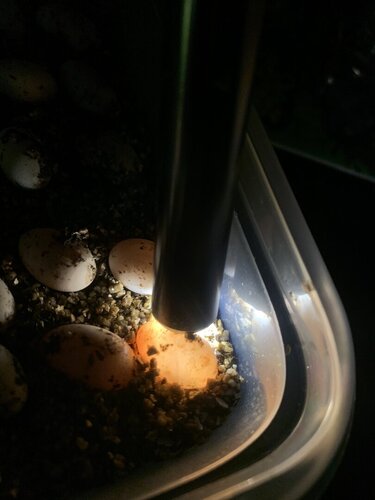
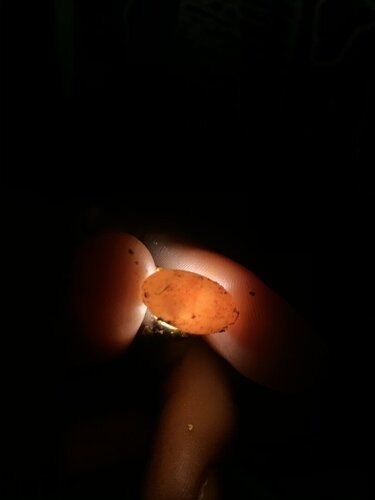
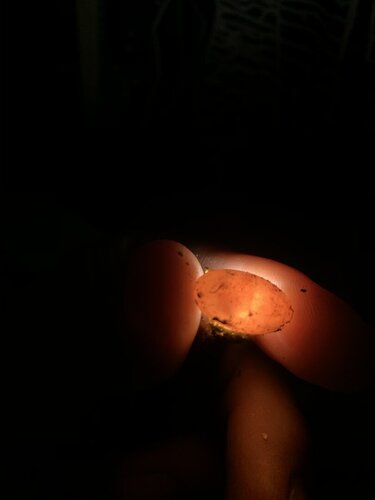
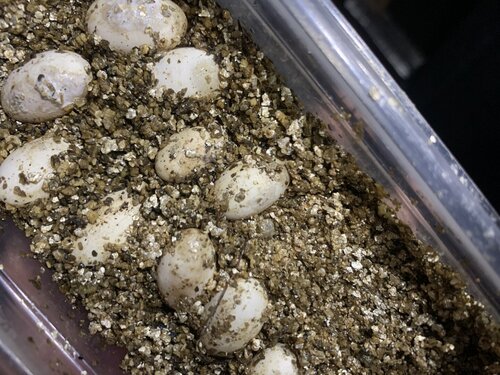
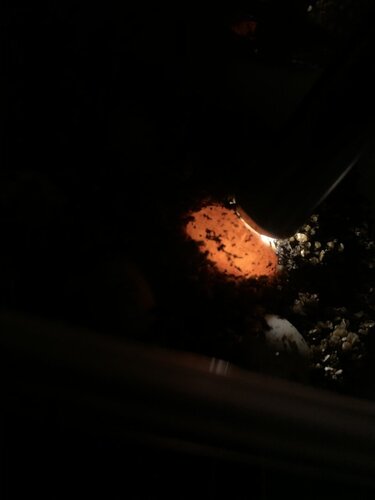
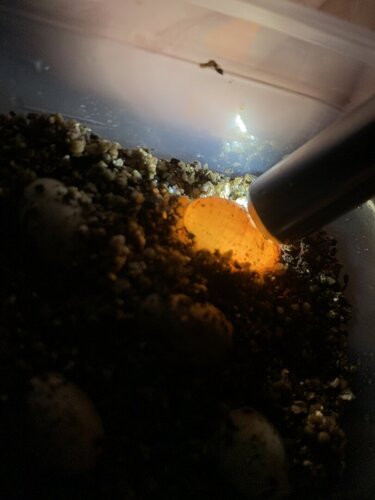
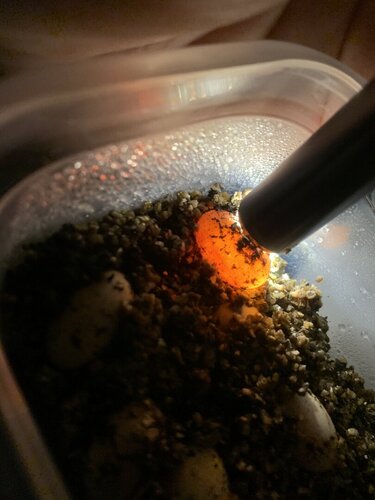
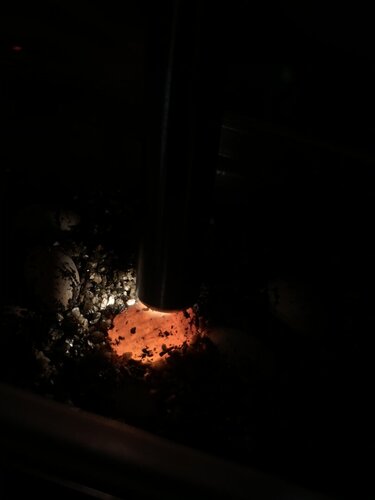
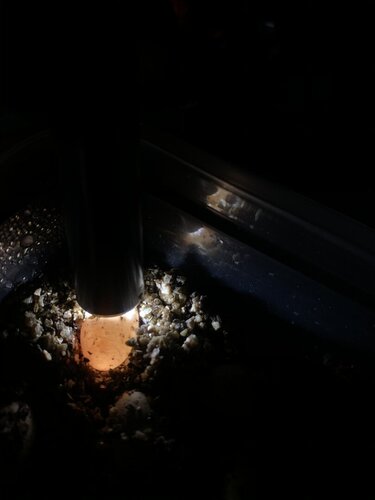
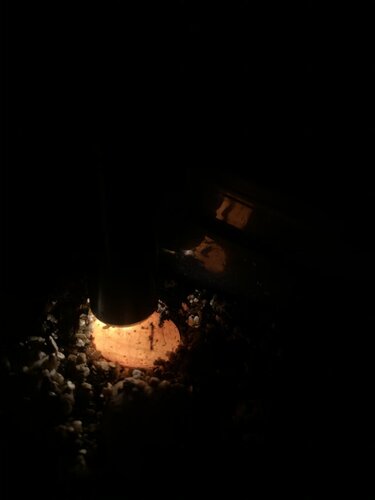
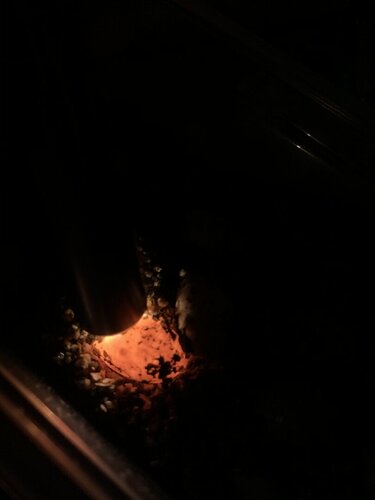
What perplexes me is that there's a lot of inconsistencies in each container of eggs. I've lost half a clutch due to incubation medium being too moist (or at least that's what we deduced on CF and I since changed it out). I kept a good amount of these moldy, concave eggs and added Lotrimin powder to them to help save them. Some of the eggs are different colors when not candled, some shrink and then mold over, some appear to have veins and and embryo while others don't. The closest thing I've seen to sweating on a number of them (similar to condensation on a cold bottle of Coke on a hot day) is a sheen, but I'm thinking its just from the lid of the container dripping water.

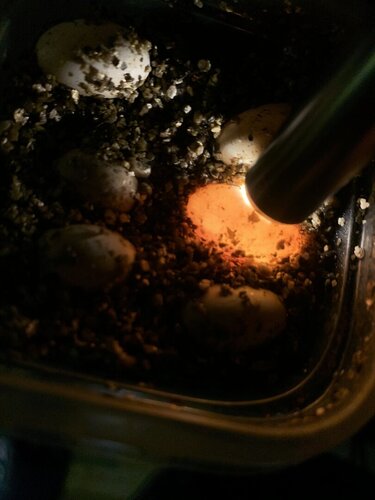
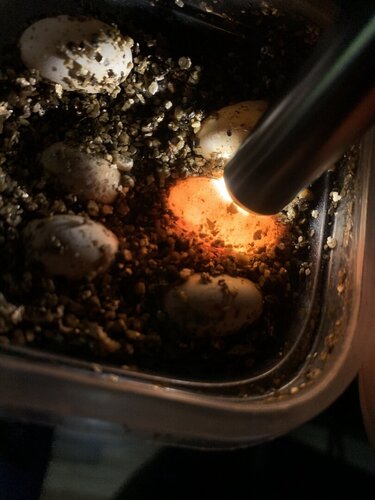
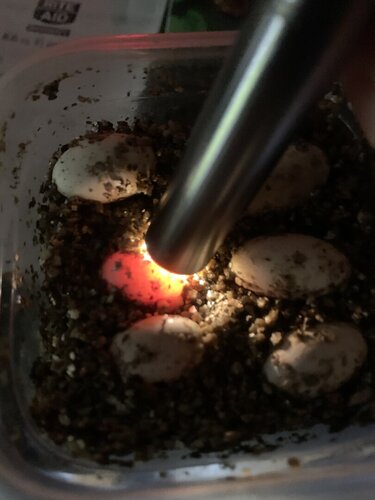
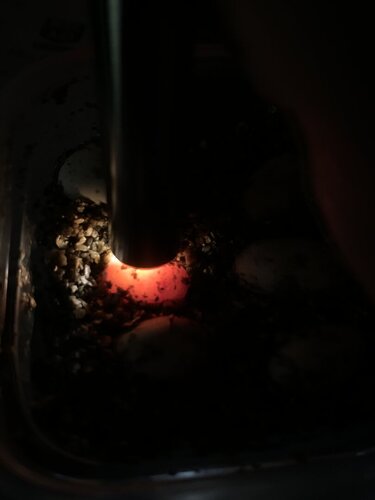
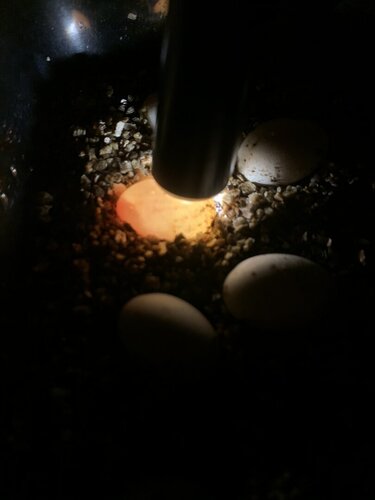
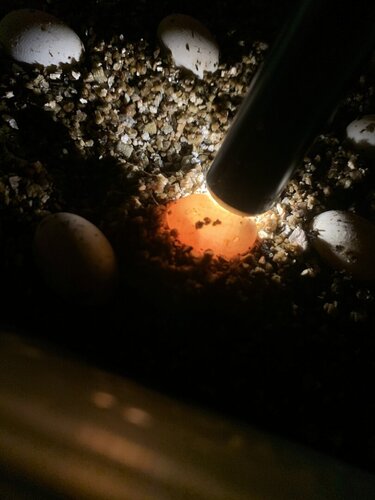
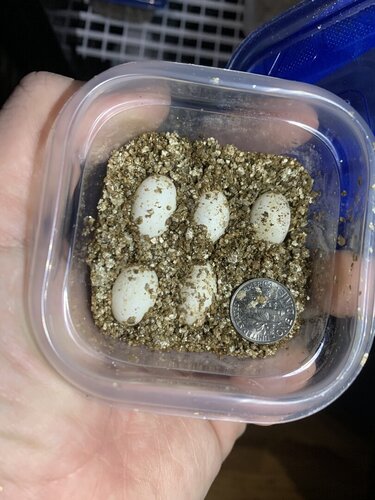
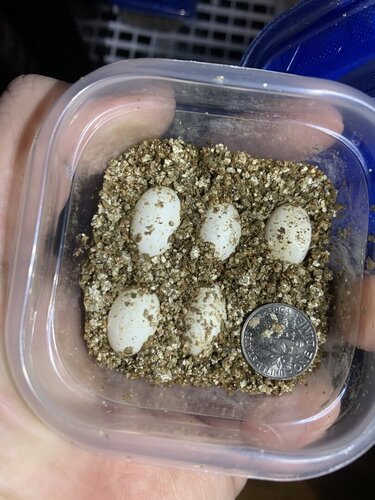
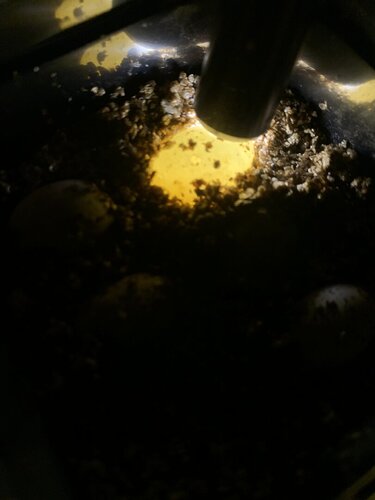
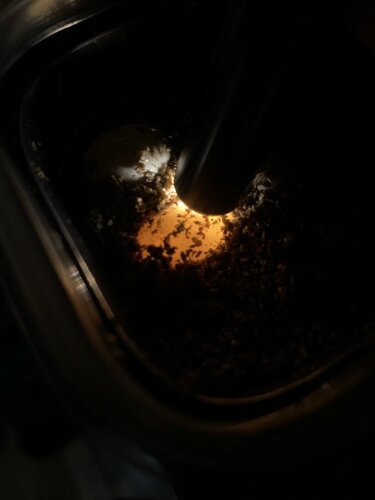
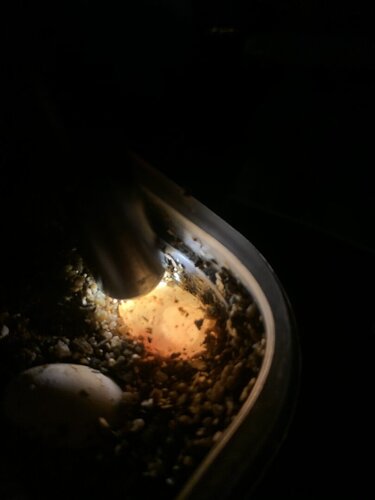
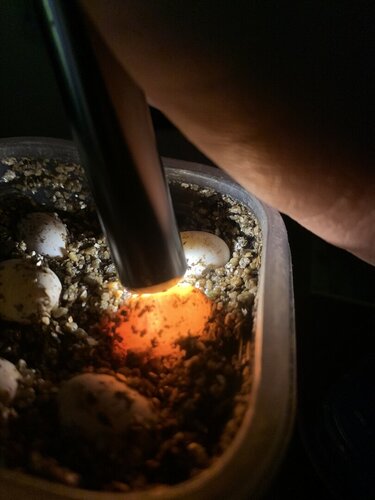
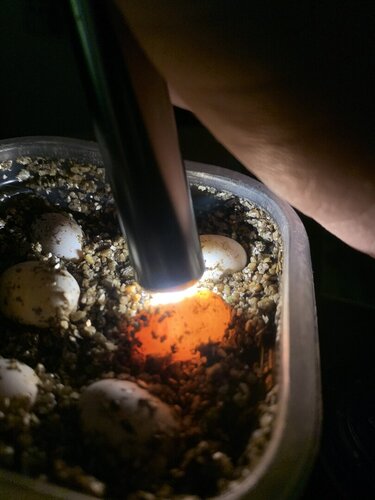
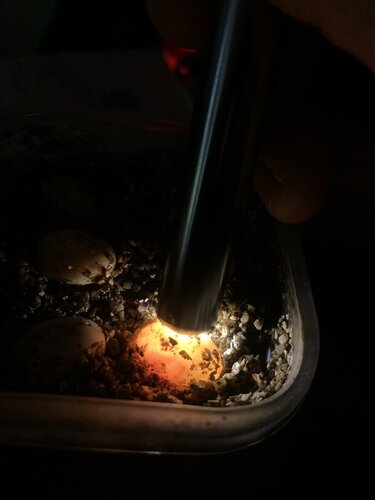
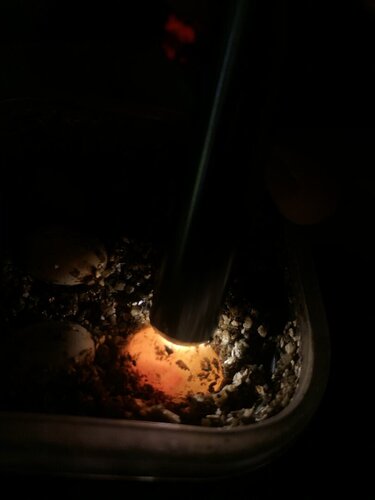
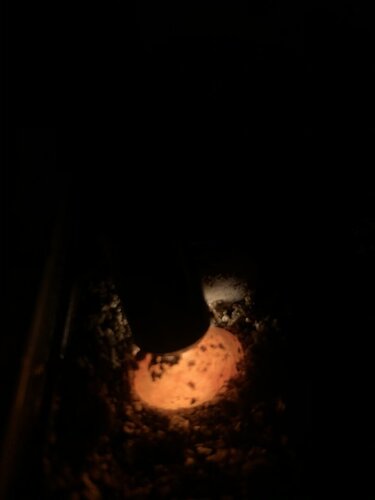
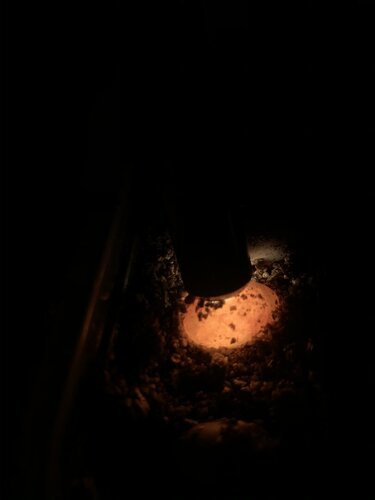
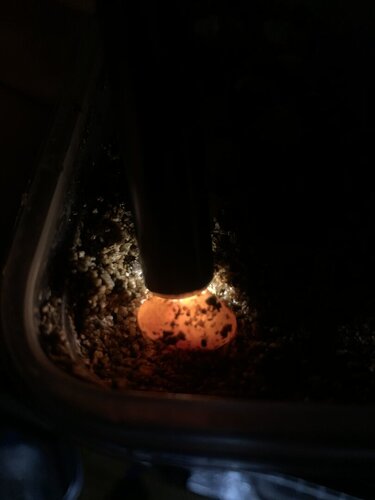
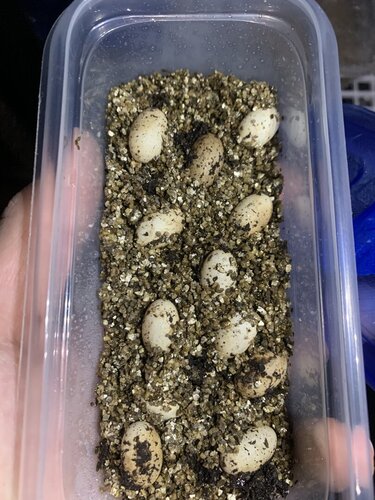
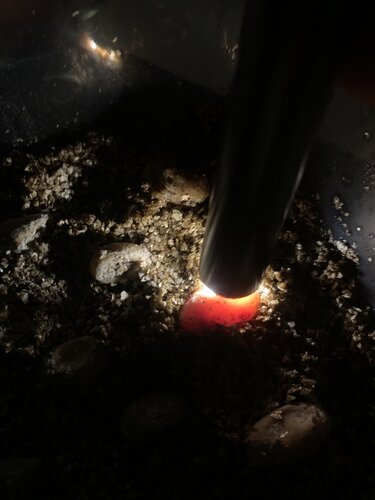
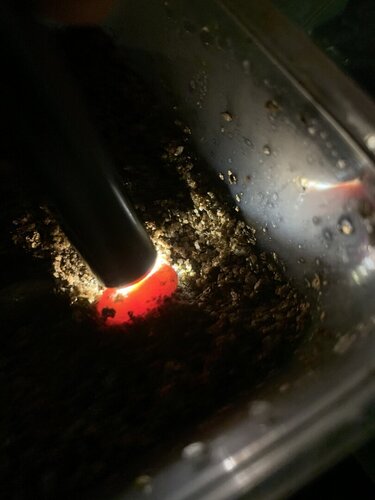
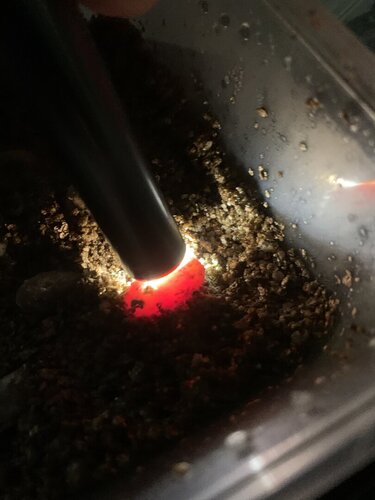
I've got twelve containers of eggs (at least those that I'm unsure about) that are "supposed" to be hatching any time between now and summer. Based off how many I've lost I want to ensure that my methods are correct so there won't be any issues hatching. Also, when candling, my results are different with a lot of the eggs. Not only this, but their appearance in a lit room differ a lot. Maybe you guys, @kinyonga or @jannb can help out here. There's a lot of pictures so I'll post a new message with each of the twelve containers.
 
Last edited:
Here's the first. Notice how the middle left is "shrunken" while the others are not. This egg appears to be dark red under candle light. Not noticed any sweating, just a sheen as I mentioned previously.
 

Attachments

  • IMG-7616.jpg
    IMG-7616.jpg
    175.1 KB · Views: 127
  • IMG-7617.jpg
    IMG-7617.jpg
    97.4 KB · Views: 147
  • IMG-7618.jpg
    IMG-7618.jpg
    104.3 KB · Views: 169
  • IMG-7619.jpg
    IMG-7619.jpg
    113.7 KB · Views: 139
  • IMG-7620.jpg
    IMG-7620.jpg
    94.4 KB · Views: 152
  • IMG-7621.jpg
    IMG-7621.jpg
    123.6 KB · Views: 149
  • IMG-7622.jpg
    IMG-7622.jpg
    101.4 KB · Views: 145
  • IMG-7623.jpg
    IMG-7623.jpg
    36.6 KB · Views: 140
Second container has eggs with shadows and pinker spots. Not sure if that spot is the embryo.
 

Attachments

  • IMG-7624.jpg
    IMG-7624.jpg
    237.9 KB · Views: 99
  • IMG-7625.jpg
    IMG-7625.jpg
    67.3 KB · Views: 152
  • IMG-7626.jpg
    IMG-7626.jpg
    57.5 KB · Views: 96
  • IMG-7627.jpg
    IMG-7627.jpg
    42.5 KB · Views: 94
  • IMG-7628.jpg
    IMG-7628.jpg
    49.4 KB · Views: 149
  • IMG-7629.jpg
    IMG-7629.jpg
    43.5 KB · Views: 150
  • IMG-7630.jpg
    IMG-7630.jpg
    43.2 KB · Views: 111
  • IMG-7631.jpg
    IMG-7631.jpg
    99.9 KB · Views: 101
My main concern with the third container is the color difference, yet no veins. From my understanding, orange means fertile, yellow means infertile?!
 

Attachments

  • IMG-7632.jpg
    IMG-7632.jpg
    172.9 KB · Views: 120
  • IMG-7633.jpg
    IMG-7633.jpg
    186.8 KB · Views: 96
  • IMG-7635.jpg
    IMG-7635.jpg
    62.5 KB · Views: 113
  • IMG-7636.jpg
    IMG-7636.jpg
    42.6 KB · Views: 128
  • IMG-7637.jpg
    IMG-7637.jpg
    34.9 KB · Views: 86
The fourth container has an egg (top right) that's similar to the second. Smaller than the rest and glows red under LED pen light. Also, top right egg seems to have a "window." Not sure if this is a window signifying that it's going to hatch or something different. You'll notice some of the other container's eggs will have this, too.
 

Attachments

  • IMG-7638.jpg
    IMG-7638.jpg
    173.6 KB · Views: 134
  • IMG-7644.jpg
    IMG-7644.jpg
    151.7 KB · Views: 141
  • IMG-7639.jpg
    IMG-7639.jpg
    89.2 KB · Views: 89
  • IMG-7640.jpg
    IMG-7640.jpg
    85.5 KB · Views: 122
  • IMG-7641.jpg
    IMG-7641.jpg
    85.9 KB · Views: 122
  • IMG-7642.jpg
    IMG-7642.jpg
    65.9 KB · Views: 90
  • IMG-7643.jpg
    IMG-7643.jpg
    75.3 KB · Views: 94
  • IMG-7645.jpg
    IMG-7645.jpg
    47.8 KB · Views: 86
Container number five has eggs that look more promising IMO. These seem to have small vein work and shadows but I may be incorrect.
 

Attachments

  • IMG-7646.jpg
    IMG-7646.jpg
    187.4 KB · Views: 85
  • IMG-7647.jpg
    IMG-7647.jpg
    85.5 KB · Views: 119
  • IMG-7648.jpg
    IMG-7648.jpg
    89 KB · Views: 84
  • IMG-7649.jpg
    IMG-7649.jpg
    117.1 KB · Views: 93
  • IMG-7650.jpg
    IMG-7650.jpg
    101.1 KB · Views: 112
The sixth container has more of the "windowed" eggs. The majority of these are bright orange when candling. One is yellow.
 

Attachments

  • IMG-7651.jpg
    IMG-7651.jpg
    183.6 KB · Views: 105
  • IMG-7652.jpg
    IMG-7652.jpg
    78 KB · Views: 84
  • IMG-7653.jpg
    IMG-7653.jpg
    97.9 KB · Views: 100
  • IMG-7654.jpg
    IMG-7654.jpg
    106.7 KB · Views: 81
  • IMG-7655.jpg
    IMG-7655.jpg
    64.3 KB · Views: 127
  • IMG-7656.jpg
    IMG-7656.jpg
    46.4 KB · Views: 118
  • IMG-7657.jpg
    IMG-7657.jpg
    107.7 KB · Views: 115
  • IMG-7658.jpg
    IMG-7658.jpg
    108.5 KB · Views: 100
Number seven has a lot of the same issues. I notice that there's a lot of discoloration on some of these. Instead of being all snow white, there's tan areas. One has a black dot, is this possibly an embryo eye?
 

Attachments

  • IMG-7659.jpg
    IMG-7659.jpg
    274.9 KB · Views: 82
  • IMG-7660.jpg
    IMG-7660.jpg
    289.4 KB · Views: 84
  • IMG-7662.jpg
    IMG-7662.jpg
    71.7 KB · Views: 118
  • IMG-7663.jpg
    IMG-7663.jpg
    83.7 KB · Views: 115
  • IMG-7665.jpg
    IMG-7665.jpg
    42.1 KB · Views: 74
  • IMG-7667.jpg
    IMG-7667.jpg
    35.4 KB · Views: 80
  • IMG-7668.jpg
    IMG-7668.jpg
    59.3 KB · Views: 74
  • IMG-7670.jpg
    IMG-7670.jpg
    43.5 KB · Views: 79
  • IMG-7671.jpg
    IMG-7671.jpg
    47.3 KB · Views: 73
Here's number eight. The one I took out to candle is darker than the rest. Is there possibly veins? Don't worry I was extremely careful when pulling this one out. I couldn't quite capture what I was seeing with the naked eye while it was in the container.
 

Attachments

  • IMG-7672.jpg
    IMG-7672.jpg
    203 KB · Views: 112
  • IMG-7674.jpg
    IMG-7674.jpg
    71.9 KB · Views: 94
  • IMG-7675.jpg
    IMG-7675.jpg
    80.5 KB · Views: 88
  • IMG-7676.jpg
    IMG-7676.jpg
    87.6 KB · Views: 120
  • IMG-7677.jpg
    IMG-7677.jpg
    26.8 KB · Views: 112
  • IMG-7678.jpg
    IMG-7678.jpg
    27.7 KB · Views: 104
Some of number nine seems to have vein work. Not trying to be a know it all, just inputting my two cents. The top two have a mixture of school glue and Lotrimin. Tested this method out on these two based off a video that was sent to me.
 

Attachments

  • IMG-7679.jpg
    IMG-7679.jpg
    225.7 KB · Views: 96
  • IMG-7680.jpg
    IMG-7680.jpg
    27.9 KB · Views: 109
  • IMG-7681.jpg
    IMG-7681.jpg
    29 KB · Views: 70
  • IMG-7682.jpg
    IMG-7682.jpg
    48.7 KB · Views: 69
  • IMG-7683.jpg
    IMG-7683.jpg
    149.6 KB · Views: 77
Number ten. Some have the same method of glue and Lotrimin applied to them. Some of these eggs are a very deep orange.
 

Attachments

  • IMG-7684.jpg
    IMG-7684.jpg
    364.6 KB · Views: 79
  • IMG-7685.jpg
    IMG-7685.jpg
    207.5 KB · Views: 121
  • IMG-7687.jpg
    IMG-7687.jpg
    32.7 KB · Views: 100
  • IMG-7688.jpg
    IMG-7688.jpg
    78.8 KB · Views: 108
  • IMG-7689.jpg
    IMG-7689.jpg
    110.9 KB · Views: 67
Number 11 is pretty intriguing to me as they are completely different from the rest of the eggs. Some of the them are a dark brown and dark orange under the LED light. The whiter ones appear whitish yellow under LED light. Note that these were a clutch where the sire is a WC Sambava. Don't know if that has anything to do with it.
 

Attachments

  • IMG-7690.jpg
    IMG-7690.jpg
    197.4 KB · Views: 67
  • IMG-7691.jpg
    IMG-7691.jpg
    208.3 KB · Views: 114
  • IMG-7692.jpg
    IMG-7692.jpg
    155 KB · Views: 90
  • IMG-7693.jpg
    IMG-7693.jpg
    34.4 KB · Views: 81
  • IMG-7694.jpg
    IMG-7694.jpg
    47 KB · Views: 97
  • IMG-7695.jpg
    IMG-7695.jpg
    28.5 KB · Views: 71
  • IMG-7696.jpg
    IMG-7696.jpg
    34.3 KB · Views: 96
FINALLY! The last container! I call these the Moldy Magoos because they were covered in mold before I brushed it off and added a layer of Lotrimin powder last night. These appear dark red under candle light and are very concave. Not sure if any of these little ones made it.
 

Attachments

  • IMG-7697.jpg
    IMG-7697.jpg
    316.9 KB · Views: 109
  • IMG-7698.jpg
    IMG-7698.jpg
    336.8 KB · Views: 130
  • IMG-7699.jpg
    IMG-7699.jpg
    317.4 KB · Views: 98
  • IMG-7700.jpg
    IMG-7700.jpg
    85.8 KB · Views: 78
  • IMG-7701.jpg
    IMG-7701.jpg
    89.2 KB · Views: 115
  • IMG-7702.jpg
    IMG-7702.jpg
    105.9 KB · Views: 94
I have a dozen or so clutches incubating, I use repashy superhatch, and don't bury them but leave enough bedding to hold them, mine hatch out everytime unless infertile, yours could be too wet or to dry, too much temp change, or non fertilization could cause eggs to mold, I'd never put a light to them like you are doing it could heat them up and kill the embryo
 
I don’t candle my eggs. I really don’t mess with them at all. I also don’t use an incubator. I do space my eggs about an inch apart on all sides. I check them once a week with out taking the lid off and just peeking through the Tupperware. I think now it’s a wait and see game. Do you have everything set up for babies? Plenty of fruit fly cultures going? Looks like you will be having allot of babies, although the eggs in the last set of pictures are probably not good.
 
I have a dozen or so clutches incubating, I use repashy superhatch, and don't bury them but leave enough bedding to hold them, mine hatch out everytime unless infertile, yours could be too wet or to dry, too much temp change, or non fertilization could cause eggs to mold, I'd never put a light to them like you are doing it could heat them up and kill the embryo

Thanks for your response.

I’ve heard that the heat from a light can burn them, however, I wouldn’t imagine the LED light I’m using is generating a lot of heat. Not saying you’re wrong, maybe the research I read was incorrect.

As far as the medium, I have suspicions it’s too wet. I’ve only ever used vermiculite because that’s what my friends were using. In one of Bill’s podcasts he mentions likening vermiculite the best. I’m open to trying something else if it’s worth it and won’t dysregulate them when transferring them over. Of course I’d be super careful not to flip them.

I bought some hatchrite for this purpose. Considering doing a control on a clutch from last week to determine which seems better.


I don’t candle my eggs. I really don’t mess with them at all. I also don’t use an incubator. I do space my eggs about an inch apart on all sides. I check them once a week with out taking the lid off and just peeking through the Tupperware. I think now it’s a wait and see game. Do you have everything set up for babies? Plenty of fruit fly cultures going? Looks like you will be having allot of babies, although the eggs in the last set of pictures are probably not good.

Hi Jann, thank you for your reply. I didn’t utilize the closet method because I have a wild little black kitty. She gets in all kinds of areas she’s not supposed to, like in my latched cricket box. She found a fairy bottle of infertile eggs I kept, knocked it down and ate the eggs. Luckily she doesn’t know how to open the incubator.

I have a bunch of Sterilite containers set up. I cut out the tops of the lids and installed screen. They also have little misters hooked up to them. Have the uvb lights installed above each shelf on the rack. I have a couple fruit fly cultures working. I didn’t think it was worth stocking up till the babies start to hatch. I can easily drive down to Rainbow Mealworms and pick up a bunch if necessary.

That’s too bad the eggs are probably not good. I didn’t set high expectations for them so it’s okay
 

Attachments

  • 083F97EE-7DF4-483E-9CE6-742190761EE4.png
    083F97EE-7DF4-483E-9CE6-742190761EE4.png
    642.5 KB · Views: 127
With superhatch it's clay granules and absorbs water, I put 1 inch across container, put ro water in it leave for 15 - 20 seconds till it absorbs then I drain it out through a kitchen strainer and shake it in strainer covering it with something, that works for me, I weigh it after eggs put in and write it on the container lid with the parents and date of eggs laid, I check them 1 a month and check weight if drops more than 2 points I will add tiny bit of water, till it weighs back to the original weight on lid, read the ingredients in your egg bedding!! I read ingredients in everything
 
With superhatch it's clay granules and absorbs water, I put 1 inch across container, put ro water in it leave for 15 - 20 seconds till it absorbs then I drain it out through a kitchen strainer and shake it in strainer covering it with something, that works for me, I weigh it after eggs put in and write it on the container lid with the parents and date of eggs laid, I check them 1 a month and check weight if drops more than 2 points I will add tiny bit of water, till it weighs back to the original weight on lid, read the ingredients in your egg bedding!! I read ingredients in everything

Thanks for the detailed how to on that. I'll definitely be looking into it :)

Have you had a bad experience with egg bedding that makes you mention checking the ingredients?

Also, have you ever noticed a difference with RO water vs tap for egg incubation?
 
Back
Top Bottom