First little project starting to come together

andrearamirezo91

Avid Member
As some of you might know, I’ve been on a mission to redo my chameleon’s cage and make something kind of like this:

U
22C9279D-133A-449A-B04E-82420CF6B382.png


I do however want to cover the black area (great stuff) with coco fiber. I finally got all the supplies I needed and got to work this morning, and I thought I’d share my progress so far.

I am aware that he will grow out of this cage very soon which I’m totally okay with and prepared for... this is practice for his long-term, permanent home :)


AFF8D269-E5E2-494E-9F13-B5ECF3402A7F.jpeg


Agatha always wants all the attention.... :love:


7F2CE382-EAC5-473D-87FA-38778A2DF07B.jpeg

1E03D5FE-4086-44D4-97F7-92C2728711D2.jpeg


Skittles soaking up the sun outside. He’s been out here all day so he’s extremely happy!

1E021D35-81D9-42D6-AD30-43E1979D7E1E.jpeg

FD01C596-C14A-48B2-A496-34A21603D7B4.jpeg


I was supposed to borrow a cage from a friend for Skittles to sleep in tonight, but he got called in to work last minute so I had to figure something out for tonight. I put this HUGE bamboo plant in the guest bathroom shower (its never used) and I will have him outside till bedtime where he’s eaten, had water, and soaked in plenty of heat and sun. The temp in this bathroom won’t go below 74-75. Peek him all the way at the top :love:

AD29C6D7-4B4B-4E47-8C70-D0FC4A46DE8B.jpeg
196002BD-F5BA-488B-A0A9-514616D1CC92.jpeg


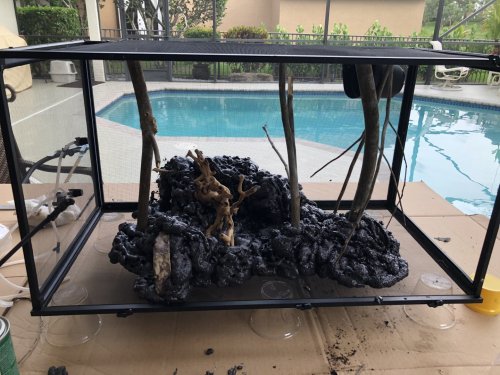
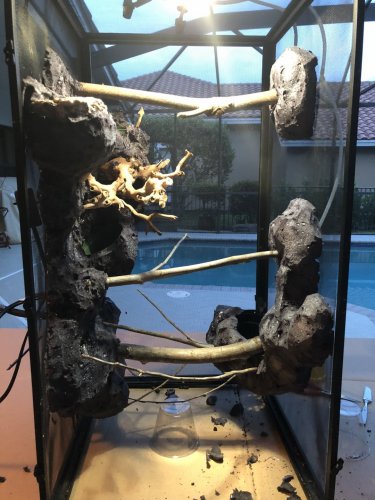
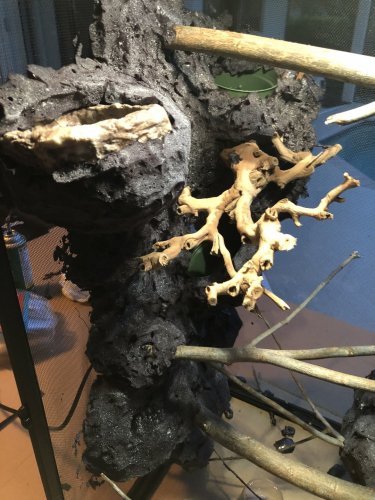
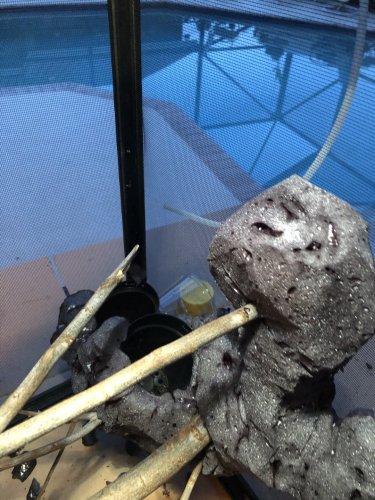
Just applied the great stuff on the second side... carving is what took the longest and killed my back :confused: This is what it looks like now... as soon as this second side is dry I can get to carving and then apply the silicone! :)

image.jpg


Still a long way to go, but it’s exciting to slowly see it coming together :D
 

Attachments

  • 81F69152-8342-40A9-99FD-DBE509F4420D.jpeg
    81F69152-8342-40A9-99FD-DBE509F4420D.jpeg
    357 KB · Views: 67
Yes absolutely! The main reason for this project is that I want him to have live plants in his enclosure. Also, I hsd a bunch of suff that was leaning on the bottom of the cleaning tray so it was very difficult to find the right balance between proper hydration and keeeping up with the cleaning. This way I’ll be able to mist freely and empty the pan every night without difficulty.
 
Here you can see some of the planters. I already made sure that they have a way to drain through the bottom, washed my plants, ans bought the organic soil. I also added a feeding plate towards the door of the enclosure because he’s terrified now.. al he does is hide in the back. Maybe this will make him associate the front of the cage with good things :)
 

Attachments

  • 166F4F1F-3AF7-4D93-87C5-1D8BDC261BB0.jpeg
    166F4F1F-3AF7-4D93-87C5-1D8BDC261BB0.jpeg
    303.3 KB · Views: 108
  • DED2EF5E-7F4C-45C0-9925-B38284EDD9E9.jpeg
    DED2EF5E-7F4C-45C0-9925-B38284EDD9E9.jpeg
    334.1 KB · Views: 95
  • 3C744836-9AFB-4F8A-8668-B7440AC1D6C3.jpeg
    3C744836-9AFB-4F8A-8668-B7440AC1D6C3.jpeg
    409.5 KB · Views: 105
Coming along nicely! Heck the guest shower would make a perfect cham enclosure. I always keep my chams in the shower(off obvi) overnight or during the day when I am working on one of their enclosures. Makes a nice temporary spot. BTW 75 is pretty high for night time temperatures. One night will make no difference, so not trying to worry you, but I like to aim for 60-70 range with getting as low as 50s in the winter.
 
Coming along nicely! Heck the guest shower would make a perfect cham enclosure. I always keep my chams in the shower(off obvi) overnight or during the day when I am working on one of their enclosures. Makes a nice temporary spot. BTW 75 is pretty high for night time temperatures. One night will make no difference, so not trying to worry you, but I like to aim for 60-70 range with getting as low as 50s in the winter.

Thank you so much! Had to stop for the day because I ran out of daylight. I struggled a little getting the coco fiber to stick nicely to the foam. Letting it dry out overnight and then trying to add another layer tomorrow wherever it’s necessary.

Thanks for the heads up about the temp! I was actually putting the air hotter than usual because I had the chameleon in the bathroom.. just moved it back down to 71 :D
 
^yup add silicone layer to stick the coco fiber on.

As for the temp yeah I wouldn't worry unless you let your house get into the 40s lol
 
Are you using silicone?

Yes! I bought 100% silicone. Had to stop last nigh because I didn’t have enough light but I’m waiting for the silicone to dry out now... how long should I wait? I saw on a bunch of Tutorials that people hose them down after to get rid of the excess fiber. Should I do this?
 
B2BC01FC-6DC8-4BC1-BB90-F7574555F6CF.jpeg


It’s drying out now.. I tried so hard to get a decent pic but it doesn’t look as nice as it does in person :cautious:

And here’s skittles again having some fun in the sun :) he looked so colorful that I couldnt help but snap another picture :love:

DC5A0506-98BE-4E5E-8B29-3C82D06E2024.jpeg
 
Love it. Maybe if you can put the bromeliad up higher? They do best under very bright light.

I like your little feeder cup(I think that's what it is).

Thank you! And yes that’s a little feeder cup :) right now my chameleon gets terrified every time someone walks into the room where his cage is at and instantly darts to the back of the cage. I figured this way maybe he’ll start associating the front of the cage with good things? About the bromeliad I kind of foamed the cage with the plant’s location already planned out. There isnt much space on top for the bromeliad.. this is a pretty small cage and I actually had to leave a few plants out.. but regardless in two months this cage will be too big for Skittles. Remember this one is practice for the bigger one! All the plants are moving to the other enclosure so I’ll plan the setup in a way that all my bromeliads are on top :)

How well did the foam take to the screen? I always hide support beams in my foam but I’ve also always thought it was overkill. How solid does it feel? Can you post som pics of where the foam meets the screen from the outside of the cage?

The foam actually held great. I was actually pretty impressed. I did however still put some zip ties and metals holding my branches to the mesh. Not just for support but because the foam expands and I didnt want it moving my branches around. But it stuck so good that I even used it to seal a huge hole thats on my cage. Here’s a couple of pics.. the first is where the hole was, which was a little over an inch big. The second is one of the branches and how I have it supported over the foam. Honestly I dont think the support is necessary to keep these up, they arent very heavy anyways, but for the setup process I do believe it might have helped to keep the branches in place.

image.jpg


image.jpg
 
Nice! Once that schefflera grows out too, will be gorgeous coverage. What brand of silicone did you end up using? I've been trying to decide and haven't bought any yet? Was the fiber not wanting to stick well because the silicone was drying to quick?
 
Nice! Once that schefflera grows out too, will be gorgeous coverage. What brand of silicone did you end up using? I've been trying to decide and haven't bought any yet? Was the fiber not wanting to stick well because the silicone was drying to quick?

I ended up using the GE for doors and windows. Read on a few different places and posts that this one is safe. Just made sure it’s 100% sylicone.

So when the greet stuff dries up, the outsides of it are kind of smooth... it’s hard for the silicone to stick to that smooth layer as well as to get in all of the little holes and crevices. You have to grab a sharp blade and carve the grest stuff out to expose the foamy part inside which silicone adheres to better. Maybe if I would have been more patient with the carving process the silicone would have stuck better but its just hard to carve out every single little hole and smooth area. I suggest applying a thicker layer of great stuff than what you need so you can carve comfortably. Don’t overdo it though because if not the great stuff will take forever to dry out. Make sure you give it the amount of time it needs to dry out before you start carving because if you touch it while its still wet it will shrink and dry differently. As long as you carve it well and apply a pretty thick layer of silicone making sure you get every hole you should be fine :)

*Careful getting great stuff or silicone on the mesh... it’s almost impossible to remove. Takes forever.
 
That’s really awesome what you are doing...I’m gonna try this out when I build my junior guys adult cage. Great advice and looking great too!
 
Back
Top Bottom