CasqueAbove
Chameleon Enthusiast
I have seen many video on the DIY foggers, but they always seem to fall short of a usable item.
This is what I have put together, more specific to chameleons.
The first pic is the completed project, though your base will be different, as this was not a great choice.

Now lets step through the components, as the right combination is what makes the difference.
The first component is the blower fan. This is where almost every video I see get it wrong. When we compare the two fans we see a clear difference with the Cooling/computer fan on the right, and the blower fan on the left. The cooling fan is meant to "scatter" the cool air, flooding the case with cool air.
The Blower fan on the other hand , as the name suggests, blows air creating a gentle air pressure that pushes the air. The blower fan is what the commercial products use, and the fan in the link is the replacement fan for the reptiBres Fogger.
Using the blower does a far better job of pushing the fog where it needs to go, and is smaller and easier to mount in place. Realize that all air blows through the open square, where as the circular fan part you can see is the intake.

https://www.amazon.com/gp/product/B07JQJ93JD/ref=ppx_yo_dt_b_asin_image_o07_s00?ie=UTF8&psc=1
Price $10 for a 4pack.
Second lets look at the fog unit it self. Though it can be difficult at first to decipher what they are selling you, I will try to help you pick.
Do not think you can use just the disks, or combine foggers on the same cord, unless they come that way. The reason for this is that there is actual kind of a small computer in the unit caled an "ESC" for Electronic speed control controller. At least this is what we call in in the rc world. The point is it has to "control" the current to the disk unit. The ESC and misting disks have to work together. Of course it can be done, but this is to be an "Anyone can do it" DIY.
The two key components you want to look at in these is the size and material of the disk. The disk is the small flat white disc. This is the work horse
Ceramic is the best choice, and bigger disk = more fog.
Here are the ones I originally went with as I was trying to be cheap because I was not sure how well it would work, and I was trying different designs.
I would call them adequate, but I will go with larger next time.
https://www.amazon.com/gp/product/B00TN5EUUE/ref=ppx_yo_dt_b_asin_image_o05_s00?ie=UTF8&psc=1
price $12
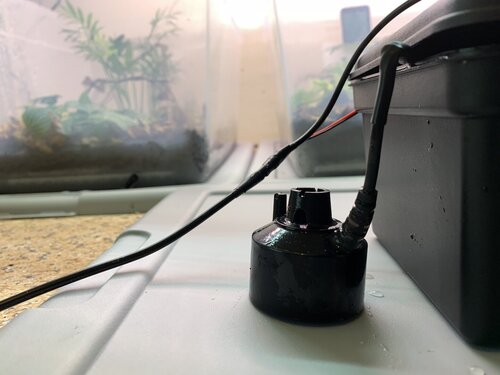
The next thing to consider is the container itself. I would suggest waiting till you get the fogging unit. The unit will dictate how deep the water should be. These units have an automatic shut off. It is the small silver thing on the edge of the unit. If water goes below this it shuts off automatically. Very handy. This is your min fill line. On the deep side, we need to allow for about 1 inch of water above this shut off. Note that the units do not function well much deeper than this. We also need to account for the exhaust tube. The tube will come down about an inch, and we need a gap between the bottom of the tube and the water so the air can flow.
One of the limiting factors is this depth requirement. Depending on how long you will want it to run, You will look for more surface area vs depth.
The box I chose is poor for a couple reasons, the depth is not good, too shallow, and doesn't seal tight. The tighter the seal the more efficient it will be.
I got these at the Dollar store, so no real loss.
Cost $1-$5
The next secret is the clear tubing, though it does come in colors if you want. It is actually a fluorescent tube guard. They can be found at HomeDepo or other hardware stores, you just need to know what to call it.
So Why this tube and not the expandable tubing they all come with ? One simple answer, cleanliness. The expandable tubing has tons of small groves, perfect to stay dam and grow bacteria. The clear tube is very light weight, and will completely dry out within hours and can be cleaned or replaced easily. Buy taking a small section (right) and cutting it length wise you can make a coupler so you can add a fancy directional blower as I have here.
Price $4-$6
I am including a link for reference, but the come it two sizes, the smaller size diameter fits well with 1 1/2in pvc corners if needed.
This tubing can also be used in place of the expandable tubing that come with most commercial units.
Putting it all together.
So we have our parts, now what ?
Well first we will need to cut the holes in the lid of our container. Try to cut the holes just the right size, it will make gluing easier.
Next we need to splice some wires. I did not get pics of this, but you use scissors to expose the wires to the fogger, use a wire stripper to expose the wires and connect color to color, wrap with electrical tape.
These are the components I have found to work best. The advantage of this is not only in price around $35-$40 depending on what supplies are needed, but also in super easy cleaning.
If a standard tuperware with removable lid is used the container can simply be place in the dish washer, while the other components are wiped and left to completely dry out, ready for a clean use the next day.
Some extras you will need are:
Electrical tape
Wire stripper
hot glue gun
These can all be found for cheap at the dollar store or walmart.
I hope I did a good job explaining, let me know if there are questions.
This is what I have put together, more specific to chameleons.
The first pic is the completed project, though your base will be different, as this was not a great choice.

Now lets step through the components, as the right combination is what makes the difference.
The first component is the blower fan. This is where almost every video I see get it wrong. When we compare the two fans we see a clear difference with the Cooling/computer fan on the right, and the blower fan on the left. The cooling fan is meant to "scatter" the cool air, flooding the case with cool air.
The Blower fan on the other hand , as the name suggests, blows air creating a gentle air pressure that pushes the air. The blower fan is what the commercial products use, and the fan in the link is the replacement fan for the reptiBres Fogger.
Using the blower does a far better job of pushing the fog where it needs to go, and is smaller and easier to mount in place. Realize that all air blows through the open square, where as the circular fan part you can see is the intake.

https://www.amazon.com/gp/product/B07JQJ93JD/ref=ppx_yo_dt_b_asin_image_o07_s00?ie=UTF8&psc=1
Price $10 for a 4pack.
Second lets look at the fog unit it self. Though it can be difficult at first to decipher what they are selling you, I will try to help you pick.
Do not think you can use just the disks, or combine foggers on the same cord, unless they come that way. The reason for this is that there is actual kind of a small computer in the unit caled an "ESC" for Electronic speed control controller. At least this is what we call in in the rc world. The point is it has to "control" the current to the disk unit. The ESC and misting disks have to work together. Of course it can be done, but this is to be an "Anyone can do it" DIY.
The two key components you want to look at in these is the size and material of the disk. The disk is the small flat white disc. This is the work horse

Ceramic is the best choice, and bigger disk = more fog.
Here are the ones I originally went with as I was trying to be cheap because I was not sure how well it would work, and I was trying different designs.
I would call them adequate, but I will go with larger next time.

https://www.amazon.com/gp/product/B00TN5EUUE/ref=ppx_yo_dt_b_asin_image_o05_s00?ie=UTF8&psc=1
price $12
The next thing to consider is the container itself. I would suggest waiting till you get the fogging unit. The unit will dictate how deep the water should be. These units have an automatic shut off. It is the small silver thing on the edge of the unit. If water goes below this it shuts off automatically. Very handy. This is your min fill line. On the deep side, we need to allow for about 1 inch of water above this shut off. Note that the units do not function well much deeper than this. We also need to account for the exhaust tube. The tube will come down about an inch, and we need a gap between the bottom of the tube and the water so the air can flow.

One of the limiting factors is this depth requirement. Depending on how long you will want it to run, You will look for more surface area vs depth.
The box I chose is poor for a couple reasons, the depth is not good, too shallow, and doesn't seal tight. The tighter the seal the more efficient it will be.
I got these at the Dollar store, so no real loss.
Cost $1-$5
The next secret is the clear tubing, though it does come in colors if you want. It is actually a fluorescent tube guard. They can be found at HomeDepo or other hardware stores, you just need to know what to call it.
So Why this tube and not the expandable tubing they all come with ? One simple answer, cleanliness. The expandable tubing has tons of small groves, perfect to stay dam and grow bacteria. The clear tube is very light weight, and will completely dry out within hours and can be cleaned or replaced easily. Buy taking a small section (right) and cutting it length wise you can make a coupler so you can add a fancy directional blower as I have here.

Price $4-$6
I am including a link for reference, but the come it two sizes, the smaller size diameter fits well with 1 1/2in pvc corners if needed.
This tubing can also be used in place of the expandable tubing that come with most commercial units.


Putting it all together.
So we have our parts, now what ?
Well first we will need to cut the holes in the lid of our container. Try to cut the holes just the right size, it will make gluing easier.
Next we need to splice some wires. I did not get pics of this, but you use scissors to expose the wires to the fogger, use a wire stripper to expose the wires and connect color to color, wrap with electrical tape.

These are the components I have found to work best. The advantage of this is not only in price around $35-$40 depending on what supplies are needed, but also in super easy cleaning.
If a standard tuperware with removable lid is used the container can simply be place in the dish washer, while the other components are wiped and left to completely dry out, ready for a clean use the next day.
Some extras you will need are:
Electrical tape
Wire stripper
hot glue gun
These can all be found for cheap at the dollar store or walmart.
I hope I did a good job explaining, let me know if there are questions.