After spotting some images of these outdoor DIY enclosures on different forums and here. I decided to try it with what I could find at my local Home Depot.
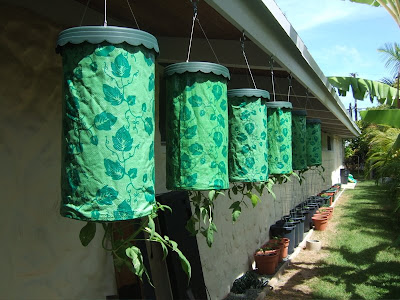
Here is what I came up with.

This is for a Veiled chameleon as a outside get-away for those nice sunny days.
Parts List
1 x roll 3ft x 15ft Hardware Cloth $16.44
2 x 24inch Fiskars Resin Tray (water tray, plant saucer) $8.78ea
(All Internet Prices) I misplaced my receipt so I cannot quote in-store prices for my area
a golden Pothos
a plant stand
a handful of small black zip-ties
some fake vines
some bamboo rods
The vines and bamboo came from a dollar store they are safe to use as long as the chameleon does not try to eat the vines. I have been using them for years now. Just wash them good first.
The Tube
Placing one resin tray upside down for the bottom gives me a nice lip to run the hardware cloth around. I ran the cloth around twice for additional stability & I stopped the wrapping right as the seams would meet. Basically you have a inner seam where you started the wrapping, a middle layer where you wrapped once and the outer seam where you stopped wrapping. I simply made sure the outter seam stopped right where the inner seam started. So I could zip tie each layer together and make the screen even all around the tube. You can see in the photo that it does not look double-wrapped but it is. I just lined up the screen so the holes/squares are even.
This gives me a nice tube shaped screen that is double layered for stability. I then took the small black zip ties and tied through each layer at the seams to make them nice and secure. Keeping them even all the way down the tube I tied them every few inches.
When I was done I had a nice evenly tied tube of screen. I also have screen left over for making more of these enclosures.
The Bottom Tray
Viewing the photo above you can see the bottom of the enclosure is the resin tray flipped upside down. You will want to poke holes right inside the channel of the center circle. This is the deepest part of the center circle where water captures naturally when it rains or drops in from the top. Poking holes here will allow proper drainage of the entire inside without having to poke holes around the whole piece or rim where the screen sits.
As a bonus the rim where the screen sits will capture and hold whatever you put in it. Oil, water etc. This acts as a barrier between the cage and ants or other crawly pests that you want to keep out of the enclosure.
So these resin trays work extremely well for a bottom piece.
The Top Tray
The top tray is the same as the bottom tray however as you can see in the photo we keep that one turned right-side up. Poking holes around the trays outer and inner ring allow for a rain effect inside the enclosure. Depending on how much water you pour into this tray it will rain fast in the enclosure or just have a easy drip. You can poke smaller or bigger holes depending on how much of a drip you want. You can also poke holes in specific locations to guide the dripping to where you want it as well.
These top trays also have a rimmed lip that slides right over the top of the screen to lock in place.
The Decorations & Greenery
As you can see in the photo's I have a plant stand inside with a golden Pothos on top. Then I used some bamboo I had around to run through the sides at different angles and places to make a lattice work. This provides a place for the Pothos vines to climb and hang as well as a place for the chameleon to roam around. It also helps stabilize the tube shape and give some structure to it. I also attached some fake vines to the sides of the tube in different places to hang down as well.
You can trim the bamboo ends off if you want but leave enough room to use a zip tie or something that keeps the bamboo from sliding out of the screen. I will eventually trim mine and tie em in. Cutting bamboo is not hard but tedious because it splinters. I recommend a fine hacksaw blade and slowly cutting through it.
In & Out
My chams are fussy and as chams go they don't like to be handled often. I find fighting to get them out of their indoor enclosure and then carrying them to the outdoor enclosure is a interesting task. That being said the biggest bonus about this enclosure setup is how easy they are to pull apart.
Simply lift the top off & place the cham on the plants/vines and replace the top.
You can set it up so you can remove the tube and top if needed but be careful not to have Pothos vines wrapped around the bamboo. You should also always check to see where your chameleon is if he is in the enclosure when you want to pull the screen off. This way you are not ripping vines out or shaking your chameleon around while trying to remove the tube.
As you can see in the photos. I setup mine with bamboo around the top portion with fake vines around it hanging down into the Pothos and around it. So I can easily lift the entire top and screen tube off without pulling the Pothos. This way when I put the cham in I simply let him climb off onto the plant then I put the screen over and put the top back on. The fake vines fall down around the Pothos & give him something to climb on around the top.
When the Pothos growns a bit more it will have longer flowing vines down around the bottom for him to roam around.
Hope someone finds this helpful.
Here is what I came up with.


This is for a Veiled chameleon as a outside get-away for those nice sunny days.
Parts List
1 x roll 3ft x 15ft Hardware Cloth $16.44
2 x 24inch Fiskars Resin Tray (water tray, plant saucer) $8.78ea
(All Internet Prices) I misplaced my receipt so I cannot quote in-store prices for my area
a golden Pothos
a plant stand
a handful of small black zip-ties
some fake vines
some bamboo rods
The vines and bamboo came from a dollar store they are safe to use as long as the chameleon does not try to eat the vines. I have been using them for years now. Just wash them good first.
The Tube
Placing one resin tray upside down for the bottom gives me a nice lip to run the hardware cloth around. I ran the cloth around twice for additional stability & I stopped the wrapping right as the seams would meet. Basically you have a inner seam where you started the wrapping, a middle layer where you wrapped once and the outer seam where you stopped wrapping. I simply made sure the outter seam stopped right where the inner seam started. So I could zip tie each layer together and make the screen even all around the tube. You can see in the photo that it does not look double-wrapped but it is. I just lined up the screen so the holes/squares are even.
This gives me a nice tube shaped screen that is double layered for stability. I then took the small black zip ties and tied through each layer at the seams to make them nice and secure. Keeping them even all the way down the tube I tied them every few inches.
When I was done I had a nice evenly tied tube of screen. I also have screen left over for making more of these enclosures.
The Bottom Tray
Viewing the photo above you can see the bottom of the enclosure is the resin tray flipped upside down. You will want to poke holes right inside the channel of the center circle. This is the deepest part of the center circle where water captures naturally when it rains or drops in from the top. Poking holes here will allow proper drainage of the entire inside without having to poke holes around the whole piece or rim where the screen sits.
As a bonus the rim where the screen sits will capture and hold whatever you put in it. Oil, water etc. This acts as a barrier between the cage and ants or other crawly pests that you want to keep out of the enclosure.
So these resin trays work extremely well for a bottom piece.
The Top Tray
The top tray is the same as the bottom tray however as you can see in the photo we keep that one turned right-side up. Poking holes around the trays outer and inner ring allow for a rain effect inside the enclosure. Depending on how much water you pour into this tray it will rain fast in the enclosure or just have a easy drip. You can poke smaller or bigger holes depending on how much of a drip you want. You can also poke holes in specific locations to guide the dripping to where you want it as well.
These top trays also have a rimmed lip that slides right over the top of the screen to lock in place.
The Decorations & Greenery
As you can see in the photo's I have a plant stand inside with a golden Pothos on top. Then I used some bamboo I had around to run through the sides at different angles and places to make a lattice work. This provides a place for the Pothos vines to climb and hang as well as a place for the chameleon to roam around. It also helps stabilize the tube shape and give some structure to it. I also attached some fake vines to the sides of the tube in different places to hang down as well.
You can trim the bamboo ends off if you want but leave enough room to use a zip tie or something that keeps the bamboo from sliding out of the screen. I will eventually trim mine and tie em in. Cutting bamboo is not hard but tedious because it splinters. I recommend a fine hacksaw blade and slowly cutting through it.
In & Out
My chams are fussy and as chams go they don't like to be handled often. I find fighting to get them out of their indoor enclosure and then carrying them to the outdoor enclosure is a interesting task. That being said the biggest bonus about this enclosure setup is how easy they are to pull apart.
Simply lift the top off & place the cham on the plants/vines and replace the top.
You can set it up so you can remove the tube and top if needed but be careful not to have Pothos vines wrapped around the bamboo. You should also always check to see where your chameleon is if he is in the enclosure when you want to pull the screen off. This way you are not ripping vines out or shaking your chameleon around while trying to remove the tube.
As you can see in the photos. I setup mine with bamboo around the top portion with fake vines around it hanging down into the Pothos and around it. So I can easily lift the entire top and screen tube off without pulling the Pothos. This way when I put the cham in I simply let him climb off onto the plant then I put the screen over and put the top back on. The fake vines fall down around the Pothos & give him something to climb on around the top.
When the Pothos growns a bit more it will have longer flowing vines down around the bottom for him to roam around.
Hope someone finds this helpful.


")