DIY 2-Level Wood Enclosure: What Wood/Sealer to prevent mold/damage over time?

EvilLost

New Member
Hello all,

Longtime herp keeper, planning my first chameleon soon. I have been designing a cage for him before I get him and have it mostly worked out....but I have run into a few problems, but mainly a major one:

What wood/sealer can I use that is safe for the chameleon, but will also resist repeated mistings and the like everyday? I plan on planting live plants in the enclosure as well. I ask this because I am 99% sure that if I use something like Pine, the entire thing will collapse of rot within a few months at most....I considered Teak, but it is WAY too expensive! My only requirement is that the wood MUST be stainable (I have heard Melamine is a good option, but I believe it is not stainable and therefore fails).


Secondarily, although in my design the back of the cage is open, in reality it will go up against a wall; also, I need a way to hide my misting tubes and power cords, so I am heavily considering adding a background. However, I realize most of you don't do this.....may I ask why? The only thing I could think of is an issue with the chameleon eating the dirt; do/would they pick at the foam? What about the kitty litter method? Any info on this would be appreciated.


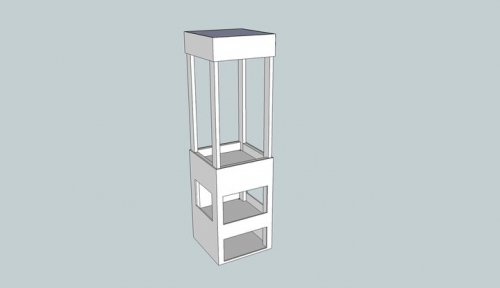
I have attached a photo of my 3D model so far. Below is a copy-paste from a short description I wrote on another forum: This is only my first design phase, I am next going to figure out the interior of both cages before I proceed with the build. Aiming to be finished with my new chameleon in 1.5 months.

Features:

Top Enclosure (JUNGLE setup; Panther chameleon..most likely, haven't bought one yet :)
-Quad 2' T8 bulbs; basking lamp; automated misting system
-Invisible door access to top lighting for maintenance via hood
-Full front opening door; smaller door within front door for short term access (prevent feeder escape)
-Substrate Dam (prevent substrate from pouring out of cage when you open the door)
-False bottom design with drainage system.

Bottom Enclosure: (DESERT setup; California Kingsnake)
-Dual 2' T8 bulbs; basking lamp
-Front opening screen
-Removable panel for light maintenance/access
-4" drop below viewing area; allows for burrowing substrate while keeping a "level" surface with the rest of the enclosure for a natural look.

Bottom Shelf:
-Large storage for feeders/supplies (2'x2'x1'); also runoff for drain goes to bucket here.
-Flush "invisible" door
 

Attachments

  • 166116_784701544718_6714107_42406186_1012735_n.jpg
    166116_784701544718_6714107_42406186_1012735_n.jpg
    14.2 KB · Views: 188
Hey EvilLost, I'd use 3-4 coats of oil based polyurethane. You would do this at least a month before you house your pet in it. I'd also drop pine for poplar, which is harder wood. I personally don't use a background because it looks tacky and prevents a good air flow inside the cage. And use potted plants and line the bottom of the cage with paper towels...
 
Eltortu: Do you have any direct experience with using a polyurethane stain + poplar? Not that I don't trust you, I just want to know for-sure if it will hold; I am attempting to cover every single angle before I begin any construction, and most certainly expect this cabinet to last a very long time. I definitely will NOT be using pine, I agree it is not a sufficient wood. As for the othe care, I have read up on it, but those are not options for me. I realize that most (seems all?) the cages I see on these forums are practical for the care of the chameleon, but they are very plain and not very pretty to look at. I am also an avid interior decorator so presentation is very important in my design.

I will be lining it with substrate and planting live plants. Also, I fully disagree on the tacky look of the background. I am talking about a DIY background as is commonly done in Frog vivaria. I have done this several times before for my snakes and newts as well as a plain open-air terrarium and I think it looks rather good (I have attached two pics of my other cages as samples).

My only concern is that the cham might try to pick off the dirt or foam of the background and eat it.....but there must be some solution to this.

Also, I am considering the standard river rock method of lining the bottom, but I am working on a custom "liner" to place over the substrate that will be removal to solve both the eating dirt problem and to be easily removable for cleaning purposes.
 

Attachments

  • 100_0006.jpg
    100_0006.jpg
    244 KB · Views: 171
  • IMG_0923.jpg
    IMG_0923.jpg
    255.9 KB · Views: 205
well now. I seem to remember that first photo on the mantid forum.
I liked it then, and I still like it now.

just do what you want and enjoy. the crazys here will drive you nuts with everything from air flow to humidifiers will give you and your Chameleon the plague. I say go for it and enjoy. your chameleon will be super happy in anything you make for it.

Harry
 
@warpdrive: heh thanks, I have kept enough herps that I am not worried about my ability to adequately house the animal, its simply that my experience with frogs has been solely in glass cages and anything made of wood gets the occasional mist at best for most of my snakes. I have been asking for some guidance on possibly free-ranging a mantis or two in that terrarium; I've posted it on mantidforums before :)

This is my first experience with a consistently wet enclosure that is not made of glass, so I am a little concerned :x At least on these forums, but I have not found any other particularly great chameleon forums to go to, it seems that there is very little consideration given to the overall look of the cage. I find this to be a general trend amongst most hobbyists, but frog keepers seem to care "the most" and colubrid keepers the "least" (from my experiences).

I just find it odd that there is such a low level of interest in a "designer" cage setup, for lack of a better word
 
Not that I have great experience, but I really don't ever notice my cham, (veiled), picking at anything in the cage, other then feeders and the dripper. I am thinking it shouldn't be a great worry, haven't seen any chewing on vines, though some do like plants. Visual beauty is important to me too, I made my own cage, sealed it 3x with polyuerathane, tiled the bottom with natural looking vinyl tiles, bathroom adhesive for glue, and sealed every nook and cranny with aquarium sealer. This has held up for 3 month's so far, no evidence of any decay, or leaking. You can get aqua. sealer in caulking gun size. I did not do a relief type background, just again put marble/rock looking tiles on back. I have pics on here somewhere, and also wanted the cage to match the home decor. I have seen some nice looking cages on here. The only thing I wish I would've done was built up the top portion to hide the lights, maybe next time! Good luck!
 
Thx Sage.

I found your pic, and was actually considering just using a piece of cork backing and trying to overpopulate it so that it gets overgrown (and thus disappears) asap to avoid the foam/dirt issue.

My concern with the foam/dirt walls is that they do deteriorate in some fashion over time and I have heard of others on these forums say their cham eats. It seems to be an individual personality type thing, but seeing as I don't have a chameleon yet I figure better safe than sorry. Seeing the way you did yours, I think I will go with the cork backing method. It came out very clean.


As for the vinyl lining, I may have to incorporate that into my build...one question though: what bathroom adhesive did you use and did you make sure it is animal safe? In my experiences with frogs especially I have found most "bathroom" building products include certain mold inhibitors which are not animal friendly even when cured. As for silicone...I have a case of brown 10oz tubes sitting in my storage :p


I think you should build a hood for your lights. It makes a world of difference in the final look of the product and only takes a short while; you've already finished the hard parts.

I'm being a little anal about my design and aiming to have no screws, seams, or hinges of any kind visible anywhere in my completed product...it has certainly added several hours to my design phase though !


EDIT: How did you do the front of your cage? Did you just stack 2x4s? It looks like there is a "ruffled" feel to the front of it, looks pretty cool.
 
The wood was called 'mansiding', which I have no clue what that means, the boards are grooved down the middle, with a tongue and groove on the long sides, so it was tricky getting everything to fit together good. Keep in mind, I am not a carpenter, and my last shop class was 23 yrs ago. I just wanted everything to match the vaulted ceilings in our great room. Really if I decide to do something, I just have to do it. Not sure on the adhesive, talked to the guy at Home Depot, so hope he knew what he was talking about. The adhesive is under the tiles and not sitting in water, so hopefully not a problem? Did let the poly. cure for awhile, till the smell had diminished. And it does need a hood:eek:. Loved the process, will def do some more building again, the planning and measurements were the hardest....
 
Haha yea the planning is the hardest.

I *HIGHLY* recommend checking out the program I used to do this. It was my very first time doing anything 3D or drawing on the computer in anyway, it wasn't too hard (to figure out the basics anyway, I haven't figured out alot of the tricky stuff). Its called "GOOGLE Sketchup" yes its google and free :p

I drew everything to scale in the program and have already noticed several that I would not have realized had I not modeled it. Also, it has a handy measure feature that gives you quick dimensions on any points.

I've never had a shop class so I'm right there with you!


In fact, I think I just realized an issue....how deep soil do I need for the larger plants? I have allotted my standard 3.5" but thats always for small plants....

what are the largest planters you have in your enclosures? Even if I plan to do soil, I will probably need it to be deeper than 3"....but how deep? 8"?
 
Back
Top Bottom