Custom build question: Has anyone used pond liner to waterproof the bottom of their custom builds?

Ceycham

Established Member
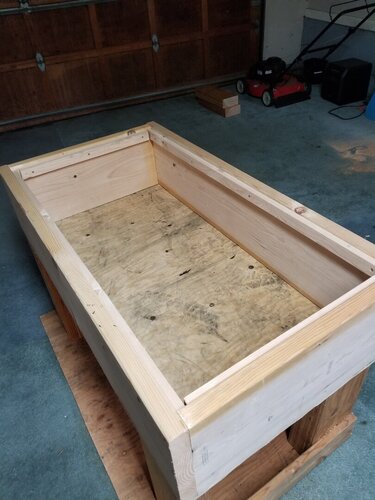
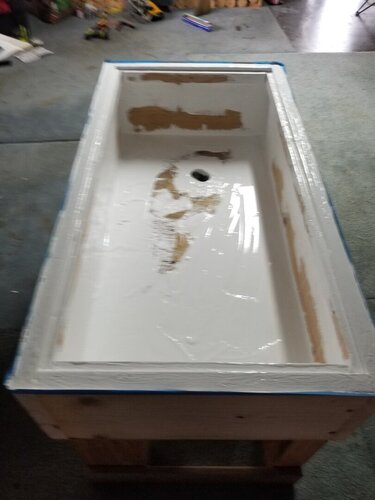
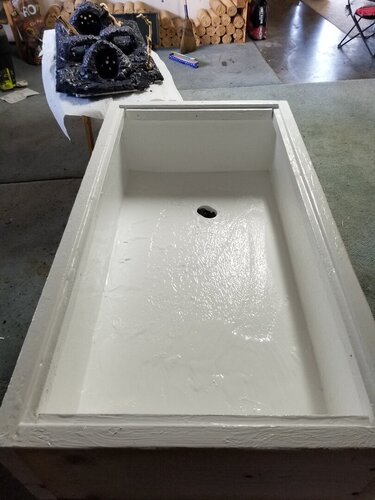
A little background: So here I am on my 3rd custom build....I'm never completely happy, although my last "furniture look" build is doing amazingly! It is a completely self built custom with a screen bottom and drains into a pan which funnels into a bucket. It was easy because all dimensions were custom made to fit my planned drainage system. However, now I'm looking for a fancier look, and decided to repurpose a really nice older curio cabinet. And because I am ME, I couldn't choose a simple piece. Instead I chose something not nearly deep enough, with lots of curved glass, no way to ventilate, and an odd rounded shape overall. I liked it so I'm calling it a challenge! This means I'm having to build out the back of the piece to give Norman more than the 10 inches of depth the curio comes with...which also gives me the opportunity to add ventilation on both sides and the back. I'm satisfied with my plans for that, though it's tricky. What I'm struggling with are drainage ideas. Right now I'm toying with draining into a narrow tray the length of the back and then funneling that down into a bucket below, but I need a way to tilt the water where I need it to go, and the odd shape rules out any repurposed trays on the bottom. Pond liner might solve my shape issues, but I wondered if anyone has experience using it?
 
So I used shower pan liner, but I like the pond liner because it is black. The shower pan liner is grey, but I was able to get a smaller size. Actually, if you go to Lowes sometimes they have the "end of the role" remnant marked way down so it is a steal! Just need the right timing ;).
 
So pond liner on bottom to add soil, water without rotting the wood?
Quick question too, Is RedWood safe for Chams?
 
The issue is as James said. Pond liner is not going to water proof anything. Water will get under the liner and rot your wood, and mold will grow under it as well.

You could build up, the wood into a slight slope, with Bondo, Clay, Wood Putty, ect. And then seal it with Flex Seal / Pond Shield, and it would be a much better seal.
 
So pond liner on bottom to add soil, water without rotting the wood?
Quick question too, Is RedWood safe for Chams?
Actually I was not going for the soil bottom. I'm still thinking I want to use a screen bottom with something under it waterproof to direct the water.
 
Actually I was not going for the soil bottom. I'm still thinking I want to use a screen bottom with something under it waterproof to direct the water.
The issue is as James said. Pond liner is not going to water proof anything. Water will get under the liner and rot your wood, and mold will grow under it as well.

You could build up, the wood into a slight slope, with Bondo, Clay, Wood Putty, ect. And then seal it with Flex Seal / Pond Shield, and it would be a much better seal.

OK, I will definitely seal the bottom. You really trust this flex seal stuff that much?
 
OK, I will definitely seal the bottom. You really trust this flex seal stuff that much?

Flex seal is pond liner.

Flex seal is a EDPM rubber emulsion, they add solvents to the rubber, like acids, and in the can they make it a liquid, a sticky liquid. Then when you paint it on, the solvents evaporate, and the rubber hardens again, well as hard as EDPM ever gets, it's still "rubbery" but it's dry and hardish.

The issue with using pond liner in rolled form, is there is no seal between it and the wood. What do you do? Staple it on? Maybe wrap some boards around it? Either way, air can get in, and if air can get it so can water, and when water and air get in you get rotting and mold. Unless your curio is MDF or Particle board, in that case you just get the bottom swelling and falling apart.


There is other options, and in some cases they are more ideal. Like Pond Armor/Sweet Water Epoxy. A disadvantage of flex seal is it adds zero strength, where the epoxys do. Another is flex seal will not stick to silicone or vice versa. Where silicon will stick to the epoxys.

A benefit to the flex seal, comes from the cons above. Since it is a rubber coating, it is still flexible, so if the enclosure bends or racks the epoxys will crack, that's why you fiberglass corners. The flex seal can bend and twist and won't crack.
 
Was reading up on Flex Seal. Interesting stuff! I'm wondering if I can pour it on the bottom with my curio tilted just a bit, make it thick and let it create its own slope? Would that be too easy??? And then brush it on the small strips of exposed wood between the glass. I love that it comes in clear, then I can keep the pretty wood look! Anyone see fault in my plan?
 
Flex seal is pond liner.

Flex seal is a EDPM rubber emulsion, they add solvents to the rubber, like acids, and in the can they make it a liquid, a sticky liquid. Then when you paint it on, the solvents evaporate, and the rubber hardens again, well as hard as EDPM ever gets, it's still "rubbery" but it's dry and hardish.

The issue with using pond liner in rolled form, is there is no seal between it and the wood. What do you do? Staple it on? Maybe wrap some boards around it? Either way, air can get in, and if air can get it so can water, and when water and air get in you get rotting and mold. Unless your curio is MDF or Particle board, in that case you just get the bottom swelling and falling apart.


There is other options, and in some cases they are more ideal. Like Pond Armor/Sweet Water Epoxy. A disadvantage of flex seal is it adds zero strength, where the epoxys do. Another is flex seal will not stick to silicone or vice versa. Where silicon will stick to the epoxys.

A benefit to the flex seal, comes from the cons above. Since it is a rubber coating, it is still flexible, so if the enclosure bends or racks the epoxys will crack, that's why you fiberglass corners. The flex seal can bend and twist and won't crack.

Thank you so much for this information. I think I like the idea of slightly flexible.
 
Was reading up on Flex Seal. Interesting stuff! I'm wondering if I can pour it on the bottom with my curio tilted just a bit, make it thick and let it create its own slope? Would that be too easy??? And then brush it on the small strips of exposed wood between the glass. I love that it comes in clear, then I can keep the pretty wood look! Anyone see fault in my plan?

That might work, my concern would be dry time in that regard. Though you would use a epoxy resin to build the slope, that will stay clear. And then flex seal over it.

The flex seal may work in that application, just be sure to allow a long cure time.
 
That might work, my concern would be dry time in that regard. Though you would use a epoxy resin to build the slope, that will stay clear. And then flex seal over it.

The flex seal may work in that application, just be sure to allow a long cure time.

So your only concern about just using the flex seal is dry time? I have all the time necessary, so I'd love to skip the resin step if I could.
 
So your only concern about just using the flex seal is dry time? I have all the time necessary, so I'd love to skip the resin step if I could.

Ya, I would think sloping it is fine, just need lots of dry time.

You don't need that much slope to direct water. Maybe 1/4 inch on the high side, and down. Maybe a tad more. Assuming the possibility of an uneven surface. So just prop up the cabinet on one side by 3/8 or so, and dump Flex seal, until it reaches the other side via gravity. It will take quite alot of flex seal though.

Make sure you have a ton of flex seal though. Maybe buy a bit more than you think you will need and then take back what you don't open. I don't think Flex Seal sticks very well to dried Flex seal, so you need to get it done first go.
 
I was a little skeptical about the flex seal also, but it does work great. Here are a couple photos of the base from a recent bioactive build.
It is about 23"x 45" and 12" deep. It took about a gallon to seal it, and had a bit left over to pour into the corners to create drainage.
It took around 4 days @ 70 degrees to get the thickest points completely cured.
Coat the stress points(corners/drainage) first. Then do a complete coat over the entire thing. Then create drainage as you want to.
It will stick to itself once the layers have cured individually.
 

Attachments

  • 20190622_135215.jpg
    20190622_135215.jpg
    139.4 KB · Views: 156
  • 20190623_112654.jpg
    20190623_112654.jpg
    95 KB · Views: 191
  • 20190624_145341.jpg
    20190624_145341.jpg
    139.4 KB · Views: 172
I was a little skeptical about the flex seal also, but it does work great. Here are a couple photos of the base from a recent bioactive build.
It is about 23"x 45" and 12" deep. It took about a gallon to seal it, and had a bit left over to pour into the corners to create drainage.
It took around 4 days @ 70 degrees to get the thickest points completely cured.
Coat the stress points(corners/drainage) first. Then do a complete coat over the entire thing. Then create drainage as you want to.
It will stick to itself once the layers have cured individually.

Thank you! I am planning for a full length drain tray in the back, so should just need the front to back tilt to create the water movement needed. Glad to hear there has been success and I can trust this stuff.
 
Back
Top Bottom