Chameleons bring so much joy and happiness to our lives but with that comes care and responsibilities. As a first time chameleon owner and being 15 years old in high school and still learning , I will be sharing with you my experience on how to create "a chameleon paradise" how much I spent and hopefully give you a idea on how much you could end up spending if you are a new chameleon keeper and want to build something similar to mines. Road bumps and problems were thrown at me during this build but I'm making this blog so hopefully you wont do the few mistakes I did, nevertheless I'm still very content on how my build came out so lets jump right in shall we? (Pictures at the end!)
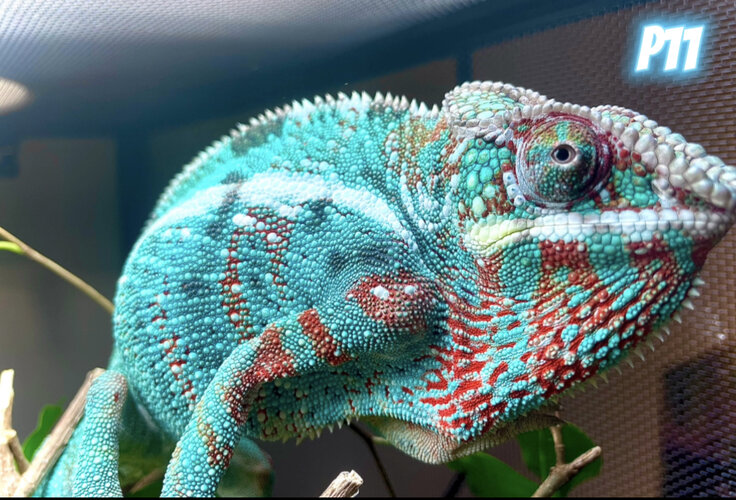
Around September I remember entering Petco I wondered around for a bit until I approached the tank where the veiled chameleon was perched, I couldn't help but admire its beauty Its body was covered in a mosaic of colors, ranging from emerald green to golden yellow, and its eyes were able to move independently of each other, giving it an almost alien-like appearance. I learned from the pet store employee that the veiled chameleon is native to the rainforests of Yemen and Saudi Arabia, and is known for its ability to change colors in response to its surroundings and mood. This fascinating adaptation, along with the chameleon's unique physical characteristics, made me even more eager to learn more and potentially bring one home as a pet. I knew I wanted to learn more about this fascinating creature before making the decision to bring it home. So, I decided to do some research prior to buying. I was determined to make an informed decision about whether to bring a veiled chameleon into my home, so I began researching the husbandry and care of these fascinating creatures. Over the course of the next two months, I spent countless hours reading articles, watching videos, and consulting with experts to learn as much as I could about chameleons. I also explored the different types of chameleons available as pets, from the more common veiled chameleon to the exotic panther chameleon. As I dived deeper into my research, I became particularly drawn to the panther chameleon, with its bold and vibrant color patterns, I decided to focus my studies on this species in particular.
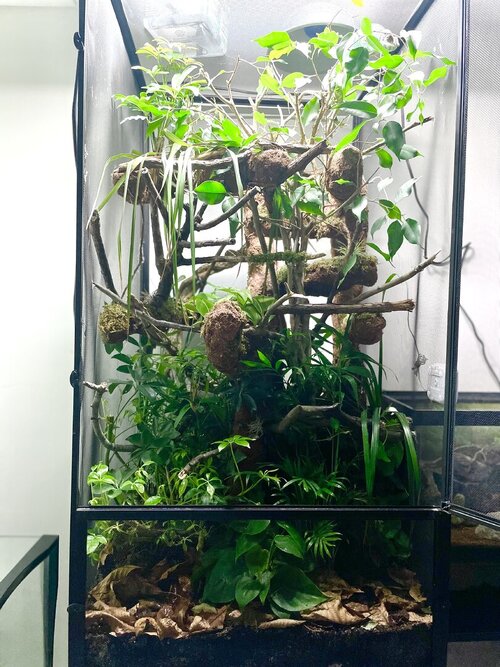
My Setup idea
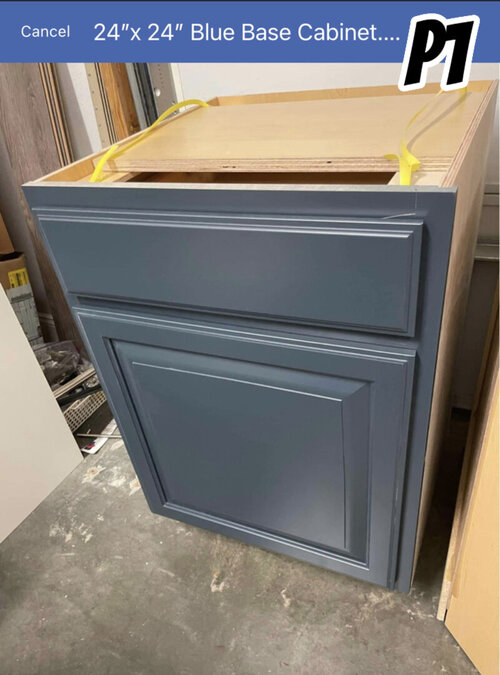
The cabinet (p1)
I found a 24x24 cabinet on Craigslist for only 10 dollars, and I was thrilled to discover that it was the perfect size and shape for my chameleon's enclosure. When I saw the listing, I knew I had to act quickly to snag this amazing deal. The cabinet was in great condition and just the right size for what I needed. After picking up the cabinet and bringing it home, I unpacked it, excited to see how it would fit into my chameleon's enclosure which was on the way. The cabinet was sturdy and well-constructed, with plenty of storage space and a sleek, modern design. I immediately filled it with all of my chameleon's supplies and accessories, and it fit perfectly into the enclosure. I was overjoyed with my purchase and couldn't believe that I had found such a great deal on Craigslist. Not only did the cabinet provide ample storage space for my chameleon's supplies, but it also added a touch of style and organization to the enclosure. I am grateful for the opportunity to find such a great deal and highly recommend checking out Craigslist for hidden gems like this one.
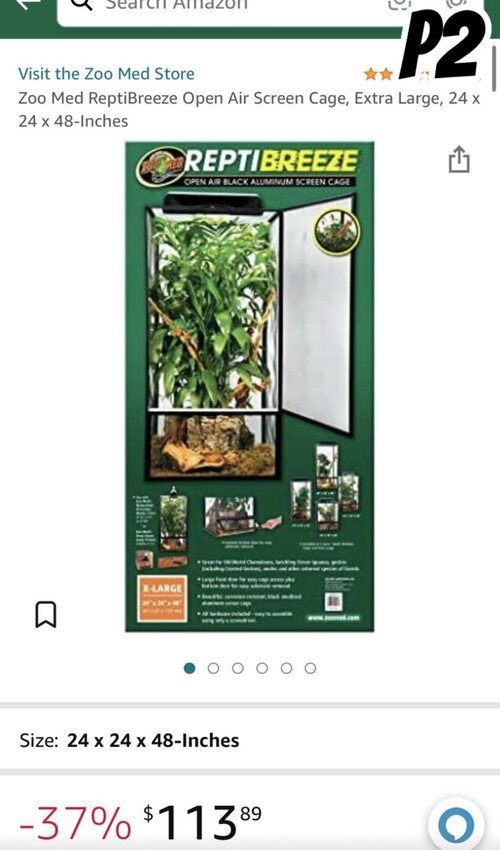
Enclosure size (p2)
After doing research on the ideal enclosure size for a chameleon, I determined that a 24x24x48 enclosure would be the most reasonable and suitable option. I scoured the internet for the best deals, and I was thrilled to find a high-quality enclosure of this size on Amazon for only 80 dollars that week only. I carefully read through the product description and customer reviews to make sure that the enclosure met my needs and standards. I was impressed by the features and specifications of the enclosure, and the overwhelmingly positive customer reviews convinced me that it was a good choice. I placed my order and eagerly awaited the arrival of my new enclosure. When the enclosure arrived, I was pleased with the quality and craftsmanship. It was sturdy and well-constructed, with plenty of ventilation so I went ahead and put it onto the cabinet and voila! it fit perfectly.
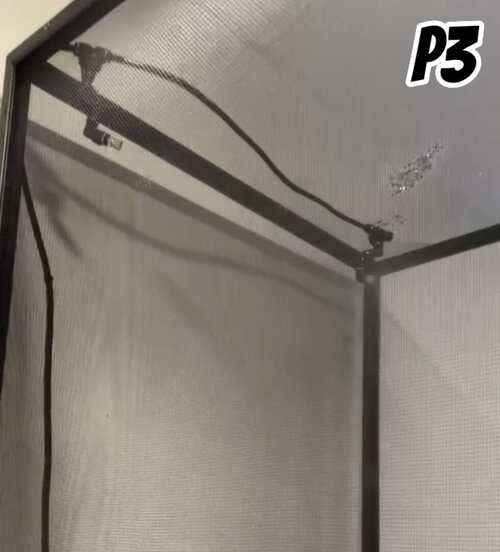
The misting system and water (p3)
The "Mist King" misting system is highly regarded in the chameleon community for its ability to produce a super fine mist that simulates a natural rainforest environment. The Mist King also comes with a reliable and user-friendly timer that allows you to easily control the misting schedule and duration. However, I was able to find a similar misting system on Amazon for 50 dollars, which was 40% cheaper than the Mist King. When I purchased the misting system on Amazon, I was initially hesitant about whether it would be as effective as the Mist King. However, after setting it up and using it for a few weeks, I was pleasantly surprised by its performance. The mist produced by the system was fine and evenly distributed, and the timer function worked flawlessly. I was able to easily customize the misting schedule to fit my chameleon's needs, and the system ran smoothly and quietly. As for day time water I have the "little dripper" that drips during the whole day and takes care of any thirsty needs and as for the misting system I run it at 7:00am-7:00pm 3 minutes both times.
In conclusion, while the Mist King misting system is highly regarded for its quality and performance, I was able to find a similar system on Amazon for a much lower price. The system I purchased has worked well for my chameleon's enclosure, and I am happy with its performance. I would recommend considering alternative misting systems on Amazon for those who want to save money without sacrificing quality.
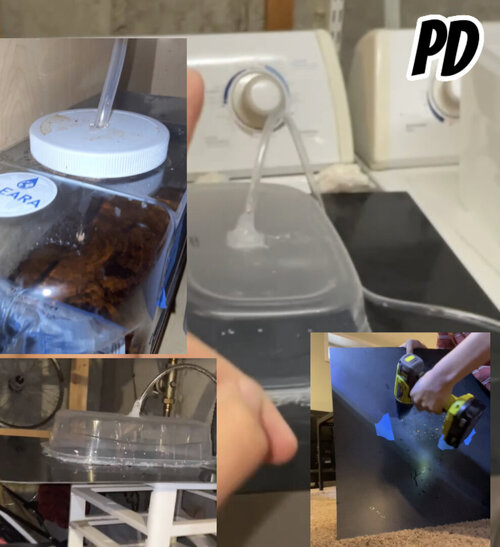
Drainage (PD)
Drainage is an important aspect of creating a proper enclosure for a chameleon. Chameleons require a source of water to drink, but they can be sensitive to excess moisture in their enclosure. To prevent excess moisture from accumulating, the enclosure should be equipped with a way to drain excess water out of the enclosure. This can be achieved by using a drainage tray that allows water to drain into it, or by using bio active substrate that be drained from the bottom , Proper drainage is essential to prevent the growth of bacteria and mold, which can be harmful to the chameleon's health. It also helps to prevent the enclosure from becoming overly humid, which can cause respiratory problems for the chameleon.
In my build I first started off drilling around 50 holes on the plastic bottom that the enclosure comes with. With that I used a plastic container and attached it using silicone to the other side of bottom to catch any water that goes into it. And within the container I had drilled a hole where a plastic tubing was inserted to drain the water below into a 5 gallon bucket. Down there below my chameleon enclosure I have 2, 5g buckets that drain and mist water.
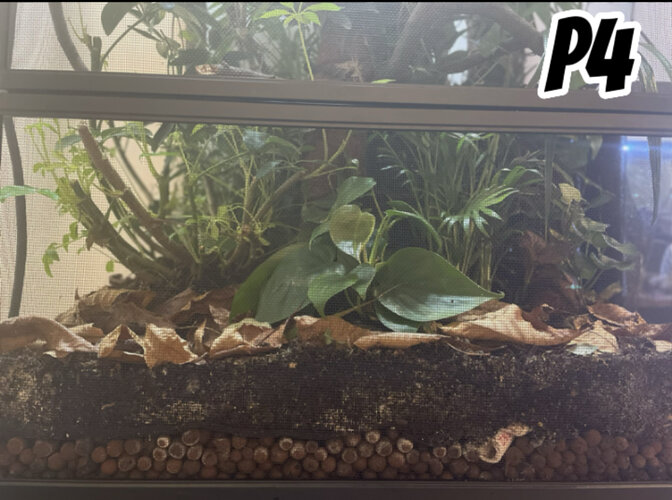
bio active or bare bottom (p4)
Deciding on the type of bottom for my chameleon enclosure was a difficult and important decision. I wanted to create a home for my pet that was both comfortable and naturalistic. After researching the different options available, I was faced with a choice between a bio-active enclosure or a bare-bottom enclosure.
A bio-active enclosure is one that is designed to mimic the chameleon's natural habitat, with live plants, soil, and other elements that support a thriving ecosystem. This type of enclosure is often more naturalistic and aesthetically pleasing, but it can also be more complex and time-consuming to maintain. A bare-bottom enclosure, on the other hand, is one that uses nothing it does not include live plants or other elements of a bio-active ecosystem. This type of enclosure is often easier to maintain, but it may not provide the same level of environmental enrichment for the chameleon.
After much consideration, I decided to go with a bio-active enclosure for my chameleon. I was drawn to the naturalistic look and feel of a bio-active enclosure, and I was willing to put in the extra effort to maintain it. I set up the enclosure with live plants, soil, to create a thriving ecosystem for my chameleon to live in. The result was a beautiful and engaging environment that my chameleon seemed to enjoy exploring and interacting with. Of course, maintaining a bio-active enclosure is not without its challenges. I have to regularly monitor and adjust the moisture and nutrient levels in the soil, as well as trim and care for the live plants. I also have to be diligent about controlling pests and other potential hazards in the enclosure. But despite the challenges, I am happy with my decision to go with a bio-active enclosure, and I believe it provides a more natural and stimulating and rewarding environment for both my chameleon and I.
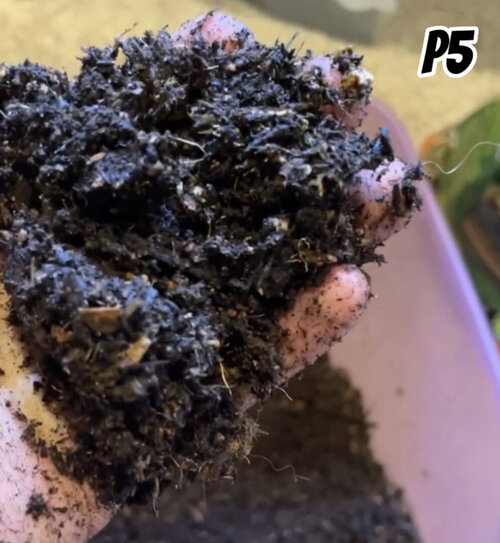
Building the base (p5)
Building a bio-active bottom for your chameleon's enclosure is a rewarding and enriching way to create a naturalistic and stimulating environment for your chameleon. The first step in building a bio-active bottom is to purchase and use LECA (lightweight expanded clay aggregate) as the base layer. LECA is a type of porous clay pebble that is ideal for use in bio-active enclosures because it promotes drainage and aeration, and provides a sturdy foundation for the other layers of the bottom. To create the second layer of the bottom, you will need to use a window screening barrier to divide the LECA from the second layer. This barrier will prevent soil from mixing with the LECA. The second layer should consist of a mixture of gravel, sand, and charcoal. The gravel and sand will provide a substrate for burrowing and digging, while the charcoal will help to absorb moisture and odors and be a hotspot for springtails. You can press the barrier down into the LECA with a small tool to ensure that it stays in place.
The third layer of the bottom should be a homemade ABG (Atlanta Botanical Gardens) mix or a similar mixture. This layer will provide a substrate for plants and micro fauna, such as isopods and springtails. To make a homemade ABG mix, There are many ways but I use equal parts of potting soil without perlite, coco fiber, and jungle soil. This mixture should be moist but not soggy, and should be spread evenly over the second layer of the bottom. Once you have completed these steps, your bio-active bottom is ready for plants, and micro fauna You can add live plants to the third layer of the bottom, and introduce isopods and springtails to help maintain the ecosystem. Finally I collected fresh leaf litter from the outdoors I made sure to rinse them in case of pesticides and to give the isopods hiding spots so the chameleon cant eat them.
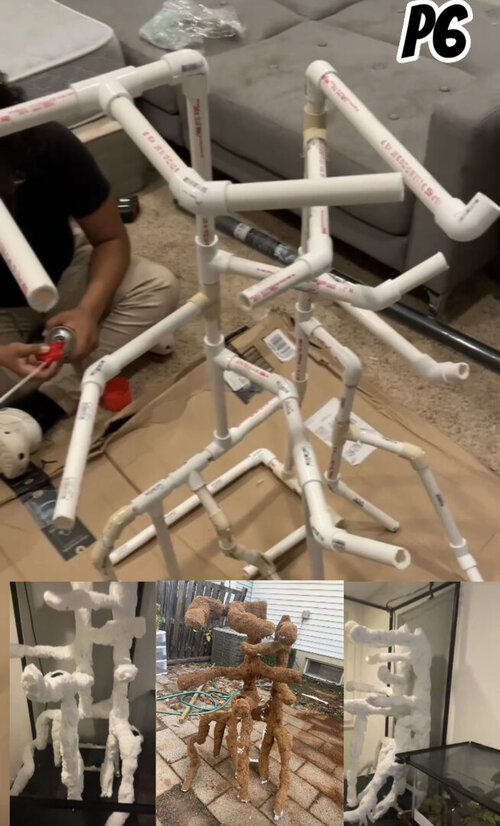
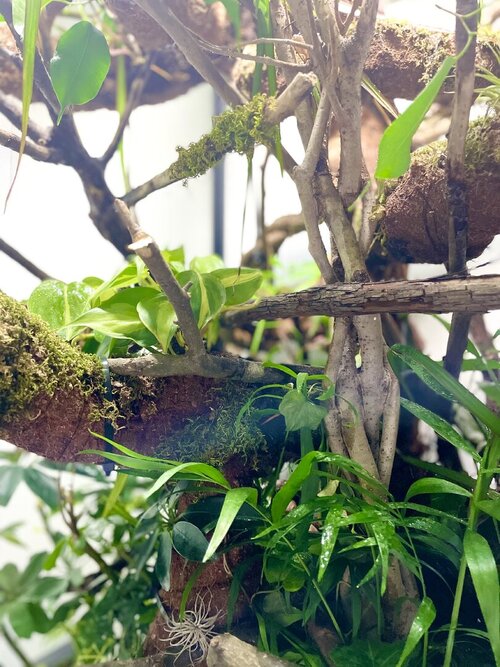
The Tree (p6)
As a chameleon enthusiast, I was always on the lookout for ways to improve my pet's enclosure and provide a more natural and stimulating environment for them to live in. That's why I was thrilled when after searching the internet for hours I found someone named "The Reef Dudes" on YouTube and saw their amazing PVC pipe tree creation which they had built for their dart frogs. Watching their step-by-step tutorial, I was so inspired to try making my own tree using PVC pipe and expandable foam. The process of creating the tree was both challenging and rewarding. I started by shaping the PVC pipe into the desired shape of the tree (P1), using a heat gun to bend and curve the pipe to create a lifelike trunk and branches. I then applied the expandable foam, using a spray nozzle to evenly distribute it over the surface of the PVC pipe. As the foam expanded and hardened, I used a knife to carefully shave it down and shape it into a more realistic tree form.
Once the expandable foam had dried, I applied a layer of silicone over it to create a smooth and seamless surface. I then attached coco fiber to the silicone, using a glue gun to create a bark-like texture on the tree. The final result was a realistic and durable tree that looked like it had been plucked straight from the forest and placed in my chameleon's enclosure I do want to mention this took me day and night and about 30+ Hours of work which was hard to do as a high school student but managed to find wiggle room around my schedule but I loved the experience! not the smell! Not only did the tree add a touch of beauty and realism to my chameleon's home, but it also provided a natural climbing and perching spot for it to enjoy. I was incredibly proud of my creation, and I felt grateful to "The Reef Dudes" for inspiring me to try something new and challenging. It just goes to show that with a little creativity and determination, even a simple PVC pipe and expandable foam can be transformed into something truly special and hopefully inspirational for someone out there.
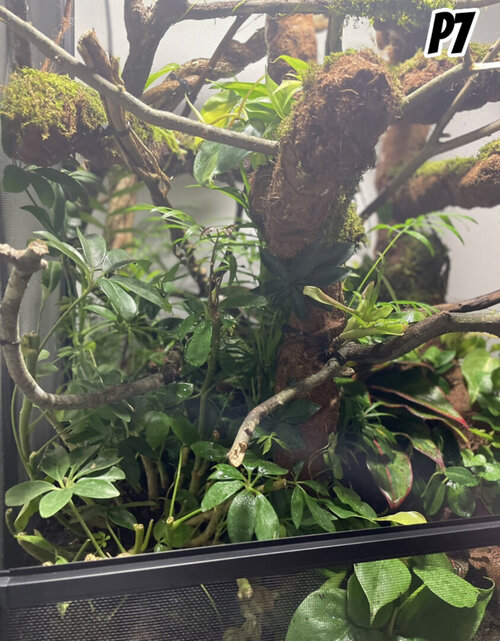
The plants (p7)
When choosing plants for your chameleon enclosure, it's best to use plants that have been recommended by experienced chameleon keepers or organizations that specialize in chameleon care. Using plants that are known to be safe and suitable for chameleons will help ensure the health and well-being of your chameleon. The umbrella plant, pathos, fiscus tree, and palm plants are all commonly recommended plants for chameleon enclosures, as they are non-toxic and provide a variety of surfaces for your chameleon to climb and explore. Using a mix of plants can also help create a more visually appealing enclosure, giving it a rainforest-like appearance so that's what I used I have roughly 15 plants inside the enclosure and there sizes range just make sure you have a few big one to take up space.
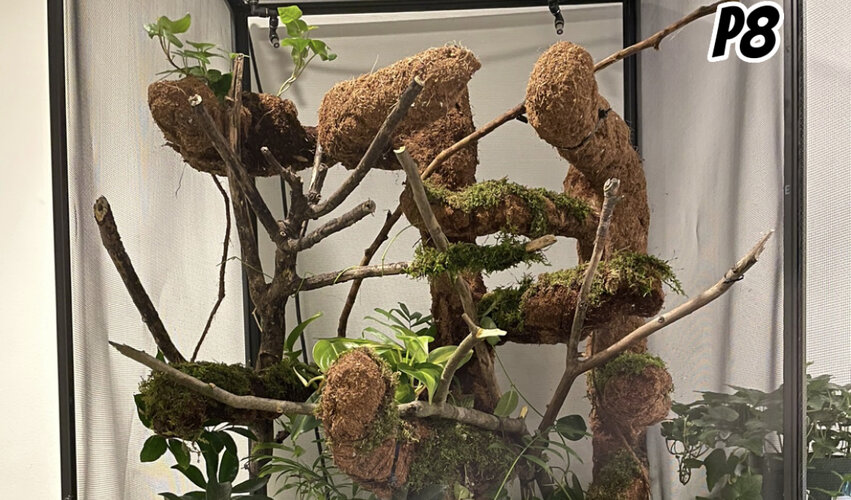
Sticks (p8)
I collected only the best sticks and rope-like sticks from the forest for my chameleon's enclosure. I carefully inspected each stick to make sure it was sturdy and free of any loose bark or debris that could potentially harm my chameleon. I also took the time to clean each stick thoroughly before adding it to the enclosure. Some of the sticks I baked in the oven to kill any bacteria or pests that might be living on them, while others I washed with warm water and mild soap to remove any dirt or grime. By taking the time to select and clean the sticks, I was able to create a safe and natural environment for my chameleon to climb and explore. The sticks added a touch of the chameleon's natural habitat to the enclosure, which helped make it feel more comfortable and inviting for my arboreal lizard. I then added moss to a few of the sticks but mostly on the artificial tree to give it a naturalistic look. With this came the issue that when I first introduced my chameleon to his enclosure he would eat it, thankfully after a few days he stopped or a risk of impaction could have been there.
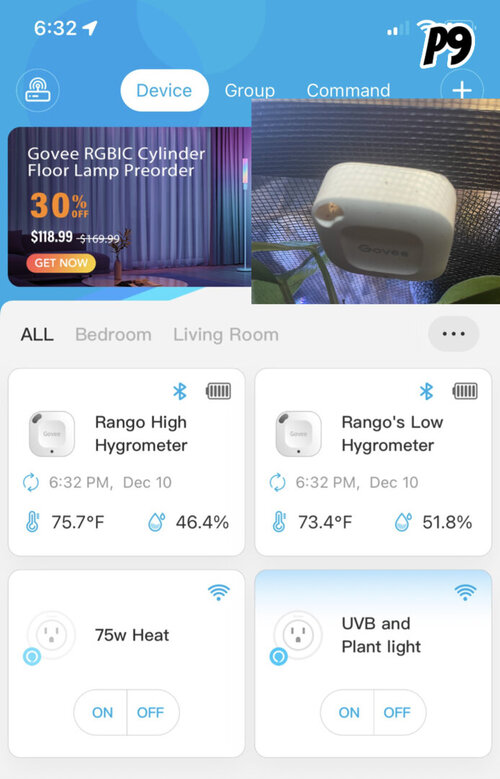
Tech/Hygro-temp (p9)
Having a well-regulated enclosure is crucial for the health and well-being of my chameleon. To ensure that the enclosure remains at the proper temperature and humidity levels, I use two Govee hygrometer thermometers. These devices allow me to monitor the temperature and humidity levels in the enclosure from my phone, so I can make adjustments as needed to ensure that my chameleon stays comfortable. The Govee hygrometer thermometers are easy to use and set up. I simply placed one in the warm side of the enclosure and one in the cool side, so I can accurately monitor the temperature in both areas. The devices are connected to my phone via Bluetooth, so I can check the temperature and humidity levels at any time and make adjustments as needed. Using the Govee hygrometer thermometers has made it much easier to regulate the temperature and humidity levels in my chameleon's enclosure. I no longer have to worry about the enclosure getting too cold or too hot, or the humidity levels getting too high or too low. I can make adjustments quickly and easily from my phone, ensuring that my chameleon always has a comfortable and safe environment to live in. Overall, using the Govee hygrometer thermometers has been a great addition to my chameleon's enclosure. They have made it much easier to regulate the temperature and humidity levels, ensuring that my chameleon always has a comfortable and safe environment to live in.
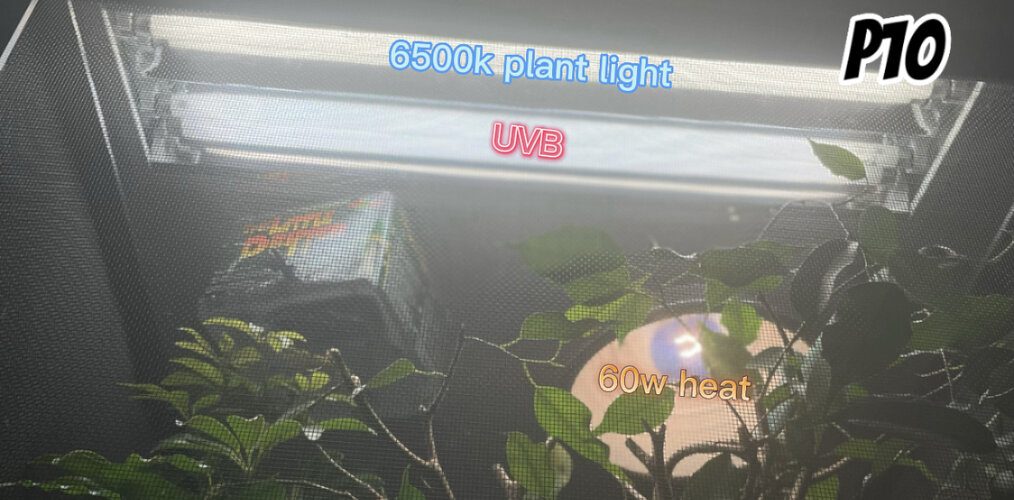
Lighting (p10)
It is crucial to provide a chameleon with the right UVB and heating wattage in order to ensure its health and well-being. UVB lighting is necessary for chameleons to properly metabolize calcium, which is essential for strong bones and muscle function. Without the proper UVB lighting, a chameleon can develop deficiencies that can lead to serious health problems, such as metabolic bone disease. In terms of heating, chameleons require a gradient of temperatures within their enclosure to properly thermoregulate. This means providing both a warm basking area and a cooler area for the chameleon to regulate its body temperature. The appropriate wattage for heating will depend on the size of the enclosure and the ambient temperature of the room, but a 60 watt heat bulb is a good starting point.
In my own setup, I use a 5.0 HO T5 linear UVB bulb to provide the necessary UVB lighting for my chameleon. For heat, I use a 60 watt heat bulb, but you may need to use a higher wattage depending on your specific circumstances. I also use a 6500K plant light to provide additional lighting and create a more natural environment for my chameleon. All of my lighting is timed to be off at 7:00pm, except for the heat bulb which is turned off at 5:00pm to mimic the natural day/night cycle. Overall, it is important to carefully consider the UVB and heating needs of a chameleon in order to provide the best possible care and ensure its health and well-being. Providing the right lighting and heating setup can make a big difference in the health and happiness of your chameleon.
Chameleon
It is always best to buy a chameleon from a reputable source, such as a breeder, rather than a pet store. Buying from a breeder ensures that the chameleon is healthy and has been properly cared for, and it also supports responsible breeding practices. In my own experience, I bought my chameleon from "Surfing Oaks Chameleons" and they did a great job. Chameleons can be expensive, with prices ranging from $30 to $5000 depending on the species and age of the chameleon. Buying from a breeder is often more expensive than buying from a pet store, but it is worth it to ensure that you are getting a healthy, well-cared-for chameleon. In addition, reputable breeders are often knowledgeable about the specific needs of chameleons and can provide valuable advice and support as you care for your new pet. Overall, it is important to always buy a chameleon from a reputable source in order to get a healthy, well-cared-for pet and support responsible breeding practices. While it may cost more upfront, it will save you money and heartache in the long run.
Total:
Cabinet 10$
Enclosure 80$
Mister and little dripper 60$
Drainage FREE
Bio active 30$ + 20$(Isopods)
Tree 200$
Plants 220$
Sticks FREE
hygro/temp- 50$
lighting 150$
Chameleon 225$
Total:1045$
There is not 1 way to do this, you can go cheaper or more expensive this is what just works for me! Thank you so much for reading my blog! I will be sharing pictures of my chameleon enclosure as it looks today at the end, i hope you enjoyed reading about where my chameleon lives and how i built his home!
Around September I remember entering Petco I wondered around for a bit until I approached the tank where the veiled chameleon was perched, I couldn't help but admire its beauty Its body was covered in a mosaic of colors, ranging from emerald green to golden yellow, and its eyes were able to move independently of each other, giving it an almost alien-like appearance. I learned from the pet store employee that the veiled chameleon is native to the rainforests of Yemen and Saudi Arabia, and is known for its ability to change colors in response to its surroundings and mood. This fascinating adaptation, along with the chameleon's unique physical characteristics, made me even more eager to learn more and potentially bring one home as a pet. I knew I wanted to learn more about this fascinating creature before making the decision to bring it home. So, I decided to do some research prior to buying. I was determined to make an informed decision about whether to bring a veiled chameleon into my home, so I began researching the husbandry and care of these fascinating creatures. Over the course of the next two months, I spent countless hours reading articles, watching videos, and consulting with experts to learn as much as I could about chameleons. I also explored the different types of chameleons available as pets, from the more common veiled chameleon to the exotic panther chameleon. As I dived deeper into my research, I became particularly drawn to the panther chameleon, with its bold and vibrant color patterns, I decided to focus my studies on this species in particular.
My Setup idea
The cabinet (p1)
I found a 24x24 cabinet on Craigslist for only 10 dollars, and I was thrilled to discover that it was the perfect size and shape for my chameleon's enclosure. When I saw the listing, I knew I had to act quickly to snag this amazing deal. The cabinet was in great condition and just the right size for what I needed. After picking up the cabinet and bringing it home, I unpacked it, excited to see how it would fit into my chameleon's enclosure which was on the way. The cabinet was sturdy and well-constructed, with plenty of storage space and a sleek, modern design. I immediately filled it with all of my chameleon's supplies and accessories, and it fit perfectly into the enclosure. I was overjoyed with my purchase and couldn't believe that I had found such a great deal on Craigslist. Not only did the cabinet provide ample storage space for my chameleon's supplies, but it also added a touch of style and organization to the enclosure. I am grateful for the opportunity to find such a great deal and highly recommend checking out Craigslist for hidden gems like this one.
Enclosure size (p2)
After doing research on the ideal enclosure size for a chameleon, I determined that a 24x24x48 enclosure would be the most reasonable and suitable option. I scoured the internet for the best deals, and I was thrilled to find a high-quality enclosure of this size on Amazon for only 80 dollars that week only. I carefully read through the product description and customer reviews to make sure that the enclosure met my needs and standards. I was impressed by the features and specifications of the enclosure, and the overwhelmingly positive customer reviews convinced me that it was a good choice. I placed my order and eagerly awaited the arrival of my new enclosure. When the enclosure arrived, I was pleased with the quality and craftsmanship. It was sturdy and well-constructed, with plenty of ventilation so I went ahead and put it onto the cabinet and voila! it fit perfectly.
The misting system and water (p3)
The "Mist King" misting system is highly regarded in the chameleon community for its ability to produce a super fine mist that simulates a natural rainforest environment. The Mist King also comes with a reliable and user-friendly timer that allows you to easily control the misting schedule and duration. However, I was able to find a similar misting system on Amazon for 50 dollars, which was 40% cheaper than the Mist King. When I purchased the misting system on Amazon, I was initially hesitant about whether it would be as effective as the Mist King. However, after setting it up and using it for a few weeks, I was pleasantly surprised by its performance. The mist produced by the system was fine and evenly distributed, and the timer function worked flawlessly. I was able to easily customize the misting schedule to fit my chameleon's needs, and the system ran smoothly and quietly. As for day time water I have the "little dripper" that drips during the whole day and takes care of any thirsty needs and as for the misting system I run it at 7:00am-7:00pm 3 minutes both times.
In conclusion, while the Mist King misting system is highly regarded for its quality and performance, I was able to find a similar system on Amazon for a much lower price. The system I purchased has worked well for my chameleon's enclosure, and I am happy with its performance. I would recommend considering alternative misting systems on Amazon for those who want to save money without sacrificing quality.
Drainage (PD)
Drainage is an important aspect of creating a proper enclosure for a chameleon. Chameleons require a source of water to drink, but they can be sensitive to excess moisture in their enclosure. To prevent excess moisture from accumulating, the enclosure should be equipped with a way to drain excess water out of the enclosure. This can be achieved by using a drainage tray that allows water to drain into it, or by using bio active substrate that be drained from the bottom , Proper drainage is essential to prevent the growth of bacteria and mold, which can be harmful to the chameleon's health. It also helps to prevent the enclosure from becoming overly humid, which can cause respiratory problems for the chameleon.
In my build I first started off drilling around 50 holes on the plastic bottom that the enclosure comes with. With that I used a plastic container and attached it using silicone to the other side of bottom to catch any water that goes into it. And within the container I had drilled a hole where a plastic tubing was inserted to drain the water below into a 5 gallon bucket. Down there below my chameleon enclosure I have 2, 5g buckets that drain and mist water.
bio active or bare bottom (p4)
Deciding on the type of bottom for my chameleon enclosure was a difficult and important decision. I wanted to create a home for my pet that was both comfortable and naturalistic. After researching the different options available, I was faced with a choice between a bio-active enclosure or a bare-bottom enclosure.
A bio-active enclosure is one that is designed to mimic the chameleon's natural habitat, with live plants, soil, and other elements that support a thriving ecosystem. This type of enclosure is often more naturalistic and aesthetically pleasing, but it can also be more complex and time-consuming to maintain. A bare-bottom enclosure, on the other hand, is one that uses nothing it does not include live plants or other elements of a bio-active ecosystem. This type of enclosure is often easier to maintain, but it may not provide the same level of environmental enrichment for the chameleon.
After much consideration, I decided to go with a bio-active enclosure for my chameleon. I was drawn to the naturalistic look and feel of a bio-active enclosure, and I was willing to put in the extra effort to maintain it. I set up the enclosure with live plants, soil, to create a thriving ecosystem for my chameleon to live in. The result was a beautiful and engaging environment that my chameleon seemed to enjoy exploring and interacting with. Of course, maintaining a bio-active enclosure is not without its challenges. I have to regularly monitor and adjust the moisture and nutrient levels in the soil, as well as trim and care for the live plants. I also have to be diligent about controlling pests and other potential hazards in the enclosure. But despite the challenges, I am happy with my decision to go with a bio-active enclosure, and I believe it provides a more natural and stimulating and rewarding environment for both my chameleon and I.
Building the base (p5)
Building a bio-active bottom for your chameleon's enclosure is a rewarding and enriching way to create a naturalistic and stimulating environment for your chameleon. The first step in building a bio-active bottom is to purchase and use LECA (lightweight expanded clay aggregate) as the base layer. LECA is a type of porous clay pebble that is ideal for use in bio-active enclosures because it promotes drainage and aeration, and provides a sturdy foundation for the other layers of the bottom. To create the second layer of the bottom, you will need to use a window screening barrier to divide the LECA from the second layer. This barrier will prevent soil from mixing with the LECA. The second layer should consist of a mixture of gravel, sand, and charcoal. The gravel and sand will provide a substrate for burrowing and digging, while the charcoal will help to absorb moisture and odors and be a hotspot for springtails. You can press the barrier down into the LECA with a small tool to ensure that it stays in place.
The third layer of the bottom should be a homemade ABG (Atlanta Botanical Gardens) mix or a similar mixture. This layer will provide a substrate for plants and micro fauna, such as isopods and springtails. To make a homemade ABG mix, There are many ways but I use equal parts of potting soil without perlite, coco fiber, and jungle soil. This mixture should be moist but not soggy, and should be spread evenly over the second layer of the bottom. Once you have completed these steps, your bio-active bottom is ready for plants, and micro fauna You can add live plants to the third layer of the bottom, and introduce isopods and springtails to help maintain the ecosystem. Finally I collected fresh leaf litter from the outdoors I made sure to rinse them in case of pesticides and to give the isopods hiding spots so the chameleon cant eat them.
The Tree (p6)
As a chameleon enthusiast, I was always on the lookout for ways to improve my pet's enclosure and provide a more natural and stimulating environment for them to live in. That's why I was thrilled when after searching the internet for hours I found someone named "The Reef Dudes" on YouTube and saw their amazing PVC pipe tree creation which they had built for their dart frogs. Watching their step-by-step tutorial, I was so inspired to try making my own tree using PVC pipe and expandable foam. The process of creating the tree was both challenging and rewarding. I started by shaping the PVC pipe into the desired shape of the tree (P1), using a heat gun to bend and curve the pipe to create a lifelike trunk and branches. I then applied the expandable foam, using a spray nozzle to evenly distribute it over the surface of the PVC pipe. As the foam expanded and hardened, I used a knife to carefully shave it down and shape it into a more realistic tree form.
Once the expandable foam had dried, I applied a layer of silicone over it to create a smooth and seamless surface. I then attached coco fiber to the silicone, using a glue gun to create a bark-like texture on the tree. The final result was a realistic and durable tree that looked like it had been plucked straight from the forest and placed in my chameleon's enclosure I do want to mention this took me day and night and about 30+ Hours of work which was hard to do as a high school student but managed to find wiggle room around my schedule but I loved the experience! not the smell! Not only did the tree add a touch of beauty and realism to my chameleon's home, but it also provided a natural climbing and perching spot for it to enjoy. I was incredibly proud of my creation, and I felt grateful to "The Reef Dudes" for inspiring me to try something new and challenging. It just goes to show that with a little creativity and determination, even a simple PVC pipe and expandable foam can be transformed into something truly special and hopefully inspirational for someone out there.
The plants (p7)
When choosing plants for your chameleon enclosure, it's best to use plants that have been recommended by experienced chameleon keepers or organizations that specialize in chameleon care. Using plants that are known to be safe and suitable for chameleons will help ensure the health and well-being of your chameleon. The umbrella plant, pathos, fiscus tree, and palm plants are all commonly recommended plants for chameleon enclosures, as they are non-toxic and provide a variety of surfaces for your chameleon to climb and explore. Using a mix of plants can also help create a more visually appealing enclosure, giving it a rainforest-like appearance so that's what I used I have roughly 15 plants inside the enclosure and there sizes range just make sure you have a few big one to take up space.
Sticks (p8)
I collected only the best sticks and rope-like sticks from the forest for my chameleon's enclosure. I carefully inspected each stick to make sure it was sturdy and free of any loose bark or debris that could potentially harm my chameleon. I also took the time to clean each stick thoroughly before adding it to the enclosure. Some of the sticks I baked in the oven to kill any bacteria or pests that might be living on them, while others I washed with warm water and mild soap to remove any dirt or grime. By taking the time to select and clean the sticks, I was able to create a safe and natural environment for my chameleon to climb and explore. The sticks added a touch of the chameleon's natural habitat to the enclosure, which helped make it feel more comfortable and inviting for my arboreal lizard. I then added moss to a few of the sticks but mostly on the artificial tree to give it a naturalistic look. With this came the issue that when I first introduced my chameleon to his enclosure he would eat it, thankfully after a few days he stopped or a risk of impaction could have been there.
Tech/Hygro-temp (p9)
Having a well-regulated enclosure is crucial for the health and well-being of my chameleon. To ensure that the enclosure remains at the proper temperature and humidity levels, I use two Govee hygrometer thermometers. These devices allow me to monitor the temperature and humidity levels in the enclosure from my phone, so I can make adjustments as needed to ensure that my chameleon stays comfortable. The Govee hygrometer thermometers are easy to use and set up. I simply placed one in the warm side of the enclosure and one in the cool side, so I can accurately monitor the temperature in both areas. The devices are connected to my phone via Bluetooth, so I can check the temperature and humidity levels at any time and make adjustments as needed. Using the Govee hygrometer thermometers has made it much easier to regulate the temperature and humidity levels in my chameleon's enclosure. I no longer have to worry about the enclosure getting too cold or too hot, or the humidity levels getting too high or too low. I can make adjustments quickly and easily from my phone, ensuring that my chameleon always has a comfortable and safe environment to live in. Overall, using the Govee hygrometer thermometers has been a great addition to my chameleon's enclosure. They have made it much easier to regulate the temperature and humidity levels, ensuring that my chameleon always has a comfortable and safe environment to live in.
Lighting (p10)
It is crucial to provide a chameleon with the right UVB and heating wattage in order to ensure its health and well-being. UVB lighting is necessary for chameleons to properly metabolize calcium, which is essential for strong bones and muscle function. Without the proper UVB lighting, a chameleon can develop deficiencies that can lead to serious health problems, such as metabolic bone disease. In terms of heating, chameleons require a gradient of temperatures within their enclosure to properly thermoregulate. This means providing both a warm basking area and a cooler area for the chameleon to regulate its body temperature. The appropriate wattage for heating will depend on the size of the enclosure and the ambient temperature of the room, but a 60 watt heat bulb is a good starting point.
In my own setup, I use a 5.0 HO T5 linear UVB bulb to provide the necessary UVB lighting for my chameleon. For heat, I use a 60 watt heat bulb, but you may need to use a higher wattage depending on your specific circumstances. I also use a 6500K plant light to provide additional lighting and create a more natural environment for my chameleon. All of my lighting is timed to be off at 7:00pm, except for the heat bulb which is turned off at 5:00pm to mimic the natural day/night cycle. Overall, it is important to carefully consider the UVB and heating needs of a chameleon in order to provide the best possible care and ensure its health and well-being. Providing the right lighting and heating setup can make a big difference in the health and happiness of your chameleon.
Chameleon
It is always best to buy a chameleon from a reputable source, such as a breeder, rather than a pet store. Buying from a breeder ensures that the chameleon is healthy and has been properly cared for, and it also supports responsible breeding practices. In my own experience, I bought my chameleon from "Surfing Oaks Chameleons" and they did a great job. Chameleons can be expensive, with prices ranging from $30 to $5000 depending on the species and age of the chameleon. Buying from a breeder is often more expensive than buying from a pet store, but it is worth it to ensure that you are getting a healthy, well-cared-for chameleon. In addition, reputable breeders are often knowledgeable about the specific needs of chameleons and can provide valuable advice and support as you care for your new pet. Overall, it is important to always buy a chameleon from a reputable source in order to get a healthy, well-cared-for pet and support responsible breeding practices. While it may cost more upfront, it will save you money and heartache in the long run.
Total:
Cabinet 10$
Enclosure 80$
Mister and little dripper 60$
Drainage FREE
Bio active 30$ + 20$(Isopods)
Tree 200$
Plants 220$
Sticks FREE
hygro/temp- 50$
lighting 150$
Chameleon 225$
Total:1045$
There is not 1 way to do this, you can go cheaper or more expensive this is what just works for me! Thank you so much for reading my blog! I will be sharing pictures of my chameleon enclosure as it looks today at the end, i hope you enjoyed reading about where my chameleon lives and how i built his home!
-
 66F111AA-5FA2-4426-8E3F-1FE06606537C.jpeg
 -
 DDE9EC9E-2F87-4C10-BE9E-E8EA4CC9450B.jpeg
 -
 51EA711D-F0B7-4BCD-AC8F-DD300AE8717B.jpeg
 -
 6640000F-D3BF-4813-8420-98E1D3C8E195.jpeg
 -
 D0CE0056-CFA9-45D9-B517-109B41B7EA9A.jpeg
 -
 9A12BE32-AD7F-4CC9-AC31-93A7B1C4EBEF.jpeg
 -
 F1D965A4-1049-494E-958C-28B771C7CC60.jpeg
 -
 64F10884-02A6-433F-B796-C5F99A953CC7.jpeg
 -
 A4FD9485-244F-49C2-AA62-BEF059A94C0C.jpeg
 -
 DC86A806-B483-4A06-B04D-C2AE29EF7489.jpeg
 -
 5771CCDE-60EA-4CE3-A975-38DABD89BE4A.jpeg
 -
 6C77D658-CB11-4F92-9512-61B124DE3DA0.jpeg
 -
 810B41C2-B782-4610-8E2F-54AD502EDF24.jpeg
 -
 802DCD70-90D8-4994-9111-C906C0D160E2.jpeg

