Brodybreaux25
Chameleon Enthusiast


This community has given me so much since I joined, time to give a little back. I’ve had a few people ask me to explain how I built a self-refilling MistKing reservoir for just $8.
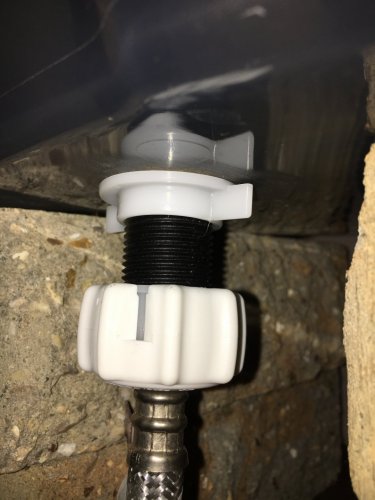
You will have to splice a “T” into whatever kind of plumbing system you have to work with. Then run your line to where ever you want to set up your reservoir. Here you have a choice to make, you can either put a male/female threaded fitting on the reservoir end of your new line or you can install a valve. I strongly recommend the valve, it will make any maintenance you have to do much easier. Once you have installed your choice of fitting you will need a hose to connect your waterline to the inlet of your toilet valve. They cost a bit more but I only use stainless steel braided flex hoses in my house, they are much stronger than a rubber one. Rubber hoses can be easily damaged but will still work here. Install your hose on your new line.
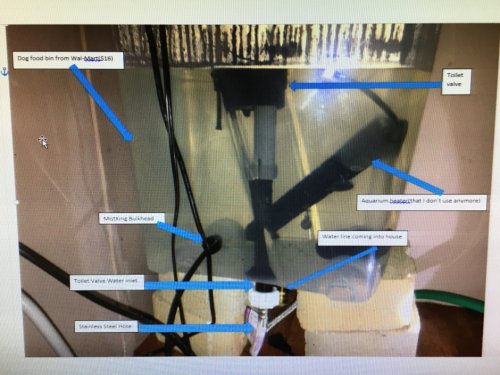
To install the toilet valve you will have to build a small platform for your reservoir to sit on top of for two reasons. The first is your tank will have fittings poking out of the bottom of it. The second is that your reservoir must be installed above your pump for it to work correctly. Your platform can be as simple as using a stack of 2x4s or bricks. See attached pics.
Once built, get a drill bit big enough to drill a hole in the reservoirs floor dead center. The hole you drill should be just barely large enough to stick the water inlet side of the toilet valve through the bottom. It should be a tight fit. If you are using a plastic tote as I have be sure to drill VERY slowly with minimal pressure. If you force it I guarantee you will crack your reservoir. From the inside of your reservoir poke the threads through the hole you drilled in the bottom. Don’t forget to install the toilet valve’s gasket inside the tank before you tighten the nut that secures the valve to the bottom of your reservoir. Connect the other end of your hose to the inlet of your toilet valve that is now sticking out of the floor of your reservoir.
Now you can install the MistKing bulkhead and make the connection from your reservoir to your MistKing pump.
Parts list:
· Pipes and fittings
· Valve (if using one)
· Hose
· Toilet valve
· Drill with Bit
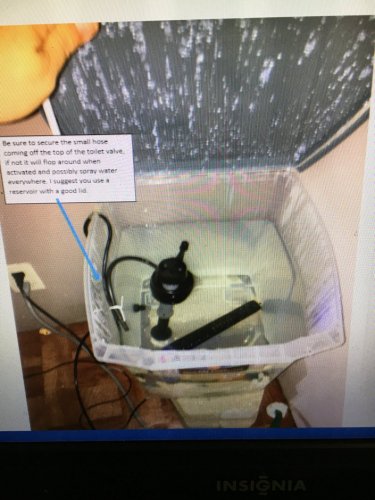
· Tank (large enough that the toilet valve has clearance on all sides. If your valve gets hung up in the open position your tank will overflow!)
Tip - If any of the line you will be installing will be exposed to freezing temps in the winter I strongly recommend using PEX pipe, not PVC or metal. PEX has two BIG advantages over other materials. The first is that it will expand when in cold service versus busting like PVC will, your line may freeze but it will not rupture on you! The second is that PEX pipe is VERY flexible, you can pretty much snake this pipe into the tightest of spaces, removing the need to install a bunch of 90s like you would have to do with PVC or metal pipe.
I'm pretty sure most people can figure out how to set something like this on their own, but I know other people, by no fault of their own, need help along the way. If you have any suggestions or if any of this is confusing your feedback is welcome!
You will have to splice a “T” into whatever kind of plumbing system you have to work with. Then run your line to where ever you want to set up your reservoir. Here you have a choice to make, you can either put a male/female threaded fitting on the reservoir end of your new line or you can install a valve. I strongly recommend the valve, it will make any maintenance you have to do much easier. Once you have installed your choice of fitting you will need a hose to connect your waterline to the inlet of your toilet valve. They cost a bit more but I only use stainless steel braided flex hoses in my house, they are much stronger than a rubber one. Rubber hoses can be easily damaged but will still work here. Install your hose on your new line.
To install the toilet valve you will have to build a small platform for your reservoir to sit on top of for two reasons. The first is your tank will have fittings poking out of the bottom of it. The second is that your reservoir must be installed above your pump for it to work correctly. Your platform can be as simple as using a stack of 2x4s or bricks. See attached pics.
Once built, get a drill bit big enough to drill a hole in the reservoirs floor dead center. The hole you drill should be just barely large enough to stick the water inlet side of the toilet valve through the bottom. It should be a tight fit. If you are using a plastic tote as I have be sure to drill VERY slowly with minimal pressure. If you force it I guarantee you will crack your reservoir. From the inside of your reservoir poke the threads through the hole you drilled in the bottom. Don’t forget to install the toilet valve’s gasket inside the tank before you tighten the nut that secures the valve to the bottom of your reservoir. Connect the other end of your hose to the inlet of your toilet valve that is now sticking out of the floor of your reservoir.
Now you can install the MistKing bulkhead and make the connection from your reservoir to your MistKing pump.
Parts list:
· Pipes and fittings
· Valve (if using one)
· Hose
· Toilet valve
· Drill with Bit
· Tank (large enough that the toilet valve has clearance on all sides. If your valve gets hung up in the open position your tank will overflow!)
Tip - If any of the line you will be installing will be exposed to freezing temps in the winter I strongly recommend using PEX pipe, not PVC or metal. PEX has two BIG advantages over other materials. The first is that it will expand when in cold service versus busting like PVC will, your line may freeze but it will not rupture on you! The second is that PEX pipe is VERY flexible, you can pretty much snake this pipe into the tightest of spaces, removing the need to install a bunch of 90s like you would have to do with PVC or metal pipe.
I'm pretty sure most people can figure out how to set something like this on their own, but I know other people, by no fault of their own, need help along the way. If you have any suggestions or if any of this is confusing your feedback is welcome!