Bammer
Member
Hello to every one in the Chamunity...
Check out this Ikea armoire I was able to customize into a dual cage enclosure. It sets atop a wood framed box-stand where I store the drainage catch bucket, Mistking, and supply water reservoir.
This armoire measures 43"w 24"d 36"h.
Hopefully these pictures will give you some ideas for your own custom enclosure.
Enjoy.
This is the armoire I purchased on Offer Up for $40.

A trip to Home Depot, I purchased sink drains in the plumbing section, and bought this Polypropylene plastic cardboard stuff.

Lots of work with my router making nice straight cuts. I actually bought (5) 48x48 screen kits at Home Depot and made custom screens to fit the top, sides and front. You can see the drains in the bottom. You cant tell from the picture, but the plastic sheeting on the floor of the enclosure grades on all sides to drain to the middle. I did this by putting a small lip on the edges so to raise the plastic sheet about .75" off the base. Then when installed the drain in the center, the washer to tighten is accessed underneath. This created the center grade for drain.

I did not take a picture of me applying the Great Stuff expanding foam and spray paint. This picture, however, does show you how I was able to make the background. I used coco coire (seed starter medium found at Home Depot but it can also be found in any gardening shop. It comes in a compressed brick and you have to add water to make it expand. Then I put in the oven at 250 for 5-8 hours until all of the water is evaporated.)
I opted to use Air Duct Sealant. This mastic is VOC free and water based. There is no bad smell, it dries in about 8 hours and is applied with a paint brush. After the mastic was all over the foam walls and still wet, I completely covered the walls with the coco coire.
Time to install some plants, vines, and grapewood. I would strongly advise having a big box of very long screws. I used 3.5". Reason being is it's easier to attach the plants in their pots to the foam walls with long screws. Since I installed a wood divider and the back wall was reinforced with 3/16" thin ply, I was able to screw the plants into a solid backing.
It's getting closer now! I used orchid bark found at the local nursery for the substrate (reptibark is too pricy). I also used some Zoo Med Natural Full Cork Rounds that I cut with my saw to give me pieces to wrap around the planting pots. Then I used moss to fill in any seams, gaps, edges, cracks and to cover shiny screw heads.
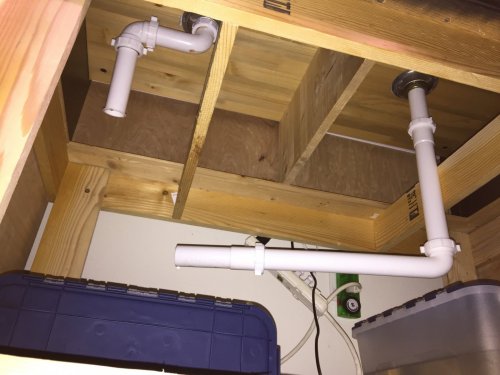
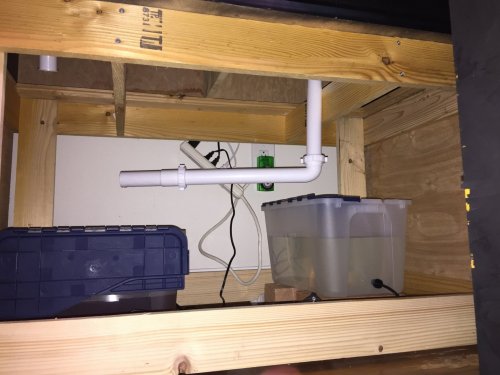
Here is a preview of the box-stand the armoire sets atop so to give my chameleons the height they prefer (6' above ground). Under here is where I store my incubator, drain tub, supply water and Mistking pump.
And tada! Even jumped on the fogger bandwagon. The two in the cab are my Blue Bar Ambilobe Panthers... Rango and Roxy. On March 29 Roxy gave me 28 beautiful eggs!
This was a about a 5 day project considering my busy schedule. I would not do it again. Since I have done similar upgrades to my reptibreeze screen cages and also built some larger enclosures for my Parson's that have the similar theme, but they are made completely from window screen kits. I will share the pics I captured during the build-out in a future post.
Hope you enjoyed... your comments and suggestions are welcome.
Best!
KRas
Check out this Ikea armoire I was able to customize into a dual cage enclosure. It sets atop a wood framed box-stand where I store the drainage catch bucket, Mistking, and supply water reservoir.
This armoire measures 43"w 24"d 36"h.
Hopefully these pictures will give you some ideas for your own custom enclosure.
Enjoy.
This is the armoire I purchased on Offer Up for $40.
A trip to Home Depot, I purchased sink drains in the plumbing section, and bought this Polypropylene plastic cardboard stuff.
Lots of work with my router making nice straight cuts. I actually bought (5) 48x48 screen kits at Home Depot and made custom screens to fit the top, sides and front. You can see the drains in the bottom. You cant tell from the picture, but the plastic sheeting on the floor of the enclosure grades on all sides to drain to the middle. I did this by putting a small lip on the edges so to raise the plastic sheet about .75" off the base. Then when installed the drain in the center, the washer to tighten is accessed underneath. This created the center grade for drain.
I did not take a picture of me applying the Great Stuff expanding foam and spray paint. This picture, however, does show you how I was able to make the background. I used coco coire (seed starter medium found at Home Depot but it can also be found in any gardening shop. It comes in a compressed brick and you have to add water to make it expand. Then I put in the oven at 250 for 5-8 hours until all of the water is evaporated.)
I opted to use Air Duct Sealant. This mastic is VOC free and water based. There is no bad smell, it dries in about 8 hours and is applied with a paint brush. After the mastic was all over the foam walls and still wet, I completely covered the walls with the coco coire.
Time to install some plants, vines, and grapewood. I would strongly advise having a big box of very long screws. I used 3.5". Reason being is it's easier to attach the plants in their pots to the foam walls with long screws. Since I installed a wood divider and the back wall was reinforced with 3/16" thin ply, I was able to screw the plants into a solid backing.
It's getting closer now! I used orchid bark found at the local nursery for the substrate (reptibark is too pricy). I also used some Zoo Med Natural Full Cork Rounds that I cut with my saw to give me pieces to wrap around the planting pots. Then I used moss to fill in any seams, gaps, edges, cracks and to cover shiny screw heads.
Here is a preview of the box-stand the armoire sets atop so to give my chameleons the height they prefer (6' above ground). Under here is where I store my incubator, drain tub, supply water and Mistking pump.
And tada! Even jumped on the fogger bandwagon. The two in the cab are my Blue Bar Ambilobe Panthers... Rango and Roxy. On March 29 Roxy gave me 28 beautiful eggs!
This was a about a 5 day project considering my busy schedule. I would not do it again. Since I have done similar upgrades to my reptibreeze screen cages and also built some larger enclosures for my Parson's that have the similar theme, but they are made completely from window screen kits. I will share the pics I captured during the build-out in a future post.
Hope you enjoyed... your comments and suggestions are welcome.
Best!
KRas


 I was going to ask you if I could borrow you and your talent until I got to the part where you said you would not do it again.


") ...
...