Bioactive in a hybrid dragon strand.

Throwingstones

Avid Member
I’ve been thinking about switching to bioactive for my Cham, I did in my bearded dragon enclosure and it’s going well. I hope anyway. So now I want to plan for the other. I’m kinda lost on doing the bottom. Like I’ve seen some people use a plant grow bag, zen habitats has a clear “bio basin”.
I also have this metal plant stand in there that I would have to work around, I’d really hate to just tear the whole thing apart to get a bag in there, if I got something workable like the zen bio basin, I could probably slip it under the legs and up that way instead of taking it all apart.

And then I question the front ventilation. It would pretty much get blocked right? I’ve seen suggestions on sloping the dirt for more room. What if I got a bio basin and cut one end off to make it shorter on one side to allow for air room without the dirt/water coming out the bottom mesh? Idk. I need to brain storm on this.
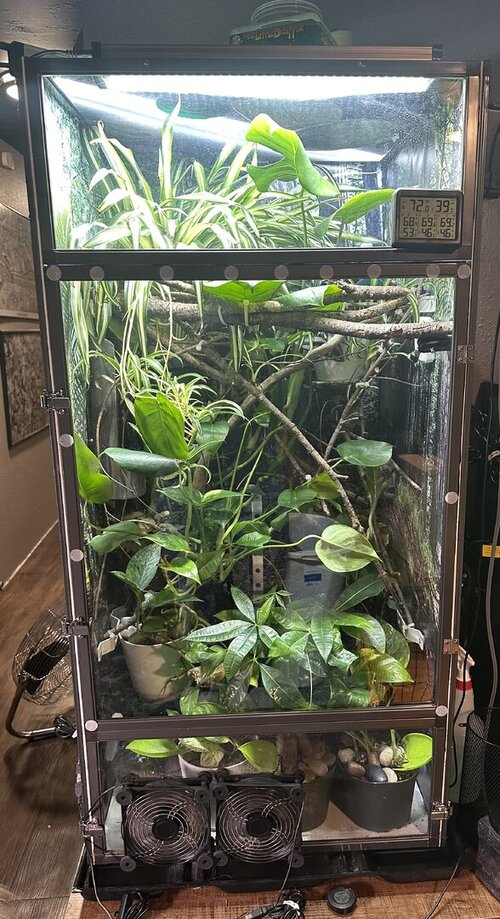
 

Attachments

  • IMG_8267.jpeg
    IMG_8267.jpeg
    202.2 KB · Views: 29
Ok, so this is definitely doable. I would say no to the Zen thing and go with a root pouch. The root pouches are breathable and very easy to fold down (or even cut) to the size you want. With the Zen basin, you’ll have to set up a way to drain excess water from the drainage layer. With the pouch, it evaporates. You will be needing and wanting to clear the floor to set up bioactive. Put the pouch in and put in whatever medium you’re using for your drainage layer - clay balls or lava rock is lightweight and works well. To give your girl a more solid and flat surface, you can cut to fit a piece of plastic eggcrate or even double up window type screen. Cover with landscape fabric. I have it extend up the sides by at least a couple of inches to keep the soil and drainage layer better seperated. Your soil doesn’t need to be very deep. You can have it be 10-12” deep or just a few inches deep. I have mine just deep enough to cover the tallest plant roots. You can push some of the soil away from the front and have it on a grade to maintain your ventilation. If you think about how the all glass enclosures are with their ventilation holes, you might feel a bit better. :) Move at least one of your fans to the top to draw air up and out. Also, with the root pouch, it’s flexible and you can always push it back and use something to hold it away by about 1/2” to further promote and maintain good ventilation. I only have one chameleon enclosure set up currently and lights are out so I can’t get any pics to show you how the front is. I’ll get some in the AM if you’d like though.
 
Ok, so this is definitely doable. I would say no to the Zen thing and go with a root pouch. The root pouches are breathable and very easy to fold down (or even cut) to the size you want. With the Zen basin, you’ll have to set up a way to drain excess water from the drainage layer. With the pouch, it evaporates. You will be needing and wanting to clear the floor to set up bioactive. Put the pouch in and put in whatever medium you’re using for your drainage layer - clay balls or lava rock is lightweight and works well. To give your girl a more solid and flat surface, you can cut to fit a piece of plastic eggcrate or even double up window type screen. Cover with landscape fabric. I have it extend up the sides by at least a couple of inches to keep the soil and drainage layer better seperated. Your soil doesn’t need to be very deep. You can have it be 10-12” deep or just a few inches deep. I have mine just deep enough to cover the tallest plant roots. You can push some of the soil away from the front and have it on a grade to maintain your ventilation. If you think about how the all glass enclosures are with their ventilation holes, you might feel a bit better. :) Move at least one of your fans to the top to draw air up and out. Also, with the root pouch, it’s flexible and you can always push it back and use something to hold it away by about 1/2” to further promote and maintain good ventilation. I only have one chameleon enclosure set up currently and lights are out so I can’t get any pics to show you how the front is. I’ll get some in the AM if you’d like though.
I also have two fans pulling up on top already too to make sure there is enough air flow. But I don’t want to block the front, right? They have grow bags like the perfect size too but tall, I found an 11” tall one. Could I cut that to where it’s like 4.5” tall and then fill it up and still get that air flow?
 
Additionally. If I only have about 5.5” of substrate including the drainage layer. Would I still need my lay bin for her? She scratched the bottom of that bin forever it seemed like. What if she gets to the mesh? Would she get that caught in her nails and get hurt? Would she know to stop?
 
Additionally. If I only have about 5.5” of substrate including the drainage layer. Would I still need my lay bin for her? She scratched the bottom of that bin forever it seemed like. What if she gets to the mesh? Would she get that caught in her nails and get hurt? Would she know to stop?
That sounds silly now. How is she going to differentiate the all over dirt with the specific lay bin. She wouldn’t because it’s all dirt.

Also if it’s okay to block the front screen, would the fans pulling air out on top be enough for airflow? I added the fans to make sure I won’t have stagnant air.
 
They have grow bags like the perfect size too but tall, I found an 11” tall one. Could I cut that to where it’s like 4.5” tall and then fill it up and still get that air flow?
I fold the bags down instead of cutting them, so that I have less room for mistakes.
I’ll add that the bottom panel is about 8” tall of screen. So I could probably do like 5.5” of substrate?
Yes, you could. Personally, I would keep the pouch at least 1/2” pushed back from the door in order to have less interference with ventilation.
Additionally. If I only have about 5.5” of substrate including the drainage layer. Would I still need my lay bin for her? She scratched the bottom of that bin forever it seemed like. What if she gets to the mesh? Would she get that caught in her nails and get hurt? Would she know to stop?
This is going to sound silly, but before you add any substrate, put her regular lay bin in. I learned the hard way that they can be fussy. Stella had me freaking out and panicking for a week until desperation made me finally put her old lay bin in her enclosure. Place it as flush against the sides as you can and then work around it. You can hide it with plants hanging down in front of it.
That sounds silly now. How is she going to differentiate the all over dirt with the specific lay bin. She wouldn’t because it’s all dirt.

Also if it’s okay to block the front screen, would the fans pulling air out on top be enough for airflow? I added the fans to make sure I won’t have stagnant air.
To me and probably you, dirt is dirt is dirt. Stella taught me that they have definite preferences for where they lay their precious eggs and not to risk messing with it.
If you keep the pouch pushed back from the door a little bit, you won’t be blocking much ventilation.
 
I fold the bags down instead of cutting them, so that I have less room for mistakes.

Yes, you could. Personally, I would keep the pouch at least 1/2” pushed back from the door in order to have less interference with ventilation.

This is going to sound silly, but before you add any substrate, put her regular lay bin in. I learned the hard way that they can be fussy. Stella had me freaking out and panicking for a week until desperation made me finally put her old lay bin in her enclosure. Place it as flush against the sides as you can and then work around it. You can hide it with plants hanging down in front of it.

To me and probably you, dirt is dirt is dirt. Stella taught me that they have definite preferences for where they lay their precious eggs and not to risk messing with it.
If you keep the pouch pushed back from the door a little bit, you won’t be blocking much ventilation.
I appreciate you!
So if I keep it 1/2” pushed back, and even left it 11” tall, would that be okay for air flow while keeping the fans there? Or I can fold it in half.
And I’ll keep the bin there. But what if she does choose the general dirt? She might dig down far enough to catch her toes on that mesh, right? Maybe if I was able to have it super tall, she wouldn’t dig all the way down. Should I put river rocks over the mesh so she knows when to stop?
 
I snuck a couple of pics of Kali’s enclosure front to show you.
It’s dark, but you can see that my pouch is about 7” in depth and at least a couple of inches are the drainage layer, plus about an inch or so that is taller than the soil height to keep it all in. It is pretty flush against the screen in the front, but if I wanted I could have (and probably even now can) push it back to where I want it and hold it in place with a spacer of some sort…even a branch would work.

IMG_5543.jpeg

This Since this is a double wide enclosure, I used a pouch has squared corners rather than the round type. It’s a crappy pic but you can see that it doesn’t fit flush in the corners.
*Btw, I have the green tarp and thick plastic as the enclosure is on a wooden shelf and I’m not into risking the whole thing rotting and squishing the gecko that lives below.
IMG_5544.jpeg

I woke my sweet little girl up, so here is an unsolicited pj pic. 💗
IMG_5545.jpeg
 
I snuck a couple of pics of Kali’s enclosure front to show you.
It’s dark, but you can see that my pouch is about 7” in depth and at least a couple of inches are the drainage layer, plus about an inch or so that is taller than the soil height to keep it all in. It is pretty flush against the screen in the front, but if I wanted I could have (and probably even now can) push it back to where I want it and hold it in place with a spacer of some sort…even a branch would work.

View attachment 347280

This Since this is a double wide enclosure, I used a pouch has squared corners rather than the round type. It’s a crappy pic but you can see that it doesn’t fit flush in the corners.
*Btw, I have the green tarp and thick plastic as the enclosure is on a wooden shelf and I’m not into risking the whole thing rotting and squishing the gecko that lives below.
View attachment 347281

I woke my sweet little girl up, so here is an unsolicited pj pic. 💗
View attachment 347282
I saw an old post of someone using a round one. I don’t think my brain would let me do that, I have a couple square 2x2 ones saved on my Amazon list. Also I could maybe sew (or have my grandma do it,lol) two of the corners so it would be almost an inch shorter on one side.
 
I hunted and found the pics from when I set up Kali’s first bioactive. Looks like I didn’t even use eggcrate or screening to firm up the top of the drainage layer. I think that was a pretty thick and rigid landscape fabric though, plus the clay balls aren’t very lumpy. Although, nature isn’t perfectly smooth so I don’t see a problem if you don’t use anything but the landscape fabric to separate the layers.
Anyhow, after the landscape fabric was in place, I just dumped the substrate and mixed it in the enclosure. You can see I used a good amount of sand and just a token amount of cocoa coir. Added plants and leaf litter and voila’! You can see how I had placed Stella’s lay bin in her substrate in the last pic.

IMG_3158.jpeg IMG_3159.jpeg IMG_3160.jpeg IMG_3162.jpeg IMG_3172.jpeg IMG_3937.jpeg
 
I hunted and found the pics from when I set up Kali’s first bioactive. Looks like I didn’t even use eggcrate or screening to firm up the top of the drainage layer. I think that was a pretty thick and rigid landscape fabric though, plus the clay balls aren’t very lumpy. Although, nature isn’t perfectly smooth so I don’t see a problem if you don’t use anything but the landscape fabric to separate the layers.
Anyhow, after the landscape fabric was in place, I just dumped the substrate and mixed it in the enclosure. You can see I used a good amount of sand and just a token amount of cocoa coir. Added plants and leaf litter and voila’! You can see how I had placed Stella’s lay bin in her substrate in the last pic.

View attachment 347289View attachment 347290View attachment 347291View attachment 347292View attachment 347294View attachment 347295
Should I get the plastic egg crate to put on top of the mesh? I’m visualizing what I want to do, I just want to make it ultra safe for her if she digs in the area.
 
For the other lazy people out there (like me), here's an easier option. What's the point in adding a root pouch? It's a permeable container. Might as well just toss in substrate and have the cage itself become that permeable container for you. I use leap habitats, but before you say "Yeah, but those were made for bioactive setups in mind," I would like to say that I don't use their plastic liner that is supposed to hold the substrate inside of the cage - making it identical, in design and theory, to a Dragon Strand cage. Without the liner, I'm left with three solid walls and a front screen service door.

I toss in the clay balls (hydroballs, leca, and whatever else they are called) for the drainage layer. Toss in a mesh window screen cut to size as a separator between the substrate and the drainage layer, then toss in the substrate on top and leaf litter. I use an ABG mix as the substrate.

Set the cage on top of a drainage pan and you're good.

If you'd like to keep the moisture in the soil a bit better, you can place a cut-to-size piece of corrugated plastic on the outside or the inside of the cage. You can also use plexiglass or a sheet of plastic as a barrier. I'll look for pics tomorrow. I make sure that there is a small gap between the top of the soil and the top of the screen ventilation door.

That's it.

I find that adding a liner for the substrate only adds more places for escaped feeder insects to hide. This method only works if you plan on letting the moisture drain out of your cage. Though you'll probably find that you would have to mist a heck of a lot to see water come out of the bottom into the drainage pan, especially in a large dragon strand. If you are looking to make your cage watertight, then this isn't the option.
 
Back
Top Bottom