Panther Egg Question

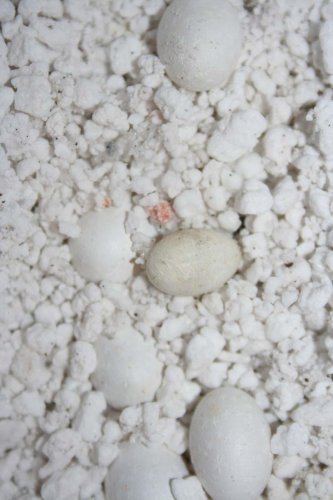
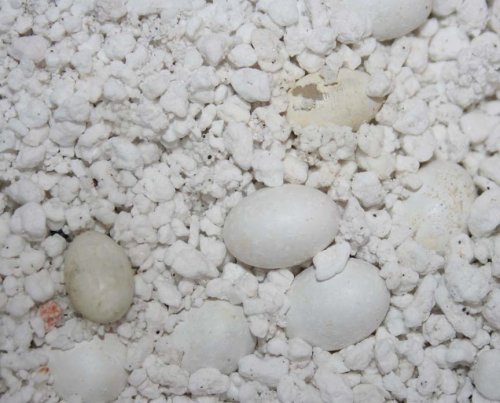
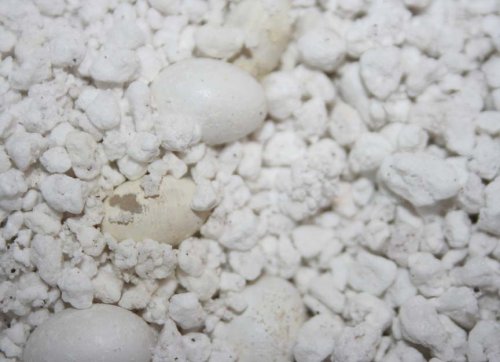
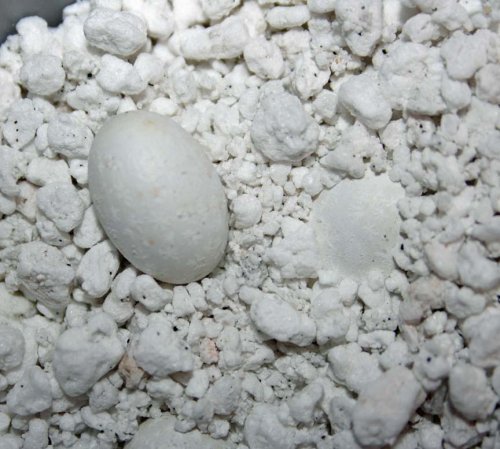
Okay, I need some help. I have NEVER seen a cham clutch act like this before. They are panther chameleons, this is the mother's first clutch. The sire has been bred many times before. They are definitely fertile (candled them). The clutch was laid on November 11th, so we are at nine months now. They have been incubating at between 72 and 74 degrees. Humidity has been normal. I have them in a LLL incubator. I have a gauge inside to make sure the external temp reading is accurate. They are in hatchrite. No power outages, or anything like that. They are in a a thick plastic container with small holes drilled in the top.

It started out very normal, with 32 nice white eggs. Well about a month ago, I noticed a snowflake like pattern appearing on many of the eggs. Each egg is demonstrating many time little snowflakes. Nothing deep, just strange. They seemed white and healthy, so I left them alone.

Well then about 4 of them starting sweating and shrinking last week. No piping at all. Just a few little beads of water, nothing major. There is a sizable difference in these eggs over the others. Well, they stopped sweating after a couple of days. They are still small, but no mold. They do now have a yellowish color to them.The others are still white but have the snowflake patterns. One does have a weird abnormality on the surface (window maybe?)

I have never seen a clutch do this before and was curious as to the status of these eggs. I have always seen piping or a starburst pattern soon after sweating. I have tried misting the four shrinkers, but nothing. The eggs don't feel rotten, but I am trying to minimize handling them. Some photos are attached. Please help!!! Can this clutch be saved? What should I do?
 

Attachments

  • eggs.jpg
    eggs.jpg
    111.6 KB · Views: 180
  • eggs2.jpg
    eggs2.jpg
    101.2 KB · Views: 154
  • eggwindow.jpg
    eggwindow.jpg
    78.3 KB · Views: 153
  • snowflake pattern.jpg
    snowflake pattern.jpg
    119.2 KB · Views: 138
They look incubated. Also they look fine to me...well most of them, I have a hard time believing that everybody has 100% success. The "window one" looks like at has has something attached to the forming shell , maybe undernieth, before candling? Usually yellow and small might equal ,bad, but I have seen worse hatch out.
 
I had the same issue with hatch rite. I ended up cutting open the yellow eggs after sweating and shrinking. They were no good. Almost solid white inside. I switch to vermiculite last week and had one of my nice big egg starting piping open. I did no like the hatch rite. Just my opinion....
 
I put water at the bottom of the incubator on a regular basis to keep humidity up. The hatchrite is not damp or wet feeling though. I haven't had any signs of denting from dehydration.

I just cut one of the more yellow ones open. Looks to have had a fully developed embryo inside, but no signs of movement or life at all. The yoke is still very large and yellow, but the baby is not moving. Seems to have died.

Any tips on what to do?
 
This is good info especially since I just bought a 2 lb bag of Hatchrite. Why would the Hatchrite cause this?
 
Thats why i stick to the good old fashioned vermiculite. It works great and I havent seen any reason to change to hatchrite. It seemed like a product that was too good to be true.
 
Thats why i stick to the good old fashioned vermiculite. It works great and I havent seen any reason to change to hatchrite. It seemed like a product that was too good to be true.

thats what i was wondering..i have a clutch on the way, and was contemplating using the hatchrite cause i thought it was a sure thing..was just sick of hassling with the perilite, or vermiculite and making the "perfect ratio" but i guess i will stick to the tried and true then and go with a big ol' bag of verm and mix it up prior to the clutch drop..
 
I recently started a thread about this. It was concluded that hatchrite does dry out. This is due to the fact that too many air holes are used. With hatchrite only one small air hole should be used based on harchrite directions. It was further discussed that many people don't use any air holes being they aren't necessary and leads to harchrite/vermic drying out. I'm not saying this is how you should do it but I do trust this info based on where it came from and my own research.

p.s. nothing wrong with vermiculite so why use hatchrite instead?
 
They look incubated. Also they look fine to me...well most of them, I have a hard time believing that everybody has 100% success. The "window one" looks like at has has something attached to the forming shell , maybe undernieth, before candling? Usually yellow and small might equal ,bad, but I have seen worse hatch out.

My last clutch all 21 hatched and all are doing fine.I incuibated them in my hall closet.my house does have a/c.Im sure there are plenty of 100%hatch rate out there. I have had clutches wheresome of the eggs went full term.the eggs sweated and then shrink w/o hatching. But when it was over I still had babbies,,,hang in there some will hatch!!! When this happened to me I changed up my suppliment schedule on my females.
 
i am incubating my 1st clutch of panther eggs(32 of them to be exact) and in the incubator instructions it said panther eggs are to be set between 80-84 degrees. That is a huge diff from your temp, and since no one questioned your temps, i am wondering if mine are too hot? :eek:
 
I have used hatchrite for all my clutches... I have hatched out quite a few different batches of babies using it. The bag says you don't have to add water to it but you do.

When the eggs are laid and put into to container, I weigh the whole container and record the info (example 100g) Then after 3 months I weigh the container again and if it says 95g then I will add drops of water to the hatchrite until is is once again up to the original weight. After the first three months I weigh the container every 1-2 months and add water to keep it at the original weight.

This method has worked out very well for us and we always have 95%-100% hatch rate.
 
Back
Top Bottom