Good evening, CF!
With all the info out there on effective UV Index (UVI) for our chameleons, I've had to rethink how my lighting is set up. In a nutshell, simply placing our UVB lights on top of screen enclosures may be simply not enough! Studies have shown that the effective range of UVI is between 1-3 for the three most common chameleons bred in captivity (Veiled, Panther and Jacksons). Depending on the strength of your UVB bulb, you may be providing too little or too much UVI for your cham. There's an in depth article here if you want to fully understand this information:
https://chameleonacademy.com/chameleon-cage-set-up-replicating-the-sun/
Where this gets tricky for me is that I prefer to have my chameleons above eye level. A vast number of chameleons reside in tree canopies in the wild. My goal is to provide as much height for them to utilize to the best of my ability. Rack systems are popular as enclosure stands because they're durable and look better than jerry-rigged stands. A lot of them are actually perfect for housing two chameleons next to each other while making the most out of a given area in our homes. Another plus, if you purchase the tallest rack system, is that you can easily place lights on the top shelf and adjust the shelf according to the UVI you're trying to achieve in the enclosure. A fall back of this, in my opinion, is that you'll have four bars around your cham enclosures that give off cham prison vibes.
There are still some setbacks to these rack systems. In my hours upon hours of online shopping to find the tallest rack, I found that the tallest rack for sale is 82" high, 6 feet. Side note: they're extremely pricey! The one populating first on Amazon is $100! Going to industrial racks that are a bit bigger and even more expensive are really an eyesore indoors.
Ideally, for Veiled, Panther and Jacksons chams, rule of thumb states that we are to use a minimum of a 2'x2'x4' enclosure. Essentially, that would leave you two feet of rack height to utilize. This would assume you'd put the enclosure at or near the bottom of the rack system so you're able to adjust the top shelf depending on where you want your lights to sit. All said and done, the top of your chameleons enclosure would be around four to five feet off the ground.
I'm 6',3" which means that my chams would still be below eye level, even at the top of their enclosure! I put on my thinking cap and thought of a plethora of ways to eliminate the cham prison while keeping them above eye level. After hours of research, I found a really cool solution, or at least I think so! Why else would I be blogging about it?!
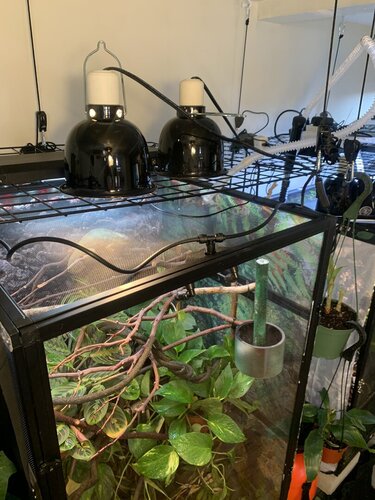
Here's my solution. I bought DIY metal photo grids (Figure A) and suspended them from the ceiling above my chameleon enclosures. I hung them using rope hangers (Figure B) (the kind marijuana hobbyists use to hang grow lights) and hung the rope hangers (Figure C) from swag hooks. Each swag hook holds up to 30 pounds and each rope hanger hold 75 pounds. This means that using three or four mounting points for the grids would give me more than enough strength to hold light fixtures and some other goodies (i.e. fogger, plants).

Figure A
Figure B

Figure C
There’s another added benefit of using this method. The rope hangers work wonderfully for exactly adjusting the lights as high or low as necessary between the enclosure and the ceiling. It’s as easy as pulling either end of the rope through the locking mechanism. The rack system gives us the drawback of attaching the shelves every inch or so. It’s also a hassle to pull off the top shelf of the rack, move the mounting clips on the poles and remount the shelf. I see this working well for when the lights start to get older and give off less UVB. All I’ll need to do is gradually lower the UVB lights to achieve 3 UVI at the top of the enclosure. I bought a $200 solar meter for this purpose. This will eventually pay for itself since I won’t have to buy a new UVB bulb after a few months if I don’t need to. I currently buy new bulbs every three or four months to play it safe.
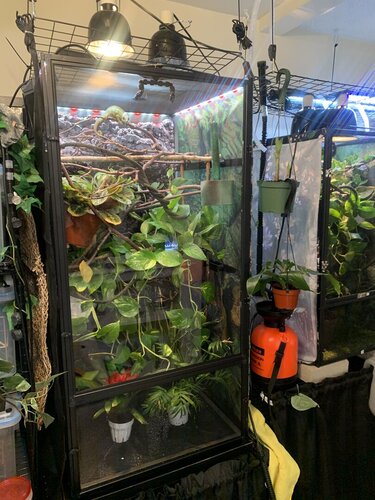
The chameleon enclosures are still on racks, but I bought ones just tall enough to keep the chameleons three feet or so off the ground. In the end I ended up saving money using this method as opposed to buying a huge rack. I don’t know about you, but I’d rather use that extra money to get my chams some delicious silkworms or a new plant... or maybe just save the money if you can resist not spoiling your chams.
What you’ll need:
(1) Swag Hooks (3 or 4 per grid)
(2) Rope Hangers (equivalent to quantity of swag hooks)
(3) DIY Picture Grid(s) (Typically these are the same size as the footprint of your enclosure, or super close.)
(4) Drill
(5) Drill Bit (The swag hooks I used called for a 1/8” bit and a 5/8” bit.) (Highly recommend 5/8” spade bit for accuracy.)
(6) Pen or Pencil
(7) Ladder or Step Stool
(8) Zip Ties
(9) Level (optional)
(10) Flat Edge (i.e. yard stick) (optional)
(11) Tape Measure (optional)
**LINKS AT BOTTOM**
Here’s how I did it:
(1) Find the perfect place in your home/apartment where your chameleon's enclosures will live. (I knew I wasn't going to move mine in the future because (a) the particular area in my apartment is where I've housed chams the last 6 years and (b) it's the ideal place in my apartment for my chams to live being that it has the least amount of traffic.)
(2) Measure where the center of the enclosures would meet the ceiling. You can do this one of two ways:
Method #1
(i) Place your chameleon enclosure where you want it to live. Using the tape measure, determine how far the back panel of the enclosure is from the wall behind it.
(ii) Push enclosure against that wall. Using the tape measure, find the center of the enclosure and mark the wall at that point (“A” in illustration).
(iii) Mark the corner between the wall and the ceiling directly above (“B” in illustration). An easy way to do this is to use the level and a flat edge, gradually making marks along the wall till you get to the ceiling. The level will ensure that you’ll mark directly above “A”.
(iv) Take the first measurement you made, where you determined the distance between the enclosure back panel and the wall, and mark the ceiling that many inches from “B” (“C” in illustration). If you plan to have the enclosure against the wall you will not need to mark “C”.
(v) Now determine the width of the grid your using and divide by 2 (. Take this number and mark that many inches to the left and to the right of “B” or “C” (whatever the last mark you made was). This marks the location where the corners of the grid will be under.
(vi) Hold the grid up to the ceiling, aligning the corners with the marks on either side of “B” or “C”. Mark the ceiling at the locations of the two final corners of the grid.

Method #1 Illustration
Method #2
(i) Place your chameleon enclosure where you want it to live.
(ii) Hold the grid against the ceiling above the cage as centered as possible. Make a mark on the ceiling at each of the four points of the grid.
(3) NOTE: PLEASE MAKE SURE YOUR CHAMELEONS AREN'T IN THEIR ENCLOSURES FOR THIS NEXT PART!!! Remove the enclosure from the area or cover it completely to ensure no dry wall will get inside. Mount swag hooks at the points on the ceiling that you marked determining the four corners of the grid. Use the directions provided on the packaging.
**Alternatively, you could mount two hooks furthest from the wall and one closest to the wall (creating a triangle formation) Just make sure the hook closest to the wall is centered between the back corner marks you made.**

(4) Hang the rope hangers from the ceiling hooks.
**Lightly tug the unused end of the rope hanger to ensure their orientation is correct. One end of the rope requires you to unlock the locking mechanism. That’s the part you want hanging from the ceiling.**
(5) Clip the other ends of the rope hangers to the grids and adjust the hangers so the grid was as level as possible.
(6) Set the light fixtures (without bulbs) on top of the grids and make sure everything is level with the added weight.
(7) Once you are sure everything is level, use zip ties to secure the cord of the light to the grid. This helps keep the lights from sliding off.
(8) Install the lights and plug in the fixtures.
Congrats! Now you can keep your chameleon enclosures at any height between the floor and ceiling!!

Side note: I planned ahead a bit for my four chams. I plan to get my lovely ladies larger enclosures in the future, so I set up the grids to cover an area larger than the dimensions of the top of their cages combined. This way I can just replace the enclosures in the future and don't need to rehang everything. In the meantime, I use the extra grid space to hang plants under the UVB lights.
The only drawback I've found with this is that the lights take some getting used to at this height. I don't stare at the sun, so instinctually I know not to stare up at the lights. Plus, I don't mind the adjustment as long as my chams are happier!
Rope Hangers:
https://www.amazon.com/gp/product/B07CJHL62X/ref=ppx_yo_dt_b_asin_image_o02_s00?ie=UTF8&psc=1
DIY Picture Grid:
https://www.amazon.com/gp/product/B072XGVVYF/ref=ppx_yo_dt_b_asin_image_o05_s00?ie=UTF8&psc=1
Swag Hooks:
https://www.homedepot.com/p/OOK-30-lb-White-Enamel-Swag-Hooks-2-Pack-50340/100115444
Zip Ties:
https://www.amazon.com/TR-Industria...n&sr=1-1-22d05c05-1231-4126-b7c4-3e7a9c0027d0
5/8” Spade Bit:
https://www.homedepot.com/p/Bosch-Daredevil-5-8-in-x-6-in-Spade-Bit-DSB1007/203274552
With all the info out there on effective UV Index (UVI) for our chameleons, I've had to rethink how my lighting is set up. In a nutshell, simply placing our UVB lights on top of screen enclosures may be simply not enough! Studies have shown that the effective range of UVI is between 1-3 for the three most common chameleons bred in captivity (Veiled, Panther and Jacksons). Depending on the strength of your UVB bulb, you may be providing too little or too much UVI for your cham. There's an in depth article here if you want to fully understand this information:
https://chameleonacademy.com/chameleon-cage-set-up-replicating-the-sun/
Where this gets tricky for me is that I prefer to have my chameleons above eye level. A vast number of chameleons reside in tree canopies in the wild. My goal is to provide as much height for them to utilize to the best of my ability. Rack systems are popular as enclosure stands because they're durable and look better than jerry-rigged stands. A lot of them are actually perfect for housing two chameleons next to each other while making the most out of a given area in our homes. Another plus, if you purchase the tallest rack system, is that you can easily place lights on the top shelf and adjust the shelf according to the UVI you're trying to achieve in the enclosure. A fall back of this, in my opinion, is that you'll have four bars around your cham enclosures that give off cham prison vibes.
There are still some setbacks to these rack systems. In my hours upon hours of online shopping to find the tallest rack, I found that the tallest rack for sale is 82" high, 6 feet. Side note: they're extremely pricey! The one populating first on Amazon is $100! Going to industrial racks that are a bit bigger and even more expensive are really an eyesore indoors.
Ideally, for Veiled, Panther and Jacksons chams, rule of thumb states that we are to use a minimum of a 2'x2'x4' enclosure. Essentially, that would leave you two feet of rack height to utilize. This would assume you'd put the enclosure at or near the bottom of the rack system so you're able to adjust the top shelf depending on where you want your lights to sit. All said and done, the top of your chameleons enclosure would be around four to five feet off the ground.
I'm 6',3" which means that my chams would still be below eye level, even at the top of their enclosure! I put on my thinking cap and thought of a plethora of ways to eliminate the cham prison while keeping them above eye level. After hours of research, I found a really cool solution, or at least I think so! Why else would I be blogging about it?!
Here's my solution. I bought DIY metal photo grids (Figure A) and suspended them from the ceiling above my chameleon enclosures. I hung them using rope hangers (Figure B) (the kind marijuana hobbyists use to hang grow lights) and hung the rope hangers (Figure C) from swag hooks. Each swag hook holds up to 30 pounds and each rope hanger hold 75 pounds. This means that using three or four mounting points for the grids would give me more than enough strength to hold light fixtures and some other goodies (i.e. fogger, plants).
Figure A
Figure B
Figure C
There’s another added benefit of using this method. The rope hangers work wonderfully for exactly adjusting the lights as high or low as necessary between the enclosure and the ceiling. It’s as easy as pulling either end of the rope through the locking mechanism. The rack system gives us the drawback of attaching the shelves every inch or so. It’s also a hassle to pull off the top shelf of the rack, move the mounting clips on the poles and remount the shelf. I see this working well for when the lights start to get older and give off less UVB. All I’ll need to do is gradually lower the UVB lights to achieve 3 UVI at the top of the enclosure. I bought a $200 solar meter for this purpose. This will eventually pay for itself since I won’t have to buy a new UVB bulb after a few months if I don’t need to. I currently buy new bulbs every three or four months to play it safe.
The chameleon enclosures are still on racks, but I bought ones just tall enough to keep the chameleons three feet or so off the ground. In the end I ended up saving money using this method as opposed to buying a huge rack. I don’t know about you, but I’d rather use that extra money to get my chams some delicious silkworms or a new plant... or maybe just save the money if you can resist not spoiling your chams.
What you’ll need:
(1) Swag Hooks (3 or 4 per grid)
(2) Rope Hangers (equivalent to quantity of swag hooks)
(3) DIY Picture Grid(s) (Typically these are the same size as the footprint of your enclosure, or super close.)
(4) Drill
(5) Drill Bit (The swag hooks I used called for a 1/8” bit and a 5/8” bit.) (Highly recommend 5/8” spade bit for accuracy.)
(6) Pen or Pencil
(7) Ladder or Step Stool
(8) Zip Ties
(9) Level (optional)
(10) Flat Edge (i.e. yard stick) (optional)
(11) Tape Measure (optional)
**LINKS AT BOTTOM**
Here’s how I did it:
(1) Find the perfect place in your home/apartment where your chameleon's enclosures will live. (I knew I wasn't going to move mine in the future because (a) the particular area in my apartment is where I've housed chams the last 6 years and (b) it's the ideal place in my apartment for my chams to live being that it has the least amount of traffic.)
(2) Measure where the center of the enclosures would meet the ceiling. You can do this one of two ways:
Method #1
(i) Place your chameleon enclosure where you want it to live. Using the tape measure, determine how far the back panel of the enclosure is from the wall behind it.
(ii) Push enclosure against that wall. Using the tape measure, find the center of the enclosure and mark the wall at that point (“A” in illustration).
(iii) Mark the corner between the wall and the ceiling directly above (“B” in illustration). An easy way to do this is to use the level and a flat edge, gradually making marks along the wall till you get to the ceiling. The level will ensure that you’ll mark directly above “A”.
(iv) Take the first measurement you made, where you determined the distance between the enclosure back panel and the wall, and mark the ceiling that many inches from “B” (“C” in illustration). If you plan to have the enclosure against the wall you will not need to mark “C”.
(v) Now determine the width of the grid your using and divide by 2 (. Take this number and mark that many inches to the left and to the right of “B” or “C” (whatever the last mark you made was). This marks the location where the corners of the grid will be under.
(vi) Hold the grid up to the ceiling, aligning the corners with the marks on either side of “B” or “C”. Mark the ceiling at the locations of the two final corners of the grid.
Method #1 Illustration
Method #2
(i) Place your chameleon enclosure where you want it to live.
(ii) Hold the grid against the ceiling above the cage as centered as possible. Make a mark on the ceiling at each of the four points of the grid.
(3) NOTE: PLEASE MAKE SURE YOUR CHAMELEONS AREN'T IN THEIR ENCLOSURES FOR THIS NEXT PART!!! Remove the enclosure from the area or cover it completely to ensure no dry wall will get inside. Mount swag hooks at the points on the ceiling that you marked determining the four corners of the grid. Use the directions provided on the packaging.
**Alternatively, you could mount two hooks furthest from the wall and one closest to the wall (creating a triangle formation) Just make sure the hook closest to the wall is centered between the back corner marks you made.**
(4) Hang the rope hangers from the ceiling hooks.
**Lightly tug the unused end of the rope hanger to ensure their orientation is correct. One end of the rope requires you to unlock the locking mechanism. That’s the part you want hanging from the ceiling.**
(5) Clip the other ends of the rope hangers to the grids and adjust the hangers so the grid was as level as possible.
(6) Set the light fixtures (without bulbs) on top of the grids and make sure everything is level with the added weight.
(7) Once you are sure everything is level, use zip ties to secure the cord of the light to the grid. This helps keep the lights from sliding off.
(8) Install the lights and plug in the fixtures.
Congrats! Now you can keep your chameleon enclosures at any height between the floor and ceiling!!
Side note: I planned ahead a bit for my four chams. I plan to get my lovely ladies larger enclosures in the future, so I set up the grids to cover an area larger than the dimensions of the top of their cages combined. This way I can just replace the enclosures in the future and don't need to rehang everything. In the meantime, I use the extra grid space to hang plants under the UVB lights.
The only drawback I've found with this is that the lights take some getting used to at this height. I don't stare at the sun, so instinctually I know not to stare up at the lights. Plus, I don't mind the adjustment as long as my chams are happier!
Rope Hangers:
https://www.amazon.com/gp/product/B07CJHL62X/ref=ppx_yo_dt_b_asin_image_o02_s00?ie=UTF8&psc=1
DIY Picture Grid:
https://www.amazon.com/gp/product/B072XGVVYF/ref=ppx_yo_dt_b_asin_image_o05_s00?ie=UTF8&psc=1
Swag Hooks:
https://www.homedepot.com/p/OOK-30-lb-White-Enamel-Swag-Hooks-2-Pack-50340/100115444
Zip Ties:
https://www.amazon.com/TR-Industria...n&sr=1-1-22d05c05-1231-4126-b7c4-3e7a9c0027d0
5/8” Spade Bit:
https://www.homedepot.com/p/Bosch-Daredevil-5-8-in-x-6-in-Spade-Bit-DSB1007/203274552