First time cham owner: one problem

willow2415

New Member
Hey all, I recently purchased my first chameleon at a reptile expo. (Nosy Be Panther). He's doin great! :D
Im just having one problem. The mister I have for his enclosure sprays all over the walls and is ruining the stand he is on. I don't know how to fix it, I tried moving the nozzle to different areas but it happens everywhere..... :confused:
Thanks
Chrystal
 
I have a clear shower curtain around the back and sides of my cages to keep all the water in :) then it just runs down in the drain pan
 
Same here, a clear/gray shower curtain covering the sides of the cage. This will help keep the mist in the cage, and in turn keep a stable humidity.Was the show in Atlanta? They had many Nosy be chameleons there.

Edit:Nevermind saw your location,good luck with the cham!
 
Last edited:
Thanks, i guess I have some shopping to do lol.
No, the show i went to was in New Hampshire. They had lots of baby chams there. I got mine from the LLLreptile booth.
 
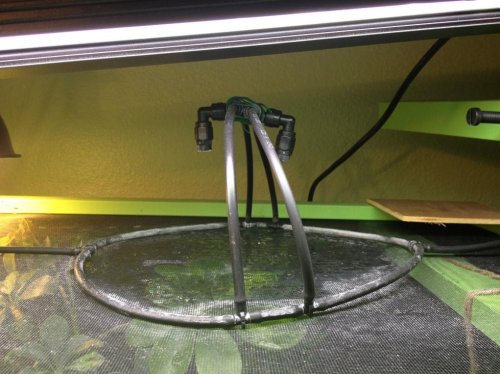
I converted my nozzles over to rain set ups like in the video below. I used 1/4 inch tubing from Lowes and used two nozzles per cages and basically did the exact thing they show in the video. I do notice my boys drinking more with rain drops than when I had it as a mister. And there isn't any over spray.

http://www.youtube.com/watch?v=dpnS6hCU1v0

Hey there Pigglett, any chance you can take a quick pic of how you did yours. Would like to see if it is something I can throw together quickly or just drop the $17 on their set up.

Thanks.
 
I can take a pic tomorrow. I already had the mist king nozzles, so that is what I used. I just bought a roll of the tubing and some T elbows. I will take some pics and post tomorrow. I did figure out that due to the pressure you want to use the thicker (more sturdy) black tubing vs the clear. It was super cheap and easy.

I also found a place not far away that sells the mist king nozzles and supplies if needed.

http://www.mistingdepot.com/
 
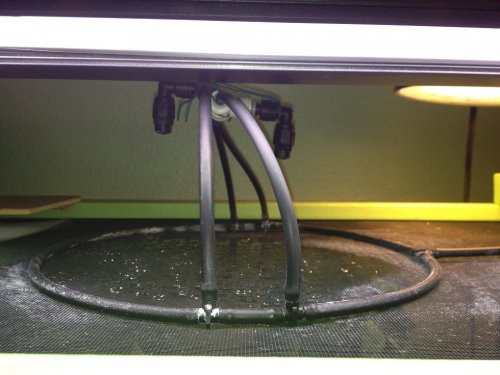
Here are the pics I promised of my DIY mistking rain set up. I tried to get decent pics, but didnt want to move stuff around too much.

First cage
Mister 1.jpg

Second cage.

mister 2.jpg
 
Thanks Pigglett,

Couple of questions.

1. Are all of those pieces, T's and such standard at Lowes. Is that part of the misting/mini sprinkler systems?

2. Do the standard MK nozzles fit into that T at the top? Looks like it.

3. Overspray? Any issues.

Thanks for the help!
 
Yeah the Ts and everything are standard for 1/4 inch tubing in the misting/ mini sprinkler area. You can see in the second pic I used a white connector, that was a standard one as I ran out of mist king connectors. Be sure to use the stiffer black tubing as when I used the clear it wasn't as sturdy and would pop open, making a huge mess. Haven't had any issues after switching to the black 1/4 inch tubing.

There is not an over spray issue it pretty much stays in the circle with minimal light mist just to the outside of the circle.,

Oh and I used 2 nozzles per cage rather than one as I felt it produced a better rain flow.
 
the basking lights hamg from the ceiling just to the rear of where the misters are and the UV lights are up on a sort of DIY stand just to the front of where the misters are.
 
Back
Top Bottom